A pattern that once required a master parquet installer and a solid hardwood budget is now achievable with waterproof planks and a weekend. Herringbone luxury vinyl flooring delivers the zigzag geometry of classic European parquet in an SPC or glue-down format that shrugs off spills, pets, and radiant heat. The catch is that herringbone punishes sloppy planning: the pattern demands more material, more layout math, and more patience than a straight lay. This guide covers what the format actually costs, where click-lock herringbone differs from glue-down, and the buying details that separate a showpiece floor from an expensive mistake.
What Makes Herringbone Different From Standard Plank
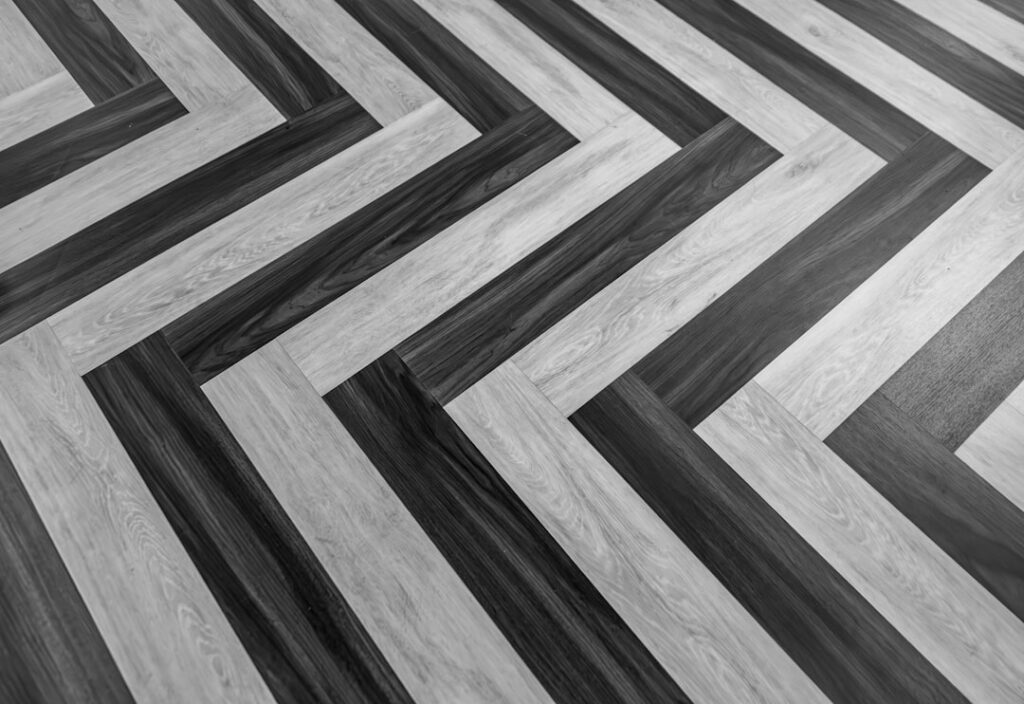
Standard luxury vinyl planks run 48 to 60 inches long and install in staggered rows. Herringbone planks are short and narrow by design, typically 3 to 5 inches wide and 18 to 36 inches long, because the pattern is built from pairs of planks meeting at 90 degrees. Each plank butts its end against the side of its neighbor, creating the broken zigzag that draws the eye down the room.
Manufacturers handle the geometry two ways. Some sell dedicated A and B planks with mirrored locking profiles, and you must buy both in equal quantities for the pattern to lock together. Others, mostly in glue-down lines, sell a single universal plank that can be laid in herringbone, chevron-adjacent layouts, or basketweave. Read the box carefully: A/B click systems will not assemble if you order two cartons of the same profile, and this is the single most common ordering error with the format.
Note that herringbone is not chevron. Chevron planks are cut with angled ends, usually 45 degrees, and meet in a continuous point like arrows. Herringbone uses rectangular planks with square ends. Chevron reads more formal and contemporary; herringbone reads more traditional and forgiving of imperfect walls.
The Pros: Why Homeowners Choose It
Visual impact is the headline. A herringbone floor makes an 8 by 10 foot entry feel architectural, and in open-plan spaces the diagonal movement of the pattern breaks up long sightlines that straight planks can make monotonous. Because luxury vinyl carries the pattern in a printed wear layer over a waterproof core, you get that look in kitchens, baths, and basements where real parquet would cup and gap.
- 100 percent waterproof cores (SPC or flexible glue-down vinyl) handle wet rooms and concrete slabs.
- Durable wear layers from 12 to 28 mil resist pet claws and grit better than most site-finished wood.
- Comfort and quiet: attached underlayment pads on click versions soften footfall compared to tile herringbone.
- Cost: materials run a fraction of solid oak parquet, which starts around $9 to $15 per square foot before the specialized labor.
- Radiant heat compatible in most lines up to a floor surface temperature of about 80 to 85°F, per manufacturer specs.
The Cons: Where the Format Bites
Waste is the first surprise. A straight plank install typically needs a 5 to 10 percent overage; herringbone needs 10 to 15 percent because every row starts and ends with an angled cut at the wall, and the short planks give you fewer usable offcuts. In a room with angles, bays, or a diagonal layout, order 15 percent over and keep the receipts for unopened cartons.
Installation time roughly doubles versus straight lay. The first three rows establish the spine of the pattern, and any drift there telegraphs across the entire floor. Click-lock herringbone in particular demands careful engagement of each short end, and rushing produces peaked joints you can feel in socks. Repairs are also harder: swapping a damaged plank from the middle of a locked herringbone field usually means disassembling back to it or cutting it out and gluing in a replacement.
Finally, small-format planks mean more seams. On floors with heavy sun exposure, cheaper products with shallow embossing can show the repeating print pattern more obviously in herringbone than the same decor would in long planks, because your eye compares dozens of adjacent faces at once. Look for lines advertising 20 or more unique plank faces.
Click-Lock vs Glue-Down Herringbone
Both formats produce the same pattern, but they suit different situations.
- Click-lock (usually SPC core, 4 to 6.5 mm thick): floats over a 1/8 inch flatness-per-6-feet subfloor, installs without adhesive cure time, and often includes an attached pad. Best for DIY installs, upper floors, and homes where you may want to remove it later. Requires A/B planks and transition moldings at large room breaks, typically every 30 to 40 feet of continuous run.
- Glue-down (flexible LVT, 2 to 3 mm thick): bonds fully to the substrate, so there is no hollow sound and no pattern drift over time. It handles rolling loads, wheelchairs, and big temperature swings better, and single-profile planks simplify ordering. The tradeoff is unforgiving prep: the slab or underlayment must be smooth, because every ridge telegraphs through thin vinyl, and adhesive work is messy for first-timers.
A practical rule from the trade: glue-down for ground-floor slabs, sunrooms, and anything over 500 square feet in one field; click for bedrooms, upstairs hallways, and fast renovations.
What Herringbone Luxury Vinyl Costs
Materials for herringbone luxury vinyl flooring run $3 to $7 per square foot for reputable mid-range lines, with premium European-styled SPC herringbone reaching $8 to $10. Glue-down planks tend to sit slightly cheaper per square foot than click, but add $0.50 to $0.80 for adhesive.
Labor is where the pattern shows up in the bill. Installers commonly charge $2 to $4 per square foot for straight-lay vinyl, and $4 to $8 for herringbone, reflecting the doubled layout time. All-in, a professionally installed 300 square foot herringbone LVP floor typically lands between $2,400 and $4,500 including prep and trim. DIY drops that by roughly half, at the cost of two to three full days for a first-timer.
Buying Guide: Specs That Matter
Once you have shortlisted decors, compare these numbers on the spec sheet rather than the marketing copy:
- Wear layer: 12 mil minimum for bedrooms, 20 mil for kitchens, entries, and pets. 28 mil is commercial-grade overkill for most homes but adds resale confidence.
- Total thickness: 5 mm and up for click herringbone; thinner click products flex at the short joints.
- A/B plank confirmation: verify carton counts of each profile before checkout.
- Unique faces: 15 or more printed variations to avoid visible repeats in the dense pattern.
- Bevel: a micro-bevel defines each plank and sharpens the pattern; square edges read flatter and more tile-like.
- Warranty language: look for residential lifetime wear plus explicit waterproof coverage, and check whether herringbone installation is listed as approved, since a few manufacturers void coverage for pattern installs of standard planks.
Installation Tips From the Field
Start layout from the room’s dominant sightline, usually centered on the main doorway or the long axis of the room, and snap a chalk line for the pattern spine rather than trusting a wall. Dry-lay the first six pairs and measure to both side walls; shifting the spine an inch now can save you from slivers at a highly visible wall later.
Acclimate cartons flat in the room for 48 hours at 65 to 80°F. For click systems, tap blocks made for herringbone profiles are worth the $15; a standard tapping block can bruise the short-end locks. For glue-down, respect the adhesive’s open time, usually 20 to 40 minutes, and roll the floor with a 75 to 100 lb roller in both directions. Leave a 1/4 inch expansion gap at every wall and fixed object for floating floors, and do not fasten trim through the planks.
The Bottom Line
Herringbone luxury vinyl flooring earns its premium in rooms where the floor is meant to be noticed: entries, kitchens, primary suites, and open living areas. Budget 10 to 15 percent material overage, choose glue-down for big slabs and click for fast upstairs projects, and insist on a 20 mil wear layer in working rooms. Plan the spine carefully and the pattern does the decorating for you, at roughly a third the cost of the hardwood parquet it borrows from.
Prefer to explore on your own?
See how new flooring looks in your actual room in seconds — free, no signup.
Try the free Floor Studio →