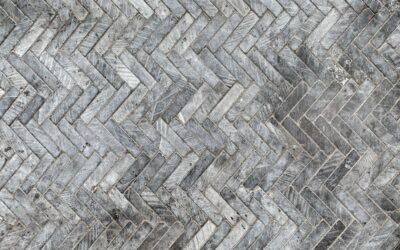
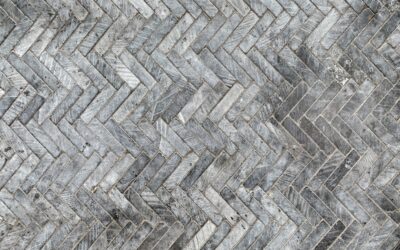
The zigzag has been a status symbol since Roman engineers laid brick roads in a 45-degree weave to keep them from shifting under cart wheels. Today, herringbone mosaic tile brings that same timeless V-shaped pattern to your kitchen backsplash or shower wall without the weeks of labor that hand-laying individual pieces used to demand. Because the small rectangles come pre-arranged on 12×12-inch mesh sheets, you install the pattern almost as fast as a plain field tile, then let the finished floor or wall do the talking.
Part of our Tile & Grout guide — explore the full guide →
What Exactly Is a Herringbone Mosaic?
A mosaic is any tile made of small pieces mounted on a backing sheet, usually mesh or paper, so you set a whole section at once instead of placing chips one by one. In a herringbone mosaic, those small rectangles are arranged in the classic offset V-shape, each piece turned 90 degrees to its neighbor.
The individual chips are typically 1/2×2 inches, 5/8×2 inches, or 1×3 inches, and the sheets measure around 12×12 inches. That pre-assembly is the whole appeal: you get an intricate pattern with none of the tedious angle-cutting, and the seams between sheets disappear once grouted.
Common Materials and How They Behave
Herringbone mosaics come in nearly every material, and each one behaves differently once it is on the wall or floor.
- Marble (Carrara, Bianco, Emperador): The luxury choice. Soft, elegant, and porous, so it must be sealed. Runs $12 to $30 per square foot.
- Porcelain and ceramic: The practical workhorse. Waterproof, stain-resistant, no sealing needed, and often the most affordable at $6 to $15 per square foot.
- Glass: Bright and reflective, popular for backsplashes. Bounces light around a small kitchen but shows scratches on floors, so keep it on walls.
- Natural stone (travertine, slate): Warm and organic, but porous and needs regular sealing.
For a shower floor, porcelain or a sealed stone mosaic is ideal because the many grout lines create built-in slip resistance for wet feet.
Best Rooms and Applications
Few tile formats are as versatile. A herringbone mosaic tile earns its keep in several spots around the house.
On a kitchen backsplash, a marble or glass herringbone running from countertop to upper cabinets creates a rich focal point behind the range. Inside a shower, a mosaic feature strip or full accent wall breaks up large field tile and adds texture. On bathroom and mudroom floors, the small chips and dense grout lines give sure footing, and the pattern hides dirt better than a large plain tile.
Layout and Design Choices
Direction matters more than beginners expect. A vertical herringbone draws the eye upward and makes a room feel taller, which is a smart move behind a range hood or in a small shower. A horizontal run visually widens a narrow wall.
You also choose the angle. A traditional herringbone sits at 45 degrees; a “double” herringbone pairs two chips per leg for a chunkier look. For color, warm marbles pair with brass fixtures and wood cabinets, while cool grays and whites suit modern kitchens with matte black hardware.
Grout: The Detail That Defines It
Grout choice changes the entire personality of a herringbone mosaic. A tight, matching grout, such as a warm white behind a Carrara mosaic, lets the pattern read as a soft, seamless texture. A contrasting grout, like charcoal against white marble, turns every V into a bold graphic statement.
Because mosaics have so many joints, use an unsanded grout for gaps under 1/8 inch to avoid scratching polished stone or glass. In showers and behind cooktops, spend the extra money on a stain-resistant urethane or epoxy grout so the many lines do not discolor over time. Plan on grouting taking longer than a plain-tile job; there is simply more surface to work.
Step-by-Step Installation
The sheets make this a realistic weekend project for a confident DIYer, though marble rewards patience.
- Prep a flat, clean substrate. Use cement backer board or a waterproof membrane like Schluter Kerdi in wet areas.
- Snap layout lines and dry-fit sheets so the pattern flows continuously across seams.
- Spread a white polymer-modified thinset with a 3/16-inch V-notch trowel; white matters under glass and marble so it does not show through.
- Press each mesh sheet in, then flatten it with a grout float and a beating block to seat all chips at the same height.
- Interlock the offset edges of adjoining sheets so the seam vanishes, and clean thinset out of the joints before it sets.
- Let it cure 24 hours, seal any natural stone before grouting, then grout, wipe, and seal again.
Cleaning and Sealing Over Time
How you maintain a herringbone mosaic depends entirely on the material. Porcelain and glass are essentially maintenance-free: wipe them down with a damp cloth and a pH-neutral cleaner, and the grease behind a range comes right off. Neither ever needs sealing.
Natural stone is a different story. Marble, travertine, and slate are porous, so they need a penetrating sealer before grouting and a fresh coat every one to two years in wet or greasy areas. Never clean stone with vinegar, lemon, or an acidic bathroom spray; the acid etches the surface into dull spots. Use a stone-safe cleaner instead, and blot spills quickly. Regardless of material, keep a soft brush handy for scrubbing the many grout lines, which trap more grime than a large-format tile.
Common Mistakes to Avoid
A few predictable errors turn a beautiful mosaic into a disappointment. First, using gray thinset under glass or white marble: it shadows through the translucent chips and muddies the color, so always use white thinset. Second, letting sheets telegraph: if you do not interlock the offset edges carefully, a faint grid appears where the 12×12 sheets meet.
Uneven chips are another giveaway. Because mosaic pieces are small, they lippage easily, so beat every sheet flat with a grout float and a padded block. Finally, do not forget to seal stone before grouting; skip that step and the grout haze stains the porous surface permanently. Take your time on layout, dry-fit generously, and the finished herringbone mosaic tile rewards the extra care.
Cost and What to Budget
For a typical 30-square-foot kitchen backsplash, expect $180 to $900 in tile depending on material, plus roughly $10 to $25 per square foot for professional installation because mosaics are labor-intensive. A pro backsplash job often lands between $600 and $1,500 installed. Buy 10 percent extra for waste, keep a spare sheet for repairs, and remember that a wet saw with a diamond blade gives the cleanest cuts on the small edge pieces.
Weigh the labor honestly before you decide between DIY and hiring out. A plain subway backsplash might take a confident homeowner an afternoon; the same wall in a marble herringbone mosaic can eat a full weekend once you factor in sealing, careful sheet alignment, and slow, deliberate grouting. The good news is that the herringbone pattern hides minor imperfections better than a straight grid, which is one reason it stays forgiving even for first-timers. If you have never set tile before, practice on a scrap board first, and start in a low-visibility spot rather than the focal wall behind the stove.
Prefer to explore on your own?
See how new flooring looks in your actual room in seconds — free, no signup.
Try the free Floor Studio →