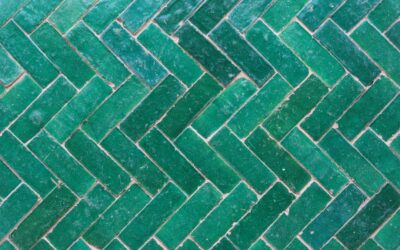
Few patterns turn heads like a well-laid herringbone floor. Herringbone porcelain tile takes the classic V-shaped zigzag that has decorated European homes for centuries and pairs it with a material tough enough for modern kitchens, baths, and entryways. The result is a floor that looks custom and expensive while shrugging off water, scratches, and heavy foot traffic.
Part of our Tile & Grout guide — explore the full guide →
I have installed a lot of herringbone over the years, and it is one of the most rewarding patterns to see come together. It is also one of the trickiest to plan. This guide covers the layouts, plank sizes, waste factors, costs, and installation realities so you know exactly what you are getting into before the first tile hits the thinset.
- What Makes Herringbone Different
- 45-Degree Versus 90-Degree Layouts
- Choosing the Right Plank Size
- The Waste Factor You Cannot Ignore
- Cost Expectations
- Installation Difficulty and Best Practices
- Grout Choices That Make or Break the Look
- Where Herringbone Porcelain Shines
- Herringbone Versus Chevron: Which to Choose
- Wood-Look Herringbone for Warmth Without the Worry
- Common Mistakes to Avoid
- Is It Worth It?
What Makes Herringbone Different
Herringbone arranges rectangular planks so the end of one tile meets the side of the next at a right angle, forming a continuous broken-zigzag. It is often confused with chevron, but the two are not the same. In chevron, the planks are cut at an angle so their ends meet in a clean point, creating perfect V’s. In herringbone, the tiles stay rectangular and offset, which makes it far more forgiving and much cheaper because no angled factory cuts are required.
Because porcelain is dense and vitrified, it holds a crisp edge that keeps the geometry sharp. That precision is exactly what the pattern needs to look right.
45-Degree Versus 90-Degree Layouts
The single biggest design decision you will make is the orientation of the pattern relative to the room.
90-Degree (Straight) Herringbone
Here the zigzag runs straight down the length of the room, aligned with the walls. It is the simpler layout to set, produces fewer cut tiles at the perimeter, and reads as a bit more traditional. If this is your first herringbone project, start here.
45-Degree (Diagonal) Herringbone
Rotated 45 degrees, the pattern points into the room like arrows. It feels more dynamic and can make a narrow hallway or small bath appear wider. The trade-off is more perimeter cuts, more waste, and a more demanding layout. Expect the diagonal version to add time and material to the job.
Choosing the Right Plank Size
Herringbone lives and dies by the length-to-width ratio of the planks. A true 2:1 ratio, where the length is exactly double the width, produces the tightest, most classic look because the tiles interlock perfectly. Popular porcelain sizes for herringbone include:
- 2×8 inch and 3×6 inch for a fine, detailed pattern in small spaces like shower floors and backsplashes.
- 4×12 inch and 6×12 inch for a balanced, versatile look that suits most kitchens and baths. Both are clean 2:1 or 3:1 ratios.
- 6×24 inch and 8×40 inch wood-look planks for a large, dramatic pattern in open living areas.
Larger planks cover ground faster and show fewer grout lines, but they exaggerate any subfloor unevenness. Smaller planks are more work per square foot but hide minor imperfections and suit tight spaces.
The Waste Factor You Cannot Ignore
Every angled or interlocking pattern wastes more tile than a straight lay, and herringbone is one of the hungriest. For a standard straight tile floor, contractors order 10 percent extra. For herringbone, plan differently:
- 90-degree herringbone: order 15 percent overage.
- 45-degree herringbone: order 20 percent overage, sometimes more in rooms with lots of jogs and closets.
Buying an extra box or two up front is cheap insurance. Dye lots vary between production runs, so matching tile months later is a gamble you do not want to take. Keep the leftovers for future repairs.
Cost Expectations
Porcelain tile itself runs roughly $3 to $10 per square foot for mid-grade lines, with premium wood-look and marble-look planks climbing to $12 to $15. Installation is where herringbone gets pricier than a basic floor. A straight tile install might cost $8 to $12 per square foot in labor, while herringbone typically adds a premium, landing around $12 to $20 per square foot in labor because of the layout complexity and extra cuts.
For a 200-square-foot kitchen, budget somewhere between $4,000 and $7,000 installed, depending on tile grade, layout angle, and your region. It is a real investment, but it is also the kind of floor that sells houses.
Installation Difficulty and Best Practices
Herringbone is not a beginner pattern. The angles compound quickly, and a small error at the start becomes a big misalignment across the room. If you are hiring out, ask to see photos of previous herringbone jobs specifically.
Keys to a Clean Install
- Start with a dead-flat subfloor. Any deviation over 1/8 inch across 10 feet needs to be leveled first, especially with long planks.
- Snap precise reference lines and dry-lay a section before spreading any mortar.
- Use tile leveling clips and wedges to prevent lippage, the uneven edges that are painfully obvious in a herringbone pattern.
- Back-butter large planks to guarantee full coverage and prevent hollow spots.
- Work from the center out on diagonal layouts so the pattern stays balanced on both walls.
Grout Choices That Make or Break the Look
Grout color dramatically changes how herringbone porcelain tile reads. A matching or tone-on-tone grout softens the pattern and highlights the tile color. A contrasting grout, like charcoal against white tile, makes the geometry pop and emphasizes the zigzag.
Keep grout lines tight, usually 1/16 to 1/8 inch, so the interlocking effect stays crisp. Epoxy grout resists staining and is worth the upgrade in kitchens and entryways, though it costs more and sets fast. For floors, choose a sanded or epoxy grout rather than unsanded, which is meant for very thin joints.
Where Herringbone Porcelain Shines
This pattern works almost anywhere porcelain works, but it earns its keep in high-visibility spaces:
- Entryways and foyers, where it makes a strong first impression and hides dirt between cleanings.
- Kitchens, where wood-look porcelain herringbone delivers warmth without wood’s water worries.
- Bathrooms and shower floors, where smaller herringbone offers slip resistance and a spa feel.
- Fireplace surrounds and accent walls, where the pattern becomes a focal point.
Herringbone Versus Chevron: Which to Choose
Homeowners often start out wanting one and end up with the other, so it pays to compare them directly. Chevron cuts the plank ends at 45 degrees so they meet in a continuous point, creating crisp, unbroken V’s that march down the room. It looks sleek and formal, but those factory miter cuts drive up the tile price and leave more waste. Herringbone keeps the planks rectangular and interlocks them at right angles, which is more forgiving to install and easier on the wallet.
If you want a bold, directional, high-fashion statement and have the budget, chevron delivers. If you want timeless texture, better durability at the joints, and a lower material cost, herringbone wins. For most homes, herringbone porcelain tile is the smarter blend of style and value.
Wood-Look Herringbone for Warmth Without the Worry
One of the fastest-growing uses of this pattern is wood-look porcelain planks laid in herringbone. You get the cozy, timber-parquet aesthetic that suits farmhouse, transitional, and European interiors, but with none of hardwood’s vulnerabilities. It will not cup in a humid bathroom, swell near a dishwasher leak, or scratch under a dog’s nails. Popular sizes for this look are 6×24 inch and 6×36 inch planks, which create a larger, more relaxed zigzag than tight mosaic herringbone. Choose a plank with realistic graining and varied faces so the repeat does not look artificial.
Common Mistakes to Avoid
- Underordering tile and getting caught by a dye-lot mismatch on the reorder.
- Skipping the flat-subfloor step, which guarantees lippage in a pattern that shows every flaw.
- Choosing a busy, variegated tile that fights the pattern instead of complementing it.
- Hiring a general handyman instead of an experienced tile setter for a demanding diagonal layout.
- Picking oversized grout joints that blur the crisp interlock the pattern depends on.
Is It Worth It?
For most homeowners, the answer is yes. Herringbone porcelain tile delivers a designer look and porcelain’s legendary durability in one package. You pay more in labor and waste than a straight lay, but you get a floor with genuine character that resists water, scratches, and time. Plan your plank ratio, order enough overage, hire a tile setter who has done the pattern before, and you will end up with a surface that looks handcrafted and lasts for decades.
Prefer to explore on your own?
See how new flooring looks in your actual room in seconds — free, no signup.
Try the free Floor Studio →