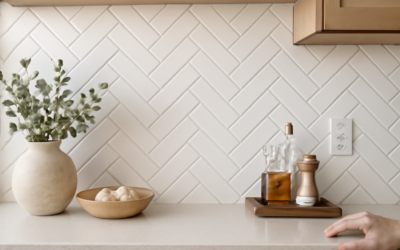
Classic subway tile in a running-bond brick pattern is timeless, but arrange those same rectangles in a zigzag and you get something with far more energy. The subway tile herringbone pattern takes ordinary 3×6 or slimmer tiles and interlocks them at angles to create a woven, dynamic surface that draws the eye and adds a custom, high-end feel to backsplashes, showers, and accent walls. It is one of the most requested tile layouts because it looks intricate while using inexpensive, widely available tile. Here is how the pattern works, the layout choices you have, and how to install it cleanly.
Part of our Tile & Grout guide — explore the full guide →
- What Makes Herringbone Different
- The Two Main Orientations
- Herringbone vs. Chevron: Know the Difference
- Choosing Tile Size and Color
- Planning the Layout
- Installation Steps
- Tips for a Professional Result
- Where the Pattern Shines
- Cost Considerations
- Choosing the Right Grout Color
- DIY vs. Hiring a Pro
- Frequently Asked Questions
What Makes Herringbone Different
Herringbone is a pattern in which rectangular tiles are laid in an interlocking V or zigzag, each tile turned perpendicular to its neighbor so the ends meet the sides. Unlike a straight stacked or offset layout, herringbone creates diagonal movement across the surface. The longer and narrower the tile, the more dramatic the zigzag — which is why elongated subway tiles (like 2×8, 1×4, or skinny 2×6 “mini” subway) produce especially striking herringbone, while a squat 3×6 gives a tighter, more subtle weave.
The Two Main Orientations
How you rotate the whole pattern changes the mood of the room.
Horizontal (45-degree) herringbone
The classic look, with the V’s running at a 45-degree angle to the floor. This is the most common backsplash orientation, creating that recognizable arrow or chevron-like flow. It reads as energetic and traditional at once.
Vertical (straight) herringbone
Here the columns of the pattern run straight up and down, forming vertical zigzag lines rather than diagonal ones. This orientation draws the eye upward, making it excellent for showers and feature walls where you want to emphasize height.
Herringbone vs. Chevron: Know the Difference
People often confuse the two. In a true herringbone, the tiles are plain rectangles laid perpendicular so the end of one meets the side of the next, creating a broken, staggered zigzag. In a chevron, the tiles are cut at an angle on the ends so they meet point-to-point in a continuous, unbroken V. Standard subway tile makes herringbone naturally with no special cuts; chevron requires angled tiles or precise miter cuts. Herringbone is therefore the more economical and forgiving of the two for a DIY project.
Choosing Tile Size and Color
The tile you pick controls how bold the pattern feels:
- 2×8 or 2×6 tiles: Long and lean, they create a strong, elongated zigzag — a modern, dramatic choice.
- 3×6 standard subway: A tighter, busier weave; classic and versatile.
- 1×3 or 1×4 mini subway: A delicate, detailed herringbone great for small accent areas and niches.
For color, remember that the pattern itself already adds visual interest, so a monochromatic tile with matching grout keeps things sophisticated, while a contrasting grout (dark grout with white tile) emphasizes every angle and makes the geometry pop. Glossy tile reflects light and feels lively; matte reads calmer and more contemporary.
Planning the Layout
A great herringbone install starts with careful layout before any tile is set. Find the center of your wall or focal area and dry-lay the pattern so cut tiles fall symmetrically at the edges rather than leaving a sliver on one side. For a backsplash, decide whether the pattern will center on the range or the sink, since that is the focal point. Snap chalk lines or use a laser to establish your working angle — for 45-degree herringbone, a level reference line at 45 degrees keeps the whole field true. Mixing tiles from several boxes as you go blends any slight shade variation across the wall.
Installation Steps
- Prep the surface: Ensure the wall is clean, flat, and primed. Backsplashes go over drywall or cement board; showers require a waterproof substrate.
- Mark your guidelines: Establish center and angle reference lines so the pattern stays consistent across the whole field.
- Spread thinset: Use a notched trowel and work in small sections so the mortar does not skin over before you set tile.
- Set the first pair: Place two tiles in an L to start the interlock, then build outward, alternating orientation. Use tile spacers or a leveling system to keep joints even.
- Check alignment often: Herringbone can drift; verify with a level every few tiles and keep the V’s crisp.
- Cut the perimeter: Mark and cut edge tiles at the angle where the pattern meets the counter, ceiling, or corner. A wet saw gives clean 45-degree cuts.
- Let it cure, then grout: After the thinset sets (usually 24 hours), grout the joints, wipe off the haze, and seal cement grout once cured.
Tips for a Professional Result
- Keep joints uniform: Inconsistent grout lines are the fastest way to make herringbone look amateur; spacers or clips are worth the effort.
- Buy 15 to 20 percent extra tile: The many angled cuts create more waste than a straight layout.
- Mind the pattern at outlets and edges: Plan cuts so partial tiles land in less visible spots.
- Use a leveling system for larger tiles: It prevents lippage where tile corners meet at angles.
- Consider a mesh-mounted sheet: Many suppliers sell subway tile pre-arranged in herringbone on mesh backing, which speeds installation dramatically and guarantees consistent angles.
Where the Pattern Shines
Herringbone subway tile is a natural fit for kitchen backsplashes, where it turns a utilitarian strip into a focal point, and for showers and tub surrounds, where vertical herringbone adds height and elegance. It also works beautifully as a fireplace surround, an entry accent wall, or a laundry-room backsplash. Because it relies on inexpensive standard tile, it delivers a custom, designer look without a custom price — the pattern does the heavy lifting.
Cost Considerations
The tile itself is affordable at $2 to $10 per square foot for ceramic subway, but the labor for herringbone runs higher than a straight layout — expect $10 to $25 per square foot installed given the extra cutting and layout precision. Mesh-mounted herringbone sheets can cut labor time and cost. For a modest backsplash, the total is very reasonable, and the visual payoff is substantial: a woven, elegant surface that looks far more expensive than the sum of its plain rectangular tiles.
Choosing the Right Grout Color
Grout color is a design decision as important as the tile itself in a herringbone layout. A matching grout — white grout with white tile — lets the pattern read as a soft, textural weave and keeps the surface calm and timeless. A contrasting grout — dark gray or charcoal against white tile — turns each angle into a bold graphic line and emphasizes the geometry, a striking modern choice but one that shows every imperfection in your spacing. A mid-tone gray splits the difference, hiding dirt and softening the lines. Whatever you choose, an epoxy or stain-resistant grout is worth the premium in a kitchen backsplash, since it resists grease and never needs sealing.
DIY vs. Hiring a Pro
Herringbone is more demanding than a straight tile layout, but it is achievable for a careful DIYer, especially on a small backsplash. The keys are accurate layout lines, consistent spacers, and a wet saw for clean angled cuts. Where people get in trouble is letting the pattern drift out of alignment over a large area or making sloppy perimeter cuts. If you are tiling a full shower, a large feature wall, or working with expensive tile, hiring an experienced tile setter is money well spent — the labor premium buys crisp angles and dead-straight grout lines that make the difference between a custom look and an amateur one. Using mesh-mounted herringbone sheets narrows the skill gap considerably.
Frequently Asked Questions
What is the difference between herringbone and chevron?
In herringbone, plain rectangular tiles meet at 90 degrees so the end of one touches the side of the next, creating a staggered zigzag. In chevron, the tiles are cut at an angle and meet point-to-point in a continuous V. Subway tile makes herringbone with no special cuts.
How much extra tile should I buy for a herringbone pattern?
Order 15 to 20 percent extra. The many angled perimeter cuts generate more waste than a straight layout, and having spares from the same lot avoids color mismatches if you need replacements later.
Is herringbone subway tile hard to install?
It is more involved than a straight or offset layout because of the angles and extra cutting, but it is doable for a patient DIYer with good layout lines, spacers, and a wet saw. Mesh-mounted sheets make it much easier and faster.
Prefer to explore on your own?
See how new flooring looks in your actual room in seconds — free, no signup.
Try the free Floor Studio →