If you want reliable temperature control without paying a monthly fee, a honeywell wifi smart thermostat remains one of the safest bets in home comfort. Honeywell Home (now sold under the Resideo brand) makes several models that fit different budgets, and after installing dozens of these over the years, I can tell you the differences matter more than the marketing suggests.
This guide walks through the three models most homeowners actually shop for, what wiring you need, how the room sensors work, and how to install one yourself in about 30 minutes. Prices below reflect typical retail as of 2024.
The Three Models Worth Considering
Honeywell’s lineup can look confusing because retailers stock older and newer versions side by side. Here is how the current smart-capable models stack up:
- Honeywell Home T5 (RCHT8610WF): The entry point at roughly $80 to $100. It offers 7-day scheduling, geofencing, and full Resideo app control. No touchscreen color display and no room sensor support, but it handles the essentials cleanly.
- Honeywell Home T9 (RCHT9610WFSW): The mid-tier pick at around $150 to $180. This is the model I recommend most often because it supports Smart Room Sensors, which solve the single biggest complaint people have about thermostats.
- Honeywell RTH9585WF (Wi-Fi Color Touchscreen): An older but still-sold flagship at about $170 to $200. It has a bright color touchscreen and customizable display colors, though it lacks the newer room-sensor ecosystem of the T9.
For most households, the T9 hits the sweet spot. If you rent or want the cheapest smart upgrade, grab the T5. Choose the RTH9585WF only if you specifically want that large color touchscreen on the wall.
The C-Wire Question You Must Answer First
Before buying anything, check your existing thermostat wiring. Smart thermostats draw continuous power to run Wi-Fi and the display, and that power usually comes from a “C-wire” (common wire). Pull your old thermostat off the wall and look for a wire connected to a terminal labeled C.
Here is what you may find:
- You have a C-wire: Great. Installation is straightforward and every model works.
- No C-wire, but you have unused wires: You may be able to repurpose a spare conductor at the furnace. This takes a little rewiring knowledge.
- No C-wire and no spare: The T5 and T9 include a “C-wire adapter” (the small terminal box that wires into your furnace control board), which solves this without running new cable.
That included adapter is a genuine advantage over some competitors. Skip it and you risk a thermostat that reboots or drops Wi-Fi when the heat cycles off.
Why Room Sensors Change Everything
The most common frustration with any thermostat is that it reads temperature only where it hangs on the wall, usually a hallway. Meanwhile the bedrooms feel too cold or the living room bakes in afternoon sun.
The T9’s Smart Room Sensors fix this. Each wireless sensor is about the size of a hockey puck, runs on a coin-cell battery that lasts around two years, and has an effective range of roughly 200 feet. You can place them in the rooms you care about most.
Then you tell the thermostat how to use them:
- Prioritize a specific room on a schedule, so the bedroom hits 68 degrees at night regardless of the hallway.
- Average across occupied rooms using built-in motion detection, so the system focuses on where people actually are.
Sensors come one in the box with some T9 bundles, or sold separately for about $35 to $40 each. Most homes do well with two or three total.
Setting Up the Resideo App
Everything connects through the Resideo app (formerly Honeywell Home), free for iOS and Android. During setup the thermostat broadcasts its own temporary Wi-Fi network; you join it from your phone, then hand off your home Wi-Fi credentials. Note that these thermostats connect to 2.4 GHz networks only, not 5 GHz, so if you have a combined network name you may need to separate the bands temporarily.
Once linked, the app gives you scheduling, remote control, energy history, filter-change reminders, and voice-assistant pairing with Amazon Alexa and Google Assistant. It also enables geofencing, which uses your phone’s location to switch to an energy-saving setback when everyone leaves and warm things up before you get home.
The real energy savings come from letting the thermostat manage itself instead of nudging it manually all day. Traditional 7-day scheduling lets you set four periods per day (Wake, Away, Home, Sleep), each with its own target temperature. A sensible winter schedule might hold 68 degrees when you wake, drop to 62 while everyone is at work, warm back to 70 in the evening, and settle to 64 overnight. Each degree of setback over an eight-hour stretch chips away at your bill.
Geofencing takes the guesswork out entirely. As you head home, the app starts recovering the temperature so the house is comfortable by the time you walk in. In a multi-phone household, the system waits until the last person leaves before going into Away mode, which prevents the heat from cutting out while someone is still home.
Step-by-Step Installation
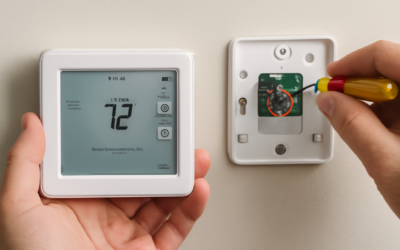
Budget about 30 minutes for a first-timer. You need a small Phillips screwdriver, a phone, and possibly a drill for new anchor holes.
- Cut the power. Turn off the breaker to your HVAC system. Confirm the old thermostat display is dead before touching wires.
- Photograph the wiring. Snap a clear picture of the existing terminals before disconnecting anything. This is your safety net.
- Label the wires. The kit includes stickers. Match each wire to its letter (R, W, Y, G, C, and so on).
- Remove the old unit. Disconnect wires and unscrew the old base. Feed the wires through the new base plate.
- Mount and level the base. Mark holes, drill if needed, insert anchors, and screw the plate to the wall.
- Connect the wires. Depress each terminal tab, insert the matching wire, and confirm it holds. Install the C-wire adapter at the furnace if your system lacks a common wire.
- Snap on the faceplate and restore power. Flip the breaker back on, then follow the on-screen and in-app prompts to finish Wi-Fi setup.
If you see error messages about heating or cooling not responding, it almost always traces back to a mislabeled wire. That photo you took becomes very handy.
System Compatibility: What It Works With
Before you fall in love with a model, confirm it matches your HVAC equipment. These thermostats are low-voltage devices, meaning they control 24-volt systems, not high-voltage electric baseboard heaters or line-voltage setups.
Here is what the T5, T9, and RTH9585WF handle:
- Forced-air furnaces running on gas, oil, or electric heat.
- Central air conditioning and standard heat pumps, including systems with auxiliary or emergency heat.
- Multi-stage systems with up to two stages of heating and two stages of cooling, which covers the vast majority of homes.
What they do not control: 120-volt or 240-volt electric baseboard heat, millivolt fireplaces, and most proprietary communicating systems. If you have a boiler or radiant floor heat, check the terminal designations carefully, because those setups sometimes use only two wires and behave differently. When in doubt, Resideo’s online compatibility checker walks you through your existing wire colors in a couple of minutes and confirms the right model before you spend a dime.
Troubleshooting Common Problems
Most issues after install trace back to just a few causes. Here is what to check first:
- Thermostat keeps rebooting or drops Wi-Fi: Almost always a power problem. Confirm the C-wire is landed correctly or install the included C-wire adapter at the furnace.
- Cannot find the network during setup: The thermostat only joins 2.4 GHz Wi-Fi. Temporarily separate your bands or move closer to the router during pairing.
- Heat or cool will not turn on: Recheck your wire labels against that photo you took. A swapped Y and W wire is the usual culprit.
- Room sensor shows offline: Replace the coin-cell battery and confirm it is within about 200 feet of the thermostat with minimal obstruction.
None of these require a service call. Spending two minutes with your setup photo resolves the large majority of first-day headaches.
Is a Honeywell Smart Thermostat Worth It?
For the money, yes. A quality honeywell wifi smart thermostat pays for itself over a few winters through smarter scheduling and geofencing, with the Department of Energy estimating around 10 percent annual savings from proper setbacks. The T9’s room sensors also solve real comfort problems that a flat 72-degree setting never will.
My short recommendation: buy the T5 if you want cheap and simple, the T9 if you want the best all-around comfort control, and the RTH9585WF only if that big color touchscreen is a must-have on your wall. All three install in under an hour, need no subscription, and give you full remote control from your phone.