Building a shower pan on a plywood subfloor is one of the most failure-prone parts of any bathroom remodel. Skip the pre-slope or sandwich the liner wrong and you’ll be tearing it out within five years when joists rot. Learning how to build a shower pan on plywood floor the right way means following a specific sequence: pre-slope, then vapor barrier, then liner, then top mud bed, then waterproof topcoat or membrane.
Part of our Bathroom Remodeling & Flooring guide — explore the full guide →
This guide walks through the traditional mud-bed method, which has worked since the 1940s and still outperforms many newer systems when done correctly.
- Materials and Tools
- Step 1: Inspect the Plywood Subfloor
- Step 2: Install the Drain
- Step 3: Build the Pre-Slope
- Step 4: Install the Rubber Liner
- Step 5: Form the Curb
- Step 6: Build the Top Mortar Bed
- Step 7: Add a Liquid Waterproofing Membrane
- Step 8: Tile the Pan
- Common Mistakes in How to Build a Shower Pan on Plywood Floor That Cause Failures
- When to Use a Pre-Made Pan System Instead
- Frequently Asked Questions
Materials and Tools
- Sakrete or Quikrete sand-topping mortar (also called deck mud) — about 1.5 bags for a 3×4 foot pan
- 40-mil chlorinated polyethylene (CPE) shower liner like Oatey or Compotite, or a Schluter KERDI membrane system
- 3-piece adjustable shower drain (Oatey 130 or 130-2 series)
- 15-pound felt paper (asphalt building paper)
- Galvanized lath or plastic mesh
- Pre-slope mix or self-leveling underlayment
- Construction adhesive, roofing nails, masonry trowel, screed board, level
- Optional but recommended: RedGard or Hydro Ban liquid membrane
Step 1: Inspect the Plywood Subfloor
The subfloor must be at least 3/4-inch tongue-and-groove plywood (not OSB) and rigid enough that there’s no flex when you walk over it. Add blocking between joists if needed and screw the plywood to joists every 6 inches with deck screws. Any soft spots, water damage, or delamination must be cut out and replaced before you go any further.
The blockout for the shower drain should be cut so the drain body sits flush at the desired final height — typically 1.5 inches below the final tile surface to allow for the mortar beds.
Step 2: Install the Drain
Set the lower drain body (the part with the side outlets and the clamping ring) into the plywood opening. Connect it to the trap below, secure it per manufacturer instructions, and seal around the drain at plywood level with construction adhesive or polyurethane caulk.
Test the drain for leaks before continuing — pour a couple gallons through it. Fixing a leaking drain after the pan is built is a nightmare.
Step 3: Build the Pre-Slope
This is the step amateurs skip — and it’s the most important. The pre-slope is a sloped layer of mortar between the plywood and the rubber liner. Without it, water that penetrates the tile and reaches the liner has nowhere to drain. It pools and slowly seeps through grout joints and screws.
- Staple two layers of 15-pound felt paper to the plywood
- Attach galvanized lath or plastic mesh with roofing nails or staples
- Mix sand-topping mortar to a damp, packable consistency — like wet sand
- Pack the mortar around the drain, sloping 1/4 inch per foot down toward the drain
- Use a screed board pivoted from the drain rim to maintain consistent slope
- The pre-slope should be at least 3/4 inch thick at the walls, tapering down to drain height
- Let cure 24-48 hours
Step 4: Install the Rubber Liner
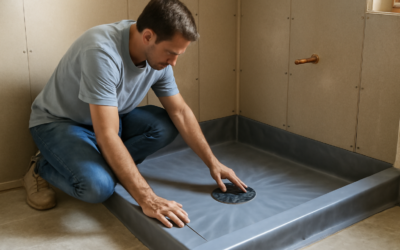
Cut the CPE liner so it extends at least 6 inches up each wall and 8 inches above the curb. Lay it over the cured pre-slope, smoothing flat. Make corner folds (don’t cut corners — fold them) and adhere with the manufacturer’s seam sealant.
Cut a hole in the liner over the drain. The drain’s clamping ring goes on top of the liner — bolt it down to the lower drain body, sandwiching the liner. Trim the liner inside the clamping ring with a utility knife so water can flow into the drain weep holes.
Run liner up the walls 6+ inches and staple ONLY in the top inch where it will be above the eventual waterline. Never punch a hole in the bottom 6 inches of the liner.
Step 5: Form the Curb
If you’re building a curb (rather than a curbless shower), wrap the curb separately with its own liner section, lapped over the floor liner. Use a continuous piece if possible. Some installers prefer to fasten 2×4 framing for the curb before the liner, then drape the liner over.
Step 6: Build the Top Mortar Bed
Mix another batch of sand-topping mortar. The top bed maintains the same 1/4-inch-per-foot slope as the pre-slope. Pack around the drain weep holes carefully — those holes need to stay open so water that gets through to the liner can drain.
Many installers add a layer of pea gravel directly over the weep holes before packing mortar to keep the holes clear long-term.
Screed the top bed to the desired height. The top of the mud bed should sit flush with the upper rim of the drain body. Let cure 48-72 hours before tiling.
Step 7: Add a Liquid Waterproofing Membrane
While not strictly required if your liner is intact, a coat of RedGard or Hydro Ban over the cured top mortar bed adds another waterproof layer and seals against any pinhole leaks in the field. Apply two coats with a roller, rolling in alternating directions. Extend the membrane up the walls a minimum of 6 inches above the showerhead height.
Alternative: skip the rubber liner altogether and build the entire system using a Schluter KERDI sheet membrane over the top mortar bed. The sheet membrane goes over the mortar bed, up walls, and over the drain flange.
Step 8: Tile the Pan
Set tile with modified thinset rated for shower applications. Use mosaic tile (2×2 or smaller) on the pan floor — small tiles conform better to the slope and provide more grout lines for traction. Maintain the slope of the mortar bed in the tile placement; don’t shim tiles to flatten the slope.
Grout with epoxy grout (Custom Building Products CEG-Lite or Mapei Kerapoxy) or a high-performance cement grout like Mapei Ultracolor Plus FA. Seal cement grout once cured.
Common Mistakes in How to Build a Shower Pan on Plywood Floor That Cause Failures
- Skipping the pre-slope (most common, most catastrophic)
- Punching nails or staples through the lower portion of the liner
- Blocking the drain weep holes with mortar (no pea gravel collar)
- Using regular thinset instead of mortar mix for the beds
- Not letting each layer cure fully before the next
- Using OSB instead of plywood for the subfloor
When to Use a Pre-Made Pan System Instead
Schluter KERDI-SHOWER, Wedi, and Tile Redi all sell pre-sloped foam pan systems that eliminate the mud bed entirely. They’re faster (one-day install vs. four-day mud pan), more forgiving for DIYers, and equally durable when installed per manufacturer specs. Costs run $200-450 depending on size — competitive with the labor saved on a traditional mud pan.
Frequently Asked Questions
How to build a shower pan on plywood floor vs OSB — does the substrate matter?
Most manufacturers and codes require plywood, not OSB. OSB swells more in moisture exposure and isn’t rated for wet structural applications. Replace OSB with 3/4-inch tongue-and-groove plywood before building.
How long does a properly built mud pan last?
30-50 years if all materials are quality and installation is correct. Many original 1950s-built mud pans are still in service.
Do I need both a rubber liner and RedGard?
Belt-and-suspenders, but yes — many tile pros use both for redundancy. The liner is the primary waterproofing layer; RedGard is backup.
What slope does a shower pan need?
1/4 inch per foot toward the drain is the universal standard, both for the pre-slope and the top mortar bed. Insufficient slope leaves standing water; excessive slope makes the pan uncomfortable to stand on.
Prefer to explore on your own?
See how new flooring looks in your actual room in seconds — free, no signup.
Try the free Floor Studio →