The shower pan is the foundation of a tiled shower, and getting it right is the difference between decades of watertight service and a slow leak that rots the subfloor. Choosing the correct mortar for shower pan construction, mixing it to the right consistency, and sloping it properly to the drain are the core skills of the job. This guide explains which mortar to use, how to mix and pack it, how to establish the critical slope, and the mistakes that lead to cracked pans and leaks.
Part of our Bathroom Remodeling & Flooring guide — explore the full guide →
- Why Mortar, Not Concrete
- Deck Mud vs. Thinset vs. Other Mortars
- The Right Mix Ratio
- Establishing the Critical Slope
- Two-Layer vs. Modern Systems
- Packing the Mortar Bed
- Curing Matters
- Common Mistakes to Avoid
- Cost and DIY Reality
- Waterproofing the Pan Correctly
- Pre-Formed Trays as an Alternative
- How Long the Job Takes
Why Mortar, Not Concrete
A shower pan base needs a specific type of mortar called deck mud, also known as dry-pack or floor mud. It is a stiff mixture of sand, Portland cement, and just enough water to hold together when squeezed, with no gravel and little or no lime. This composition lets you pack it, carve it, and shape a precise, uniform slope that would be impossible with a wet, soupy concrete. Deck mud is strong in compression, resists cracking when packed correctly, and creates the firm, sloped bed that tile and waterproofing sit on.
Deck Mud vs. Thinset vs. Other Mortars
It is easy to confuse the mortars used in a shower, so here is the distinction:
- Deck mud (dry-pack): The thick sand-and-cement mix used to build the sloped pan base itself. This is the “mortar for shower pan” you shape to the drain.
- Thinset mortar: A fine, polymer-modified cement adhesive used to bond tile to the cured pan and walls. Not used to build the pan.
- Fat mud (wall mud): Contains lime and is used for float coats on walls, not the pan floor.
You buy deck mud as a pre-blended bag (sand-topping mix or a dedicated floor mud) or mix your own from sand and Portland cement.
The Right Mix Ratio
A classic deck mud recipe is roughly 4 to 5 parts sand to 1 part Portland cement by volume, mixed with only enough water to reach a “just packs” consistency. The test is simple: squeeze a handful; it should hold its shape and show your finger impressions without water weeping out or the ball crumbling apart. Too wet and it slumps, ruining your slope and weakening the pan; too dry and it won’t bond into a solid mass. Many pros buy sand-topping mix, which is essentially pre-blended at close to the right ratio, and simply add minimal water. Add water gradually, because it is far easier to add more than to fix an over-wet batch.
Establishing the Critical Slope
Building code and tile industry standards call for a slope of 1/4 inch of fall per foot from the shower walls down to the drain. This ensures water runs to the drain rather than pooling. Measure from the drain to the farthest wall to calculate total rise; a 3-foot run needs 3/4 inch of rise at the wall edge. On a traditional two-layer pan, the first mortar bed (pre-slope) sits under the waterproof liner and also slopes to the weep holes at the drain, so water that penetrates the tile still drains. The pre-slope is essential and the single most-skipped step in DIY pans, causing water to sit under the liner and breed mold.
Two-Layer vs. Modern Systems
There are two common approaches:
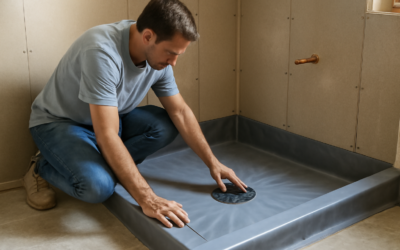
- Traditional (liner) method: Pre-slope mortar bed, then a PVC or CPE waterproof liner draped up the walls and clamped into a three-piece drain, then a second mortar bed on top for the tile. Weep holes in the drain let sub-surface water escape.
- Modern (topical membrane) method: A single sloped mortar bed or a pre-formed foam tray, waterproofed on top with a sheet or liquid membrane and a bonding-flange drain. Systems like this waterproof at the surface, so the tile stays drier.
Both work when done correctly. Modern topical systems are more forgiving for DIYers because there is one slope to build and the waterproofing is right under the tile.
Packing the Mortar Bed
- Set your drain height and mark the slope line on the walls, 1/4 inch per foot up from the drain.
- For a topical system, dampen the substrate and apply a thin bonding slurry so the deck mud grabs.
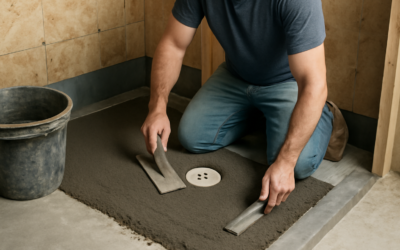
- Pack deck mud firmly with a wood float or trowel, working from the perimeter down toward the drain, screeding to your slope marks.
- Compact it as you go; loose mud crumbles later. Use a straightedge from wall to drain to confirm a consistent, unbroken slope with no dips.
- Trowel the surface smooth and let it cure before waterproofing or tiling.
Curing Matters
Deck mud gains strength as it cures, and rushing this stage weakens the pan. Let the mortar bed cure at least 24 to 48 hours before tiling, and keep it from drying out too fast in hot, dry conditions, which can cause surface cracking. A properly cured, well-packed bed becomes a hard, monolithic base that supports the tile without flexing.
Common Mistakes to Avoid
- Skipping the pre-slope: On a traditional liner pan, a flat pre-slope traps water under the liner. Always slope the first bed too.
- Mixing too wet: Soupy mud slumps and loses your slope and strength. Aim for “just packs.”
- Wrong slope: Less than 1/4 inch per foot pools water; check with a level and straightedge.
- Adding gravel or using bagged concrete: Concrete with aggregate cannot be shaped precisely; use sand-based deck mud.
- Not compacting: Loosely floated mud crumbles under tile. Pack it firm.
- Tiling before cure: Tiling on green mud invites cracks and movement.
Cost and DIY Reality
Waterproofing the Pan Correctly
The mortar bed provides the slope and the structure, but waterproofing is what actually keeps water out of the building. In a traditional two-layer pan, the PVC or CPE liner sandwiched between the pre-slope and top mortar bed is the waterproof layer, and it must run up the walls above the curb height and clamp into the three-piece drain. In a modern topical system, a sheet membrane or liquid-applied waterproofing goes over the single sloped bed, directly under the tile, and bonds to a flange drain. Whichever system you use, the waterproofing must be continuous, lapped correctly, and integrated with the drain and walls, because a single gap lets water into the subfloor where it rots framing and breeds mold unseen. Flood-test the finished pan by plugging the drain and filling it before tiling, to confirm it holds water overnight.
Pre-Formed Trays as an Alternative
For homeowners nervous about hand-packing a mortar bed to a precise slope, pre-formed shower pans offer a reliable shortcut. These lightweight foam or molded trays come with the correct 1/4-inch-per-foot slope already built in and a bonding-flange drain designed to integrate with a topical waterproof membrane. You set the tray in a bed of thinset or mortar, waterproof the seams, and tile directly on top. Pre-formed trays cost more than a bag of deck mud but remove the two hardest parts of the job: achieving a perfect slope and getting the waterproofing right. For a first shower build, many DIYers find the trade of higher material cost for lower risk well worth it, especially since a leaking pan is one of the most expensive mistakes in the house.
How Long the Job Takes
Building a mortar shower pan is not a rush job, and the timeline matters for planning. Packing the mortar bed itself takes a few hours for an average shower, but the mortar must then cure before you waterproof or tile, typically 24 to 48 hours depending on conditions. A traditional two-layer pan adds time because the pre-slope must cure before the liner and top bed go in, effectively spreading the work across several days. Rushing any curing stage weakens the bed and invites cracks. Budget the full sequence into your bathroom project schedule rather than trying to compress it, and resist the temptation to tile on a bed that is still green. Patience here is what produces a pan that stays solid and watertight for decades.
Materials for a shower pan mortar bed are cheap, often $30 to $80 in sand-topping mix or deck mud plus the drain and waterproofing system. The skill, not the cost, is the barrier. A first-timer who studies the slope math, mixes to the right consistency, and takes care with waterproofing can build a sound pan; a careless one creates a hidden leak that costs thousands to remediate. If you are uncertain about the waterproofing details in particular, a modern pre-formed tray system removes much of the risk. Whichever route you choose, the right mortar for shower pan work, mixed dry and packed to a true 1/4-inch-per-foot slope, is what keeps your shower watertight for the long haul.