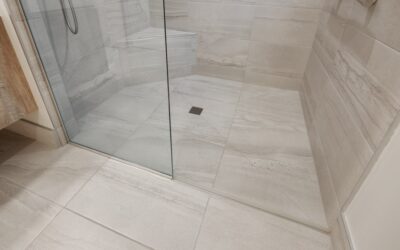
Before foam trays and orange membranes, every tiled shower in America stood on packed sand and cement, and millions of those pans are still bone dry after 50 years. A dry pack shower pan is built from deck mud — sand and portland cement mixed so dry it barely holds a snowball — packed and screeded into a sloped bed over a waterproof liner. It remains the only method that lets you build any shape, any size, any drain position, for about $80 in raw materials.
Part of our Bathroom Remodeling & Flooring guide — explore the full guide →
The learning curve is honest, though. A dry pack shower pan done right is a two-layer assembly with a pre-slope under the liner and a finish bed over it, and skipping that first layer is the single most common failure in tile showers, period. This guide covers the mix, the layers, the liner, and the cure schedule the way a tile setter would teach an apprentice.
Deck Mud: The 5:1 Mix
Deck mud is nothing but clean coarse sand, portland cement, and a little water. The classic ratio is 5 parts sand to 1 part portland by volume; anywhere from 4:1 (stronger, slightly stickier) to 6:1 (leaner, easier to screed) works. What you must not use is standard wet concrete or bagged mortar mix with lime — sticky mixes slump, shrink, and crack instead of packing.
Water is the whole art. Add just enough that a fist-squeezed clump holds its shape and shows no water sheen — the “snowball test.” Roughly 2.5 to 3 quarts per 60-pound batch gets you close. Pre-blended options save the measuring:
- Sand + portland yourself: about $12 for a 60-lb sand bag plus $16 per 94-lb portland sack; cheapest per shower.
- Custom Building Products Deck Mud or Sand/Topping mix (Quikrete, Sakrete): $9-$15 per 60-lb bag, correct gradation out of the bag.
A standard 32×60 pan uses roughly six to eight 60-lb bags across both layers. Mix in a wheelbarrow with a hoe, small batches, and err dry — you can mist, you cannot un-soup.
Layer One: The Pre-Slope
Water that penetrates grout and tile — and some always does — must travel along the liner to the drain’s weep holes. A flat liner ponds that water into a swamp under your finish bed, which is why code (and every tile council method, notably TCNA B414) requires sloped fill beneath the membrane. The pre-slope is a thin deck-mud wedge: 1/4 inch per foot of fall from perimeter to the lower drain flange.
Practical build: staple felt paper or 6-mil poly over a wood subfloor, add galvanized diamond lath, then pack the mud from a 1-1/4 inch perimeter thickness (minimum 3/4 inch over lath) down to flush with the bottom flange of a standard three-piece clamping drain. Mark the perimeter height on the walls with a level line first — for a pan 30 inches from drain to corner, that line sits about 3/4 inch above the flange plus your base thickness. Screed with a straight 2×4, working the wedge like spokes around the drain. Let it set overnight before walking on it.
The Liner and the Clamping Drain
Over the cured pre-slope goes the waterproof membrane — 40-mil PVC (Oatey, Chloraloy) at about $3-$5 per square foot, or CPE. Cut it big enough to run up every wall at least 3 inches above the finished curb height, which usually means 8 to 10 inches up the studs.
- Lay the liner loose, fold — never cut — the inside corners into hospital folds, and tack it to studs only within the top inch.
- Feel for the drain bolts through the liner, cut a hole for the drain barrel only, and bolt the clamping ring down over a bead of liner sealant on the bottom flange. Snug, then quarter turns in a star pattern — cracking a cast flange by gorilla-torquing bolts is a classic.
- Keep the weep holes in the clamping ring clear; they are the pan’s entire drainage logic.
- Dam corners at the curb get preformed liner patches solvent-welded, because the curb is where scissors-happy installers create leaks.
Flood test now, before the top bed hides everything: plug the drain, fill 1 inch deep, mark, and check at 24 hours.
Layer Two: The Finish Bed
Protect the weep holes with a handful of pea gravel or a plastic weep protector around the drain barrel, thread the barrel to its approximate final height, and pack the top bed: minimum 1-1/4 inches thick at the drain, growing toward the walls to continue the 1/4-inch-per-foot slope. Perimeter thickness on a typical pan lands between 1-3/4 and 2-1/2 inches.
Screed technique separates flat pans from wavy ones. Set perimeter screed strips of packed mud at your wall line, verify with a 4-foot level, then pull the straightedge from walls toward the drain in overlapping passes, filling lows and re-pulling. Steel-trowel the surface lightly at the end. You are building the actual tile substrate here — every hump becomes a rocking tile, every dish a puddle. Slope tolerance to chase: within 1/8 inch of true anywhere on the pan.
Curing and Tiling Schedule
Deck mud reaches walkable strength overnight and tiling strength in about 24 to 48 hours. The realistic timeline for the whole assembly:
- Day 1: pre-slope packed. (2-3 hours of work)
- Day 2: liner in, drain clamped, flood test started. (2-4 hours)
- Day 3: test passed, finish bed packed. (3-4 hours)
- Day 4 or 5: tile.
Moisture in the bed is fine — thinset bonds happily to damp mud — but do not seal or membrane-coat a mud bed that will rely on weep-hole drainage. If you want surface waterproofing instead (a liquid like RedGard or a sheet like Kerdi over a single mud bed with a bonded-flange drain), that is a different, equally valid system; just do not mix the two logics in one pan.
Dry Pack vs Foam Trays, Honestly
Foam kits win on speed and idiot-proofing: one day, factory slope, warranty paperwork. Mud wins everywhere else that matters to me:
- Cost: $60-$120 in materials versus $500-$700 for a name-brand kit.
- Custom geometry: any footprint, offset drains, curved curbs, 67-inch odd alcoves — no SKU required.
- Compressive strength: a packed bed runs 2,000-plus psi under the tile; foam relies entirely on its thinset bedding being flawless.
- Repairability: a cracked tile over mud is a local fix, not a system question.
The honest downside: your first mud pan will take a full weekend and your forearms will feel it, and an unvented mistake hides under tile for years. If the shower is a plain 32×60 alcove and you have never floated mud, the foam tray is the safer buy. If the space is custom or you are doing several bathrooms, learn mud once and you own the skill forever.
Curbs and Benches in a Mud Pan
Curbs get built before the liner and wrapped by it. On wood floors, stack three 2x4s flat — a 4-1/2 inch curb — screwed down outside the liner footprint, then drape the liner up and over without a single fastener penetrating the top or inside face; nails go only through the outside face below the finished-floor line. Cap the wrapped curb with galvanized lath bent into a U and float it with the same deck mud at 3/4 to 1 inch thickness on all three faces. On slabs, form and pour the curb from mud or use a solid concrete brick core. Pitch the finished curb top 1/4 inch toward the drain so water sheds inward, a detail even some pros miss.
A masonry bench follows the same logic: build the block or framed core first, run the liner up and over it with preformed corners at every fold, and float it after the pan’s finish bed. Benches add 15 to 18 inches of liner height at their wall, so buy the membrane oversized before demo day rather than seaming it later.
Field Notes That Save First-Timers
- Buy one extra bag of mix; running out mid-screed ruins the bed’s monolithic pack.
- Pack hard. Deck mud gains strength from compaction — hit it with a wood float and body weight, not gentle pats.
- Keep a margin trowel and a level within reach the whole pour; checking after screeding is too late.
- Cold garages slow the set; below 50 degrees F, give every stage an extra day.
- Write the flood-test date and photo it. Inspectors and future buyers both respect the paper trail.
Sand, cement, gravity, and patience — the mortar bed method is the oldest system in the book precisely because when it is built in the right order, there is almost nothing in it that can fail.