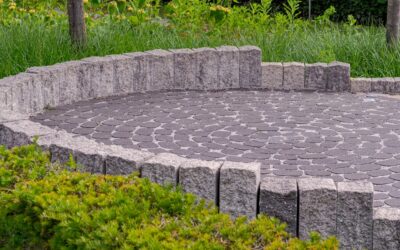
A paver patio is the highest-value DIY hardscape project you can take on — contractors charge $18-$35 per square foot, and you can build the same thing for $8-$14 in materials. The trick is base preparation: 90% of failed patios fail because the homeowner cut corners on excavation and compaction. This guide walks through how to make a patio the right way, from layout to polymeric sand, with the tool list, material specs, and timing that gets a 12×14 patio done over a long weekend.
Part of our Decks & Outdoor guide — explore the full guide →
- Plan and Permit Before You Dig: How to Make a Patio Without Code Issues
- Materials You Need
- Tools You Need
- Step 1: Excavate
- Step 2: Lay Geotextile Fabric (Optional but Recommended)
- Step 3: Add and Compact the Base
- Step 4: Set Edge Restraints (Optional Now or Later)
- Step 5: Screed the Bedding Sand
- Step 6: Lay the Pavers
- Step 7: Install Edge Restraints (If Not Already Done)
- Step 8: Sweep and Compact Polymeric Sand
- Step 9: Activate the Polymeric Sand
- Frequently Asked Questions
Plan and Permit Before You Dig: How to Make a Patio Without Code Issues
Before you order pavers, settle these questions:
- Size and shape: 12’x14′ (168 sq ft) is the most common DIY size — large enough for a table and 6 chairs
- Drainage direction: the surface must slope away from the house at 1/4 inch per foot minimum
- Permits: most jurisdictions allow grade-level patios under 200 sq ft without a permit, but check setbacks and HOA rules
- Utility location: call 811 at least 3 business days before digging — free underground utility marking
Sketch the patio on graph paper at 1/4″ = 1′. Lay out the actual location with marking paint or a string line, then live with the layout for a day before excavating. Most homeowners realize the patio should be 1-2 feet larger or shifted by sitting outside and visualizing the furniture.
Materials You Need
For a 12×14 patio (168 sq ft), with a 6-inch overdig on every side for compacted base support:
- Pavers: 168 sq ft + 10% waste = 185 sq ft. Belgard, Pavestone, or Techo-Bloc 6″x9″ or 12″x12″ pavers run $3-$6 per sq ft. Total: $560-$1,100.
- Paver base (3/4″ minus crushed stone): 4 inches deep over 200 sq ft = 2.5 cubic yards. About $90-$150 delivered.
- Bedding sand (concrete sand, not play sand): 1 inch over 168 sq ft = 0.5 cubic yards. About $30-$50.
- Polymeric jointing sand: 2-3 bags ($25-$30 each)
- Edge restraint: Snap Edge, ProEdge, or rebar — about $80-$150 for the perimeter
- Geotextile fabric (optional but recommended): $40-$80
Total materials for a 12×14 patio: roughly $850-$1,500 depending on paver choice. Add $150-$300 if you rent a plate compactor (most rental places, $60-$80 per day).
Tools You Need
- Spade and round-point shovel
- Wheelbarrow
- Plate compactor (rented)
- 4-foot level and 8-foot 2×4 for screeding
- Mason’s line and stakes
- Tape measure and Speed Square
- Rubber mallet
- Wet saw or angle grinder with diamond blade for cutting
- Push broom and garden hose with adjustable nozzle
- Knee pads and work gloves
Step 1: Excavate
Stake out the patio shape and excavate to a total depth of 7-8 inches below the desired finished surface (4″ base + 1″ sand + paver thickness, plus 1″ for slight overdig). Remove all vegetation, roots, and topsoil.
Build the slope into the excavation now. The bottom of the hole should already drop 1/4 inch per foot away from the house. Use the 4-foot level on a long 2×4 to verify slope. Patio fails to drain start at this step — get the slope right before adding any base.
Step 2: Lay Geotextile Fabric (Optional but Recommended)
Lay woven geotextile fabric over the bare soil before adding base material. The fabric prevents the crushed stone from sinking into clay subsoil over time and adds significant longevity. Skip it on sandy or well-draining soil.
Step 3: Add and Compact the Base
Spread 2 inches of paver base material across the excavation. Mist with water (lightly damp, not soaking). Run the plate compactor over the entire surface in overlapping passes — at least four passes in two perpendicular directions. The lift should drop noticeably as the stone consolidates.
Repeat with a second 2-inch lift, watered and compacted the same way. Total compacted depth: 4 inches. Verify the slope is still correct after compaction; adjust by adding stone in low spots and re-compacting.
Step 4: Set Edge Restraints (Optional Now or Later)
Some installers set edge restraints before sand and pavers, others install after. Setting them now lets you screed the sand to a fixed reference. Either way, the edge restraint must be at the same elevation as the underside of the paver — 1 inch above the compacted base.
Step 5: Screed the Bedding Sand
Lay two 1-inch-diameter PVC pipes across the base parallel to each other, about 6 feet apart. Pour concrete sand between them and screed flat with a 2×4 dragged across the pipes. The pipes act as guide rails and ensure a uniform 1-inch sand bed.
Lift and remove the pipes, fill the channels with sand, and smooth with a trowel. Do not walk on the screeded sand — work from the edges and lay pavers as you go.
Step 6: Lay the Pavers
Start in a corner closest to the house and work outward, keeping a tight pattern. Set each paver gently onto the sand, then tap with a rubber mallet to seat. Maintain consistent 1/8″ joint spacing using paver spacers or by eye.
Check elevation every few rows with a string line. Keep the paver field 1/4 inch high during installation — the final compaction will drop it to grade. Cut perimeter pieces with a wet saw or angle grinder; measure each piece individually rather than assuming the cuts repeat.
Step 7: Install Edge Restraints (If Not Already Done)
If you held off on edge restraint, install it now. Snap-Edge or ProEdge fits flush against the outside paver edge and is staked into the base with 10-12 inch spikes every 12 inches around the perimeter. Curves require closer spike spacing.
Step 8: Sweep and Compact Polymeric Sand
Pour polymeric sand on the patio surface and sweep diagonally into the joints with a stiff push broom. Fill joints completely — keep sweeping until no more sand falls in.
Run the plate compactor over the patio surface (with a rubber mat under the plate to protect the pavers). The compaction settles the pavers into the sand bed and works more polymeric sand into the joints. Sweep more sand and recompact until joints are full to within 1/8″ of the paver surface.
Step 9: Activate the Polymeric Sand
Mist the patio with a fine spray nozzle — never blast with a stream. The water activates the polymer binder in the sand. Most polymeric sands need 2-3 gentle wetting cycles, with 30 seconds between each cycle. Stop when water sits on the surface briefly before soaking in.
Critical: do not allow the polymeric sand to sit on the paver faces while wet. Sweep all loose sand off before wetting, or you will end up with a hazy white residue on the pavers that takes weeks to weather off.
Let the patio cure 24 hours before walking on it and 48-72 hours before placing furniture. Avoid heavy rain for 24 hours after activation.
Frequently Asked Questions
How long does it take to make a paver patio?
For a typical 12×14 DIY build with two people: Saturday for excavation, base, and compaction; Sunday for sand, pavers, cutting, and edge restraints; Monday for polymeric sand and curing. Plan a long weekend and assume the cure period rules out furniture for 2-3 days after.
How thick should the base be under a patio?
Four inches of compacted 3/4″ minus crushed stone is the residential minimum in stable, well-draining soil. In freeze-thaw zones or clay subsoils, increase to 6 inches. Skipping the base or using only sand is the leading cause of patio failure within 3-5 years.
Can I make a patio without polymeric sand?
Yes, but joints will need refilling annually with regular paver sand and will host weeds and insects. Polymeric sand bonds the joints into a flexible mortar that resists weeds and insects for 10-15 years. The cost difference is small ($25-$30 per bag versus $5 per bag); use polymeric.
What is the cheapest way to make a patio?
Concrete pavers from Home Depot or Lowe’s set on a properly compacted base. Total materials run $5-$8 per sq ft. Cheaper alternatives like pea gravel ($2-$3 per sq ft) or stepping stones in mulch ($1-$2 per sq ft) work for paths but lack the flat, furniture-ready surface a patio needs.