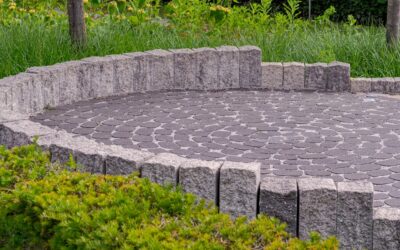
A paver patio is one of the highest-value projects a homeowner can tackle, adding usable outdoor living space and real curb appeal for a fraction of what a contractor charges. Learning how to make a paver patio the right way comes down to a single truth the pros know well: the patio you see is only as good as the base you don’t. Nearly every failed patio — the ones that sink, heave, and turn into a puddle of wobbly stones after a few winters — failed underground, in a base that was too thin or poorly compacted. Do the excavation and base work correctly, and a paver patio will stay flat and handsome for 25 years or more. This guide walks through the full process.
Part of our Decks & Outdoor guide — explore the full guide →
- Planning and Materials
- Step 1: Call Before You Dig and Lay Out the Area
- Step 2: Excavate to the Right Depth
- Step 3: Lay Landscape Fabric and Build the Base
- Step 4: Screed the Bedding Sand
- Step 5: Lay the Pavers
- Step 6: Install Edge Restraints
- Step 7: Sweep in Joint Sand and Compact
- Choosing a Pattern and Estimating Cost
- Caring for Your Finished Patio
- Enjoying a Patio That Lasts
Planning and Materials
Start by deciding the size, shape, and location. Sketch the layout, mark it with paint or stakes and string, and choose pavers that suit your style — concrete pavers are the most economical and come in countless shapes and colors, while brick and natural stone cost more. Order about 5 to 10 percent extra to cover cuts and breakage.
You’ll need crushed stone base material (often called crusher run or road base), coarse bedding sand, edge restraints, polymeric joint sand, and landscape fabric. For tools, plan on a plate compactor (rentable by the day), a shovel, a level, a long straightedge or screed board, a rubber mallet, and a masonry saw or splitter for cutting pavers.
Step 1: Call Before You Dig and Lay Out the Area
Before any digging, call 811 to have underground utilities marked — it’s free and prevents a dangerous, expensive mistake. Then lay out your patio precisely with stakes and string, establishing the finished height and, critically, a slope for drainage. The patio must fall away from your house at about a quarter-inch per foot so water runs off instead of pooling or draining toward the foundation. Set your string lines to reflect that slope.
Step 2: Excavate to the Right Depth
This is where the work begins in earnest. Dig out the area to accommodate the full layered assembly: the compacted base, the bedding sand, and the paver thickness. For a patio (foot traffic only), a base of 4 to 6 inches of compacted gravel is standard; driveways need more. Add roughly an inch for bedding sand plus the paver’s own thickness. Total excavation for a typical patio often runs 7 to 10 inches below the finished surface.
- Dig a little wider than the finished patio — about 6 extra inches on each side — to give the edge restraints solid ground to sit on.
- Keep the base of the excavation sloped to match your drainage plan.
- Remove all roots, sod, and soft spots, and firm up the exposed soil (the subgrade) by compacting it before adding any material.
Step 3: Lay Landscape Fabric and Build the Base
Line the excavation with landscape fabric to separate the soil from the gravel, which keeps the base from mixing into the subgrade and sinking over time. Then add the crushed stone base in thin layers — called lifts — of about 2 to 3 inches at a time. Compacting the base in multiple thin lifts rather than one thick dump is the single most important step for a lasting patio; a plate compactor can only densify a couple inches at a time.
Run the plate compactor over each lift several times in overlapping passes, lightly dampening the gravel with a hose to help it lock together. Check with your level and straightedge as you go, maintaining the slope. When you’re done, the base should be firm, flat to your slope, and so solid you barely leave a footprint.
Step 4: Screed the Bedding Sand
On top of the compacted base goes a thin, even layer of coarse bedding sand — about an inch deep — that the pavers nestle into. The trick to a perfectly flat sand layer is screeding. Lay two parallel pipes or screed rails on the base set to the sand depth, spread sand between them, then drag a straight board across the pipes to level the sand to a uniform thickness. Remove the pipes, fill the grooves, and smooth them.
Do not compact the bedding sand and do not walk on it after screeding — the whole point is a pristine, uniform bed for the pavers to seat into. Screed only as much area as you’ll cover with pavers before you’d have to walk on the sand.
Step 5: Lay the Pavers
Start in a corner, ideally a fixed 90-degree reference like the house or a string line, and work outward in your chosen pattern — running bond, herringbone, or basketweave. Set each paver down straight into the sand rather than sliding it, which would push sand and ruin the bed. Leave consistent joint spacing (many pavers have small spacer nubs) and tap each one gently with a rubber mallet to seat it level with its neighbors.
Check your lines frequently with a string or level as you go; small errors compound across a large patio. When you reach the edges and obstacles, mark and cut pavers with a masonry saw or splitter for a clean fit.
Step 6: Install Edge Restraints
Edge restraints are what keep the whole field of pavers from spreading and drifting apart over time — skip them and the outer pavers will migrate within a season. Install plastic or metal paver edging around the perimeter, spiking it down into the base with long landscape spikes. The restraint should sit tight against the outer pavers, locking the entire assembly in place. This is the border that holds everything together, so don’t treat it as optional.
Step 7: Sweep in Joint Sand and Compact
With the pavers laid and edged, spread polymeric joint sand across the surface and sweep it into all the joints. Polymeric sand contains a binder that hardens when wetted, locking the pavers together and resisting weeds and ants far better than plain sand. Once the joints are full, run the plate compactor over the entire patio — with a protective mat or a piece of carpet under it — to vibrate the sand down and settle the pavers into the bed. Sweep in more sand and compact again until the joints are full.
Finally, mist the patio with water per the polymeric sand’s instructions to activate the binder, being careful not to flood it. Let it cure before heavy use.
Choosing a Pattern and Estimating Cost
The laying pattern shapes both the look and the strength of your patio. Running bond, where each row is offset like brickwork, is the simplest and forgiving of slight cuts. Herringbone — pavers set at 45 or 90 degrees in an interlocking zigzag — is the strongest pattern and the best choice for areas that see heavier loads, because the interlock resists shifting. Basketweave and pinwheel patterns add visual interest but require more careful cutting. If this is your first patio, running bond keeps the job manageable while still looking clean.
On cost, a DIY paver patio typically runs $5 to $15 per square foot in materials — pavers, base gravel, sand, edging, and polymeric sand combined — while hiring a contractor pushes the installed price to roughly $15 to $30 or more per square foot, since labor is the largest expense. Doing the work yourself can easily save half the total cost, and the main investment beyond materials is a day’s rental on a plate compactor and a weekend or two of physical labor. Buy about 10 percent extra pavers to cover cuts and to have replacements on hand years later, since colors and styles get discontinued.
Caring for Your Finished Patio
A properly built paver patio needs little upkeep, but a few habits keep it looking new for decades. Sweep it regularly to keep grit and organic debris from collecting in the joints, where they can host weeds and moss. Rinse with a hose as needed, and for deeper cleaning, a gentle wash removes ground-in dirt — just avoid blasting the joint sand out with a high-pressure nozzle held too close.
Every few years, inspect the joints and top them off with fresh polymeric sand where it has settled or eroded, which keeps the pavers locked together and weeds out. If a paver ever cracks or a section settles, the beauty of the system is that individual pavers lift out and replace easily — pry up the damaged unit, correct the bedding sand beneath, and set a new paver in its place. You can also apply a paver sealer to deepen the color, resist stains, and further stabilize the joints, reapplying it every few years. With this minimal care, the patio you built will stay flat, tight, and handsome far longer than most homeowners expect, rewarding the effort you invested in the base below.
Enjoying a Patio That Lasts
Now you know how to make a paver patio that stands up to years of seasons: excavate deep, build and compact the gravel base in thin lifts, screed a perfect sand bed, lay and cut the pavers, lock the edges with restraints, and finish with polymeric joint sand. The finished surface should shed water away from the house, sit dead flat, and feel rock-solid underfoot. Put in the effort below grade where no one will ever see it, and the patio above will reward you with decades of low-maintenance outdoor living.