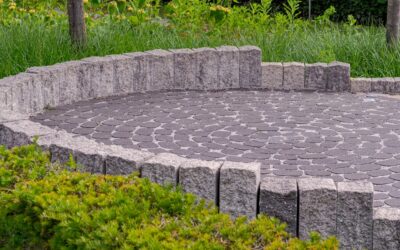
The difference between a paver patio that stays flat for 25 years and one that heaves and sinks after two winters is buried out of sight, in the base you never see. Building a paver patio is one of the most rewarding weekend-scale projects a homeowner can tackle, adding usable outdoor living space and real property value, but success lives entirely in the preparation beneath the stones. Skip the base work and the prettiest pavers will fail. Do it right and you get a durable, beautiful surface you laid with your own hands. Here is the complete process from planning to the final joint.
Part of our Decks & Outdoor guide — explore the full guide →
Planning and Layout
Before you lift a single paver, plan the size, shape, and location. Consider how you will use the space, whether for a dining set, a lounge area, or a grill zone, and size it accordingly. A comfortable dining patio needs at least 12 by 12 feet to fit a table and chairs with room to move. Check for underground utilities by calling 811 before digging, and confirm any local permit requirements for larger patios. Sketch the layout and choose a paver pattern, such as running bond, herringbone, or basketweave, since the pattern affects how many pavers you buy and how you cut them.
Estimating Materials for Building a Paver Patio
Accurate estimates prevent mid-project supply runs. Calculate your needs based on the patio’s square footage:
- Pavers: Buy 5 to 10 percent extra to cover cuts and future repairs.
- Base gravel: Crushed stone for a base 4 to 6 inches deep for patios, deeper in cold or clay-heavy soil.
- Bedding sand: About 1 inch of coarse sand over the compacted base.
- Edge restraints: Plastic or metal edging plus spikes to lock the perimeter.
- Polymeric sand: To fill the joints and stabilize the surface after laying.
Rent a plate compactor for the day, since hand-tamping never achieves the density a durable patio needs. It is the single most important rented tool for the job.
Excavating the Area
Proper excavation sets the stage for everything. Mark the patio outline with stakes and string, then dig out the area to the required depth: the paver thickness plus your base and sand layers, typically 7 to 10 inches total. Critically, build in a slope for drainage. The patio should fall away from your house at about 1/4 inch per foot so water runs off rather than pooling or draining toward the foundation. Check the slope continuously with a level and a long board as you dig. Remove all sod, roots, and soft soil until you reach firm subgrade.
Building the Base
The gravel base is the backbone of the patio and where most of your effort should go. Add crushed stone in lifts of about 2 inches, compacting each layer thoroughly with the plate compactor before adding the next. Compacting in thin layers achieves far better density than dumping it all at once. Lightly dampening the gravel helps it lock together during compaction. Keep checking your slope as you build up, since the base must maintain that gentle grade toward drainage. A properly compacted base 4 to 6 inches deep is what prevents the settling and heaving that ruins amateur patios.
Screeding the Sand Bed
Once the base is compacted and graded, add the bedding sand. Lay two screed rails, often lengths of 1-inch pipe, on top of the base, spread coarse sand between them, and drag a straight board across the pipes to create a perfectly smooth, level 1-inch sand layer. Work in sections and avoid walking on the screeded sand, since footprints ruin the flat surface you just created. This sand bed lets you set each paver at a consistent height and is the layer you adjust into, not the base.
Laying the Pavers
Now comes the satisfying part. Start in a corner, ideally a 90-degree corner against the house, and lay pavers in your chosen pattern, working outward. Follow these practices for a clean result:
- Place pavers straight down into position rather than sliding them, which disturbs the sand.
- Leave consistent joints, using the pavers’ built-in spacer nibs or a small gap for jointing sand.
- Check alignment often with a string line so rows stay straight.
- Cut border and edge pavers with a masonry saw or splitter to fit the perimeter cleanly.
- Kneel on a board laid over set pavers to distribute your weight and avoid dislodging them.
Take your time keeping lines true, because small drifts compound across a large patio. A taut string line as a guide is your best friend here.
Edging and Jointing
Two final steps lock the patio together for the long haul. First, install edge restraints around the entire perimeter, spiking them firmly into the base to prevent the pavers from spreading and shifting over time. Without edging, a paver patio slowly creeps apart at the edges. Second, sweep polymeric sand across the surface, working it into all the joints with a broom. Compact the pavers once more with the plate compactor over a protective mat to settle the sand, then sweep in more until the joints are full. Finally, mist the surface lightly with water to activate the polymeric sand, which hardens to lock the pavers and resist weeds and ants.
Curing and Maintenance
Let the polymeric sand cure for 24 hours before heavy use, longer if rain threatens. Going forward, sweep the patio regularly, rinse it as needed, and reapply jointing sand every few years as it wears. Reseal the pavers periodically if you want to enrich their color and add stain resistance, though it is optional. Pull any weeds promptly and address low spots early by lifting a paver, adding sand, and resetting it. With this simple upkeep, a well-built paver patio easily lasts 25 years or more.
Choosing the Right Pavers
The pavers you select affect both the look and the longevity of your patio, so weigh the options before buying. Concrete pavers are the most popular choice, affordable at roughly $3 to $6 per square foot and available in countless colors, shapes, and textures, including styles that convincingly mimic natural stone. Clay brick pavers offer timeless color that never fades since the hue runs through the material, though they cost more and come in fewer shapes.
Natural stone pavers like travertine, bluestone, and flagstone deliver premium beauty and unique variation, but they carry the highest price, often $10 to $30 per square foot, and can require more careful installation. For most homeowners, concrete pavers hit the sweet spot of cost, durability, and design flexibility. Whatever you choose, confirm the pavers are rated for your climate, since freeze-thaw regions need pavers that resist cracking and de-icing salts. Thicker pavers, around 2-3/8 inches, hold up better under patio furniture and foot traffic than thinner patio stones.
Adapting the Base for Your Soil and Climate
The standard 4-to-6-inch gravel base works for average conditions, but your soil and climate may demand adjustments. In areas with heavy clay soil, which holds water and heaves badly when it freezes, increase the base depth to 8 or even 10 inches and pay extra attention to drainage. Sandy, well-draining soil is more forgiving and can sometimes get by with a shallower base. In cold-winter regions, a deeper, well-compacted base below the frost concerns is what prevents the heaving that lifts and tilts pavers over the seasons.
Drainage deserves special thought in problem soils. A layer of geotextile fabric between the subgrade and the gravel keeps clay from pumping up into your base and contaminating it, a common cause of long-term settling. In wet sites, some builders add a perforated drain pipe within the base to carry water away. Taking the time to match your base to actual site conditions, rather than blindly following a one-size-fits-all depth, is what separates a patio that stays flat for decades from one that fails early.
The Bottom Line
Building a paver patio rewards patience with a durable, handsome surface that boosts your outdoor living and home value. The visible pavers get the attention, but the hidden work, deep excavation, a properly sloped and compacted gravel base, a screeded sand bed, solid edge restraints, and polymeric jointing sand, is what determines whether it lasts decades or fails in a season. Rent a plate compactor, respect the slope for drainage, and take your time with the base. Nail those fundamentals and you will have a professional-quality patio you built yourself.