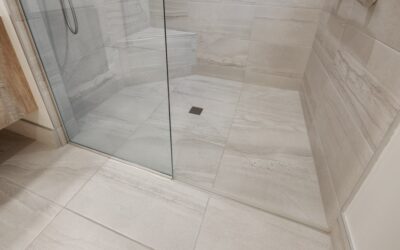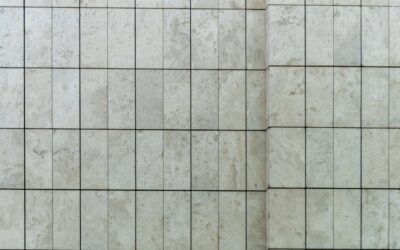
The look that makes a modern kitchen or bathroom feel expansive and seamless usually comes from one design choice: bigger tiles with fewer grout lines. Large porcelain tile has moved from a commercial specialty to a homeowner favorite, with formats running from 12 by 24 inches all the way up to gauged slabs measuring 5 by 10 feet. Fewer joints mean a cleaner look, less grout to clean, and a sense of openness in small rooms. But big tiles are also less forgiving to install, demanding a flatter subfloor and the right tools, so it pays to understand what you are getting into before the tiles arrive.
Part of our Tile & Grout guide — explore the full guide →
- Why Bigger Tiles Have Taken Over
- Understanding the Size Range
- Why Subfloor Flatness Matters So Much
- Tools That Make Large Tile Possible
- Mortar Coverage and Back-Buttering
- Grout Lines and Layout
- Cutting Large Porcelain
- Caring for Your Tile
- Is Large Tile Right for Your Project?
- Where Large Tile Works Best
- Cost Considerations
Why Bigger Tiles Have Taken Over
Beyond style, large-format porcelain offers practical advantages. Fewer grout lines mean fewer places for dirt and mildew to collect, which makes the floor easier to keep clean. Visually, a continuous expanse of tile makes a small bathroom or galley kitchen feel larger because the eye is not chopped up by a busy grid. Many large tiles also mimic marble, concrete, or wood plank convincingly, delivering those looks with porcelain’s durability and water resistance.
Understanding the Size Range
The category covers a wide span, and the right size depends on the room and your appetite for installation difficulty.
- 12 by 24 inches: the popular entry point, manageable for confident DIYers
- 24 by 24 and 24 by 48 inches: dramatic, modern, and increasingly common in living areas
- Plank formats like 8 by 48 inches that imitate wide wood boards
- Gauged porcelain slabs up to 5 by 10 feet for nearly seamless walls, floors, and even countertops
The biggest slabs are a professional installation; they are thin, heavy, awkward to handle, and require specialized suction tools and cutting equipment. For a DIY project, 12 by 24 is a realistic ceiling for most homeowners.
Why Subfloor Flatness Matters So Much
This is the single most important factor with large tile. A big, rigid tile cannot conform to a wavy floor the way small tiles can, so any high or low spot in the subfloor leaves the tile lippage, where one edge sits higher than its neighbor. Industry guidance tightens the flatness requirement as tile size grows: for tiles with any edge 15 inches or longer, the subfloor should be flat within about 1/8 inch over 10 feet. Skipping a self-leveling underlayment or floor patch on a wavy floor is the leading cause of failed large-tile jobs.
Tools That Make Large Tile Possible
You cannot install large-format tile well with small-tile tools. A few specific items are essential.
- A large-notch trowel (often 1/2 inch or larger) to lay enough mortar for full coverage under the big footprint
- A tile leveling system with clips and wedges that hold adjacent tiles flush while the mortar cures, preventing lippage
- A quality wet saw with a continuous-rim blade and a table large enough to support the tile
- Suction cups to lift and place big tiles precisely without dropping them
- A back-buttering technique, spreading mortar on the tile back as well as the floor, to guarantee full bonding
Mortar Coverage and Back-Buttering
Large tiles need near-total mortar contact on the back, ideally 95 percent coverage in wet areas. Voids under a big tile become weak spots that crack under load. The proven method is to comb mortar onto the floor in straight lines with a large-notch trowel, then back-butter a thin layer onto the tile itself before setting it. Use a medium-bed or large-format mortar designed not to slump under the weight of big tiles, rather than a standard thin-set.
Grout Lines and Layout
Large tiles look best with thin grout lines, often 1/8 to 3/16 inch, which reinforces the seamless effect. Be cautious with running-bond or brick-pattern layouts on long planks; the natural slight crowning in the center of large tiles means offsetting joints more than one-third can create noticeable lippage at the ends. Many manufacturers recommend keeping the offset to a third or less for tiles longer than 18 inches. A straight grid or a one-third offset is the safest layout.
Cutting Large Porcelain
Porcelain is dense and brittle, so cutting demands the right blade and patience. A wet saw with a continuous-rim diamond blade gives the cleanest edges. For the largest slabs, professionals use rail-mounted scoring tools and special blades. Feed the tile slowly, keep the blade wet, and support the full tile as it cuts so it does not snap. For outlet and pipe cutouts, an angle grinder or a diamond hole saw handles the curves.
Caring for Your Tile
Porcelain is one of the lowest-maintenance flooring surfaces available, which is part of its appeal. The dense, non-porous body resists water, stains, and scratches with very little effort on your part.
- Sweep or vacuum regularly to remove grit that could dull the surface
- Damp-mop with water or a pH-neutral cleaner; avoid harsh acids on polished finishes
- Seal the grout, not the tile, to keep the few joints you have stain-free
- Wipe spills promptly even though the tile itself will not absorb them
Is Large Tile Right for Your Project?
Where Large Tile Works Best
Big-format porcelain suits some spaces better than others. Open-plan kitchens and living areas benefit most, because a continuous expanse of large tile reads as seamless and makes the whole footprint feel bigger. Bathrooms gain from fewer grout lines, which means fewer places for mildew to take hold and less scrubbing. Entryways and mudrooms put porcelain’s water and scratch resistance to work against tracked-in grit and moisture.
Smaller, choppy rooms with many corners and obstructions are tougher, since large tiles require more cutting to fit around fixtures, and each cut on dense porcelain takes time. In those spaces, a 12-by-24 format is usually the largest worth attempting. The biggest payoff comes in wide, open rooms where the tile can stretch out and show off its seamless character.
Cost Considerations
Budgeting for large tile means looking past the per-square-foot price of the tile itself. Several other costs factor in, and skimping on any of them risks a failed installation.
- Floor prep: self-leveling underlayment or patching to achieve the required flatness adds material and labor
- Specialized mortar: large-format or medium-bed mortar costs more than standard thin-set
- Leveling system: clips and wedges are an extra but essential purchase to prevent lippage
- Tools or rental: a large wet saw and suction cups, bought or rented for the job
- Professional labor for the biggest slabs, which are not a realistic DIY material
Large-format porcelain delivers a clean, modern, low-maintenance surface that makes rooms feel bigger and cuts down on grout cleaning. The trade-off is a more demanding installation that requires a dead-flat subfloor, specialized tools, and careful technique. If you are comfortable prepping the floor and investing in a leveling system, 12-by-24 tile is a rewarding DIY upgrade. For the biggest slabs, hire a pro experienced in gauged porcelain. Either way, get the subfloor flat first, and the rest of the job, and the finished look, will follow.
Prefer to explore on your own?
See how new flooring looks in your actual room in seconds — free, no signup.
Try the free Floor Studio →