Walk into any tile aisle and you will see the familiar blue and white bags of Mapei tile mortar stacked high, and for good reason. Mapei is one of the most trusted names in setting materials, used by pros and DIYers alike for everything from a small backsplash to a full mud-set floor. But the company makes a wide lineup of mortars, and grabbing the wrong bag can mean a floor that cracks, tiles that pop loose, or a job that fails inspection. Knowing which product matches your tile and substrate is the whole game.
Part of our Tile & Grout guide — explore the full guide →
I have set tile with Mapei products for years, and the difference between a lasting installation and a callback almost always comes down to picking the correct mortar and mixing it right. Here is how to navigate the lineup.
- Mapei Tile Mortar: What Tile Mortar Actually Does
- Mapei's Main Mortar Lines
- Choosing the Right Product for Your Job
- Coverage and How Much to Buy
- Mixing Mapei Mortar Correctly
- Application Tips for a Strong Bond
- Standard vs. Rapid-Set Formulas
- Reading the Coverage Chart and Data Sheet
- Curing and Common Mistakes
Mapei Tile Mortar: What Tile Mortar Actually Does
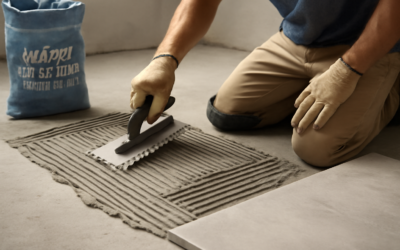
Mortar, often called thinset, is the adhesive layer that bonds tile to a substrate like cement board, concrete, or an uncoupling membrane. It is a cement-based powder blended with sand and polymers that you mix with water into a peanut-butter consistency, comb onto the surface with a notched trowel, and press the tile into. As it cures, it forms a rigid, permanent bond.
The reason there are so many formulas is that different tiles and substrates demand different performance. A heavy porcelain plank on a floor needs a mortar with strong grip and slip resistance, while glass mosaic on a wall needs a bright white, flexible adhesive. Matching the mortar to the job is what prevents failures down the road.
Mapei’s Main Mortar Lines
Mapei’s catalog can be overwhelming, so here are the products most homeowners will encounter:
- Ultraflex 1: A quality polymer-modified thinset for most ceramic and porcelain on walls and floors. A reliable everyday choice.
- Ultraflex 2: A stronger, non-slip formula for large and heavy tile, ideal for big-format porcelain planks.
- Ultraflex LFT: A large-format tile mortar (also called medium-bed) that supports big tiles without sagging or lippage.
- Kerabond / Keralastic system: A professional two-part mortar for demanding installations.
- Type 1 mastic: A premixed organic adhesive for small wall tile in dry areas only, not for floors or wet zones.
For most home projects, Ultraflex 1 or Ultraflex 2 covers the vast majority of tile and substrate combinations.
Choosing the Right Product for Your Job
Match the mortar to three things: the tile, the substrate, and the location. For standard ceramic wall tile in a dry area, premixed Type 1 mastic is convenient. For porcelain floor tile, step up to Ultraflex 1 or, for larger planks, Ultraflex 2 or LFT so the tile does not sag or telegraph unevenness.
Large-format tile, meaning any tile with a side longer than 15 inches, specifically needs a medium-bed or LFT mortar that can hold thickness without shrinking. Glass tile and moisture-sensitive stone call for a bright white, non-staining mortar. When in doubt, read the tile manufacturer’s recommendation and Mapei’s coverage chart, both of which spell out the right product.
Coverage and How Much to Buy
Estimating quantity keeps you from a mid-job supply run. Coverage depends heavily on your trowel size and tile format. As a rough guide, a 50-pound bag of Ultraflex covers roughly 90 to 100 square feet with a 1/4-inch notched trowel, but large tile with a bigger trowel drops that to 40 to 60 square feet per bag.
Always buy a little extra, since running short mid-floor means a hardware run and a seam where fresh mortar meets partially cured mortar. For a typical bathroom floor of around 50 square feet, one to two bags is usually plenty depending on trowel size.
Mixing Mapei Mortar Correctly
Mixing is where DIY jobs often go wrong. Follow this method for consistent results:
- Add powder to water, not the reverse. Pour the recommended amount of clean water into a bucket first, then add the powder to avoid dry pockets.
- Mix with a paddle on low speed. Blend to a smooth, lump-free, peanut-butter consistency that holds trowel ridges without slumping.
- Let it slake. Allow the mix to rest 5 to 10 minutes so the chemicals fully activate, then remix briefly.
- Do not add extra water later. If it stiffens, remix; adding water after slaking weakens the bond.
- Mix only what you can use within the pot life, typically about 2 hours, so it does not cure in the bucket.
Getting the consistency and slake right is what gives you strong, void-free coverage under every tile.
Application Tips for a Strong Bond
Spread the mortar with the flat side of the trowel first to key it into the substrate, then comb it out with the notched side held at a consistent angle to create even ridges. For large or heavy tile, back-butter the tile as well, spreading a thin skim on its back to guarantee full contact and eliminate voids.
Periodically pull up a tile to check your coverage. You want the mortar to have collapsed into near-full contact, at least 80 percent on dry areas and 95 percent in wet or exterior installations. Hollow spots under a tile are weak points that crack or debond later.
Standard vs. Rapid-Set Formulas
Mapei offers many of its mortars in both standard and rapid-set versions, and choosing between them affects your whole timeline. Standard-set thinset gives you a comfortable working window, typically a couple of hours of pot life and 24 to 48 hours before you can grout. It is the right choice for large jobs, beginners, and anyone who wants time to adjust tiles and fix mistakes before the mortar grabs.
Rapid-set formulas cure dramatically faster, sometimes allowing grouting in as little as two to three hours. This is invaluable when you need to put a floor back in service quickly, tile a high-traffic entry, or finish a job in a single day. The tradeoff is a much shorter working time, so mix small batches and work fast. For a shower or a big floor where you are learning as you go, stick with standard set; save rapid formulas for repairs and situations where speed genuinely matters.
Reading the Coverage Chart and Data Sheet
Every Mapei product comes with a technical data sheet, and learning to read it prevents most installation failures. The data sheet spells out exactly which substrates and tile types the mortar is approved for, the correct water ratio, the pot life, the open time, and the cure schedule before grouting. Following these numbers is not optional; it is what stands behind the manufacturer’s warranty.
Pay particular attention to the open time, meaning how long the combed mortar stays workable before it skins over. In a hot, dry room or on a sunny wall, mortar skins over faster, and pressing tile into skinned mortar produces a weak bond that fails later. Periodically touch the combed ridges; if the surface has crusted or no longer transfers to your finger, scrape it off and re-comb fresh mortar. Respecting the data sheet’s timing and coverage figures is the difference between an installation that lasts decades and a callback within a year.
Curing and Common Mistakes
Give the mortar time. Most Mapei thinsets need 24 to 48 hours before grouting and longer before heavy use, though rapid-set versions cure faster. Grouting too soon traps moisture and can cause hazing or weak grout lines.
The most common mistakes I see are using mastic where a cement mortar is required in wet areas, using standard thinset under large-format tile, and adding water to stiffened mortar. Avoid those, match the Mapei product to your tile and substrate, mix it properly, and your installation will hold tight for the life of the floor. When you are unsure, a quick call to Mapei’s technical line or a look at their coverage chart settles the question fast.
Prefer to explore on your own?
See how new flooring looks in your actual room in seconds — free, no signup.
Try the free Floor Studio →