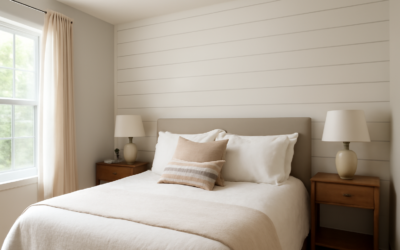
A well-built master bedroom shiplap bedroom wall does something a plain painted wall never will. It adds texture, shadow, and a sense of craftsmanship that makes the whole room feel finished. I’ve installed shiplap in dozens of primary suites, and the difference between a wall that looks custom and one that looks like a weekend mistake comes down to planning, board choice, and clean lines.
Shiplap earned its name from the overlapping rabbet joints that let boards “lap” together with a consistent gap between them. That small, uniform reveal is what creates the crisp shadow lines people love. Below, I’ll cover where to put it, what materials to buy, realistic costs, and exactly how to install it so it looks like a pro handled the job.
Why Shiplap Belongs in the Master Bedroom
The primary bedroom is the ideal room for shiplap because it’s a space you experience up close, slowly, at the start and end of every day. Texture reads more strongly there than in a hallway you walk through in three seconds. A shiplap wall behind the bed frames the headboard, anchors the largest piece of furniture in the room, and creates an instant focal point.
There’s a practical upside too. Shiplap hides minor drywall imperfections and gives you a durable, wipeable surface that holds up better than flat paint. If your walls are older and a little wavy, cladding one of them can be easier than skim-coating and repainting.
Choosing the Right Wall
In almost every master bedroom, the headboard wall is the natural home for shiplap. It’s the wall you see from the doorway and the one that benefits most from a defined backdrop. That said, a few other placements work beautifully:
- The headboard wall for a classic, symmetrical focal point.
- A fireplace or TV wall to give the media zone architectural weight.
- An angled or vaulted ceiling wall where shiplap emphasizes the interesting geometry.
- A reading nook or window seat surround for a cozy, cottage-inspired corner.
Avoid cladding all four walls unless you’re after a rustic cabin look. In a modern primary suite, one accent wall carries more impact and costs a fraction of a full wrap.
Board Orientation and Style
Direction changes the entire feel of the wall. Horizontal shiplap is the most popular choice. It visually widens the room and reads as classic farmhouse or transitional. Vertical shiplap draws the eye up, making it a smart pick for rooms with lower ceilings. Diagonal or herringbone layouts feel contemporary and custom, but they burn through more material and labor.
Reveal size matters as much as direction. A tight one-eighth-inch gap looks refined and modern, while a quarter-inch reveal leans more rustic and traditional. Pick one gap and keep it dead consistent using a spacer, such as a nickel or a scrap of the right-thickness plywood, so every board matches.
Materials and What They Cost
You have three main routes, and the right one depends on budget and the finish you want.
- True nickel-gap shiplap boards (primed pine or MDF): the cleanest look with built-in spacing. Expect $2.50 to $5 per square foot for materials.
- Plywood strips ripped to width from a sanded sheet: the budget favorite. A single sheet cut into 6-inch strips can clad a wall for well under $1.50 per square foot.
- Peel-and-stick or faux shiplap panels: fastest for renters, but the shadow lines are shallower and less convincing. Roughly $1 to $3 per square foot.
For a typical 12-foot-wide headboard wall, plan on $150 to $500 in materials depending on which product you choose. Add another $40 to $80 for finishing supplies like nails, caulk, primer, and paint. If you hire a carpenter, installed costs usually land between $6 and $12 per square foot.
Best Paint Colors for Shiplap
Crisp white remains the go-to and keeps the room bright, with warm whites like Benjamin Moore White Dove or Simply White leading the pack. For a moodier primary suite, deep charcoal, soft sage, or a muted navy make the texture glow under lamplight. Whatever you choose, use a satin or semi-gloss finish so you can wipe the boards clean and so the shadow lines stay sharp.
Tools and Materials Checklist
Before you start, gather everything so you’re not stopping mid-project:
- Shiplap boards or plywood strips
- Brad nailer with 2-inch nails, or a hammer and finish nails
- Stud finder and a good 4-foot level
- Miter saw for clean crosscuts
- Spacers for consistent gaps
- Construction adhesive, wood filler, and paintable caulk
- Primer, paint, and a quality brush and roller
Step-by-Step Installation
Installing a master bedroom shiplap bedroom wall is a very achievable weekend DIY if you work methodically. Here’s the sequence I use on the job:
- Locate and mark the studs. Run painter’s tape up the wall and mark every stud, usually 16 inches on center. You’ll nail into these.
- Prime or paint the wall first. Paint the drywall the same color as your boards so the gaps don’t flash white or reveal bare wall.
- Start level, not from the floor. Floors are rarely level. Snap a level line for your first board and build up and down from there.
- Apply adhesive and nail. Run a bead of construction adhesive on the back, set the board, check level, and nail into each stud.
- Use spacers on every board. Insert your spacers, seat the next board, nail, remove spacers, and repeat. Consistency is the whole game.
- Stagger the seams. Where boards meet end to end, offset the joints between rows so they don’t line up in a column.
- Cut around outlets. Turn off the power, measure carefully, and notch boards around receptacles. Add outlet box extenders so the plugs sit flush with the new surface.
- Fill, caulk, and paint. Fill nail holes, caulk the outer edges where the wall meets trim, and apply two finish coats.
Plan on one full day for a single accent wall if you’re comfortable with a nailer, or a full weekend if it’s your first time.
Styling the Finished Wall
Once the paint cures, let the texture be the star. An upholstered or wood headboard set against the boards reads as layered and intentional. Flank the bed with matching sconces or pendant lights to draw the eye upward. Keep bedding in tones that contrast the wall color, and add a single large piece of art or a pair of framed prints rather than a busy gallery that competes with the board lines.
Frequently Asked Questions
Does shiplap make a bedroom look dated?
Only if it’s overdone. One tasteful accent wall with a tight, modern reveal reads as timeless. Cladding every wall in wide rustic boards is what tends to age quickly.
Can I install shiplap over textured walls?
Yes. Because the boards attach to studs and sit proud of the surface, minor texture underneath disappears completely. That’s one of shiplap’s practical advantages.
How do I keep dust out of the gaps?
The gaps collect very little dust in practice. A quick pass with a vacuum brush attachment or a dry microfiber cloth every few weeks keeps them clean.
Is peel-and-stick shiplap worth it for renters?
For a rental where you can’t nail into walls, peel-and-stick panels are a reasonable compromise. Just know the shadow lines are shallower, so the effect is subtler than real boards.
A master bedroom shiplap bedroom wall delivers custom character for a modest budget and a weekend of work. Pick the headboard wall, commit to a consistent reveal, paint the drywall behind the boards, and finish with clean caulk lines and two coats. The result is a warm, textured backdrop that makes the whole room feel designed.