Most homeowners fall for the light oak look in a showroom, then panic when they remember real hardwood and moisture do not mix. Portmore white tile solves that exact problem. It is a glazed porcelain plank built to mimic bleached, whitewashed oak, but it shrugs off spills, pets, and steam that would ruin genuine wood. If you want that Scandinavian, coastal, or modern-farmhouse feel without babying your floor, this is one of the smartest materials on the market today.
Part of our Tile & Grout guide — explore the full guide →
- What Portmore White Tile Actually Is
- Sizes, Finishes, and What to Expect
- Where Portmore White Tile Works Best
- Cost and Budget Planning
- Installation Tips From the Field
- Grout Color Strategy
- Cleaning and Long-Term Care
- How It Compares to Hardwood and Vinyl Plank
- Common Mistakes to Avoid
- Is Portmore White Tile Right for You?
What Portmore White Tile Actually Is
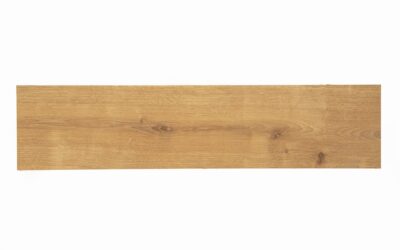
Portmore is a wood-look porcelain plank line, and the white colorway lands on the palest end of the range. Each piece is a rectified porcelain tile printed with high-definition oak grain, knots, and subtle color variation so no two planks look identical. Because it is porcelain rather than ceramic, the color and pattern run consistently through a dense, low-porosity body that resists chipping.
The white shade reads as a soft, warm off-white with faint gray and beige undertones rather than a stark, clinical white. That warmth is deliberate. It keeps rooms feeling inviting while still bouncing light around, which is why designers reach for it in smaller or north-facing spaces that need brightening.
Sizes, Finishes, and What to Expect
Wood-look planks in this style typically come in a 6-by-24-inch or 6-by-36-inch format, with some collections offering a wider 8-inch plank. The surface carries a matte, low-sheen finish that imitates a natural oil-rubbed wood look and hides footprints far better than a polished tile would.
- Plank size: commonly 6″ x 24″, giving a realistic board proportion
- Thickness: around 3/8 inch (9-10 mm), standard for floor-rated porcelain
- PEI rating: usually PEI 4, meaning it handles heavy residential and light commercial traffic
- Finish: matte, slip-resistant texture suited to kitchens and baths
- Edges: rectified for tight, uniform grout lines
Buy from a single production run, or “dye lot,” so shade and caliber match across every box. Order 10 to 15 percent extra to cover cuts, waste, and future repairs, since matching a discontinued lot years later is nearly impossible.
Where Portmore White Tile Works Best
This tile earns its keep in wet and high-traffic zones where real wood struggles. Kitchens top the list because the porcelain body will not swell when a dishwasher leaks or a dropped glass sends water across the floor. Bathrooms and mudrooms follow closely, since the material is fully waterproof once grouted and sealed at the joints.
Open-concept main floors are another sweet spot. Running the same light plank from the entryway through the kitchen and living room visually enlarges the space and eliminates awkward transition strips. Because porcelain conducts heat well, it also pairs beautifully with in-floor radiant heating, turning a cool tile into a cozy, warm surface underfoot.
Cost and Budget Planning
Expect material pricing in the range of $2.50 to $6 per square foot for wood-look porcelain in this class, with the exact number driven by size, retailer, and current promotions. That undercuts most engineered and solid hardwood, which often starts above $6 per square foot before installation.
Professional installation adds roughly $6 to $12 per square foot depending on your region, subfloor prep, and layout complexity. A plank pattern with staggered joints takes longer to set than a simple square-tile grid, so factor that labor into the estimate. For a 200-square-foot kitchen, a realistic all-in budget lands somewhere between $1,700 and $3,600 installed.
Installation Tips From the Field
Plank tile is less forgiving than short square tile, so preparation matters. A flat subfloor is non-negotiable; any dip beyond 1/8 inch over 10 feet will cause lippage, where one plank edge sits higher than its neighbor. Grind high spots and fill low spots with a self-leveling compound before you spread any thinset.
Keep the Stagger Modest
The instinct is to offset planks 50 percent like hardwood, but that maximizes lippage on long tiles because the center of one plank meets the high point of the next. Stick to a 30 percent offset, roughly one-third, to keep the surface flat and reduce failed edges.
Back-Butter Every Plank
Use a large-format tile mortar and back-butter each piece to guarantee full coverage under the plank. Voids under a long tile create weak spots that crack under a dropped pot or a heavy chair leg. A 1/2-inch notched trowel plus back-buttering gets you the 95 percent coverage the industry recommends for floors.
Grout Color Strategy
Grout choice makes or breaks the wood illusion. A matching light or greige grout blurs the seams so the floor reads like continuous planking rather than a tile grid. A contrasting dark grout, by comparison, frames each piece and gives a more graphic, deliberately tiled appearance. For the seamless whitewashed-wood look most buyers want with portmore white tile, pick a grout within one or two shades of the plank and keep joints tight at 1/16 to 3/16 inch.
Use a stain-resistant epoxy or a high-quality urethane grout in kitchens and baths. It resists the coffee, wine, and grease that turn cheap cement grout dingy, and light-colored joints show every stain a dark grout would hide.
Cleaning and Long-Term Care
One of the biggest advantages here is how little maintenance the floor demands. Porcelain does not need waxing, refinishing, or resealing the way hardwood does. Dry-mop or vacuum to lift grit, then damp-mop with a neutral pH cleaner. Skip oil soaps and wax-based products, which leave a haze on the matte surface.
The only ongoing task is keeping the grout clean, and a periodic scrub with a soft brush handles that. Reseal cement grout every year or two; epoxy grout needs no sealing at all. Treated this way, a quality porcelain floor easily lasts 20 years or more, outliving nearly every other flooring material in the home.
How It Compares to Hardwood and Vinyl Plank
Against solid or engineered hardwood, porcelain wins on durability and water resistance every time. Hardwood scratches, dents, and swells with moisture, and it needs periodic sanding and refinishing that can cost thousands over a floor’s life. The trade is warmth and feel: real wood is softer and quieter underfoot, while porcelain is harder and cooler unless paired with radiant heat.
Against luxury vinyl plank, the comparison is closer. Vinyl is warmer, softer, and easier to install as a floating floor, and it costs less to put down. But porcelain resists scratches, heat, and UV fading far better, will not dent under heavy furniture, and holds its value longer. If you want the most realistic look and the longest lifespan, tile edges out vinyl; if you want the fastest, most forgiving install, vinyl has the advantage.
Common Mistakes to Avoid
The most frequent regret is skimping on subfloor prep, which leads to cracked planks and lippage that no grout can hide. The second is choosing a grout color that clashes with the tile and turns a seamless floor into a busy grid. The third is under-ordering, then discovering the dye lot is gone when a plank cracks. Prep the substrate flat, pick a tonal grout, and buy extra boxes, and the floor will reward you for decades.
Is Portmore White Tile Right for You?
If you love the airy, light-wood aesthetic but live with kids, pets, or moisture-prone rooms, this tile delivers the look without the vulnerability. It costs less than hardwood over its lifetime, never needs sanding, and holds up to abuse that would gouge or stain a real board. The trade-offs are a harder, cooler surface underfoot and a more demanding installation that rewards hiring an experienced tile setter.
For most homeowners chasing a bright, durable, low-maintenance floor, this material is an easy recommendation. Order samples, view them in your own lighting at different times of day, and confirm the undertone works with your cabinets and wall color before committing to a full order.
Prefer to explore on your own?
See how new flooring looks in your actual room in seconds — free, no signup.
Try the free Floor Studio →