A range hood cover is the decorative shell that hides the working ventilation liner above your range, turning a utilitarian stainless box into a custom focal point that matches your cabinetry, plaster, or metalwork. It’s one of the highest-impact details in a kitchen remodel — the difference between an appliance bolted to the wall and a built-in design element. This guide covers what a hood cover actually is, how to size it, your material options, and whether to build it yourself.
Part of our Kitchen Remodeling guide — explore the full guide →
The key concept to understand up front is that a range hood cover is not the ventilation itself. Inside the cover sits a hood insert or liner — the blower, filters, and lighting that do the real work. The cover is the finished enclosure around that insert. Confuse the two and you’ll size the whole thing wrong.
What a Range Hood Cover Does
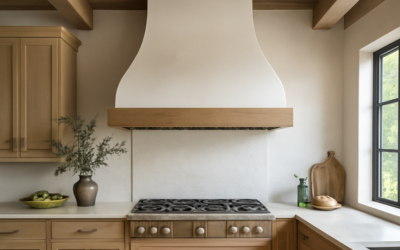
Functionally, the cover conceals the metal liner, its ductwork, and its wiring while directing the captured air up into the duct. Aesthetically, it’s the star — a custom wood surround that matches your cabinets, a plaster hood that blends into the wall, a reclaimed-wood statement piece, or a metal shroud in brass, copper, or zinc. It ties the range wall together and often becomes the visual anchor of the whole kitchen.
Because it’s decorative, the cover offers nearly unlimited design freedom in a way the boxy stainless hood underneath never could. That’s exactly why custom covers have become so popular in remodels.
The Critical Relationship: Cover and Insert
Here’s the sizing rule that governs everything. You choose a ventilation insert rated for your cooktop’s needs — the CFM, width, and duct size that actually move the air — and then build or buy a cover to enclose it. The insert must be sized to your cooking (roughly 100 CFM per foot of electric cooktop, or about 1 CFM per 100 BTU for gas), and the cover must be built large enough to house that insert with proper clearances.
Inserts commonly come in widths to match a 30-, 36-, or 48-inch cooktop, and the cover’s interior opening has to accommodate the insert’s dimensions plus the manufacturer’s required clearance to combustible materials — critical when the cover is wood. Always read the insert’s install manual for its minimum clearances before framing a wood cover around it. Skip that step and you’ve built a fire hazard.
Material Options
Range hood covers come in a few main materials, each with its own look and build approach:
- Wood — the most popular custom option. Painted or stained to match cabinetry, or left as reclaimed timber for a rustic statement. Built as a plywood/MDF box faced with trim, or from solid hardwood. Requires careful attention to heat clearance around the insert.
- Plaster / drywall — a smooth, seamless hood that reads as an extension of the wall, often with a curved or tapered profile. Popular in modern and Mediterranean kitchens.
- Metal — brass, copper, zinc, or stainless shrouds, either handcrafted or ordered as prefab covers. Durable, easy to wipe, and a strong design statement.
- Prefabricated covers — ready-made wood or metal covers designed to drop over a standard insert, sold in set sizes for a faster, lower-cost install.
Match the material to your kitchen style and your appetite for custom work.
Sizing and Proportions
Beyond fitting the insert, the cover’s overall proportions drive whether it looks right. Width should generally match or slightly exceed the cooktop below — a common approach is to make the hood cover as wide as, or a few inches wider than, the range. Height depends on ceiling height; taller ceilings call for a taller cover to stay proportional, and most covers taper from a wider base to a narrower chimney that meets the ceiling.
Mounting height follows the insert’s requirement — typically the bottom of the hood sits 30 to 36 inches above the cooktop surface. Get the insert placement right first, then build the decorative cover around and above it up to the ceiling.
DIY vs. Professional Build
A wood range hood cover is a realistic advanced-DIY project if you’re comfortable with framing and finish carpentry. The typical approach: build a plywood or MDF frame anchored to wall studs and ceiling joists, install the ventilation insert inside per its clearance specs, then face the frame with trim, shiplap, or paneling and paint or stain to match. Budget a weekend and careful attention to the insert’s heat and duct requirements.
Plaster and metal covers, and any cover involving new ductwork or gas-range clearances, are better left to pros — a cabinetmaker, plasterer, or metalworker plus an electrician for the insert wiring. If the project also involves running or modifying duct through the ceiling, bring in an installer. The cover itself is decorative, but the insert and duct inside it are a fire-safety and code matter.
Costs
Costs vary widely by approach. A prefabricated wood or metal cover runs roughly $300 to $1,200. A DIY custom wood build costs mostly in materials — $150 to $500 in lumber, trim, and finish — plus the insert (a good liner runs $300 to $900 on its own). A professionally built custom wood, plaster, or handcrafted metal cover typically lands between $1,500 and $5,000-plus depending on materials, size, and craftsmanship, not counting the insert and any ductwork.
The insert is a separate, non-negotiable cost. Don’t cheap out on it to fund a fancier cover — the insert is what actually vents your kitchen.
Matching the Cover to Your Kitchen Style
A range hood cover is a design decision as much as a functional one, so let the kitchen’s style guide the material and shape. In a farmhouse or transitional kitchen, a painted wood cover with shiplap facing or simple trim, often in white or a soft greige, reads warm and built-in. Rustic and craftsman kitchens suit reclaimed timber or a wood cover with visible straps and corbels. Modern kitchens lean toward smooth plaster hoods that melt into the wall, or sleek metal shrouds in brushed brass, blackened steel, or zinc.
Mediterranean and Tuscan kitchens favor curved plaster or stucco hoods, sometimes with a decorative band. Whatever the style, the cover looks most intentional when it echoes an existing element — matching the cabinet paint, picking up the metal of the faucet and hardware, or repeating a wood tone from open shelving or the island. That repetition is what makes a hood cover feel designed-in rather than added-on.
Ventilation Inserts: What to Buy for the Inside
Since the cover is only as good as the insert it hides, spend real attention here. Ventilation inserts (also called liners or power packs) come in widths to match your cooktop and CFM ratings for your cooking load — remember roughly 100 CFM per foot of electric cooktop, or about 1 CFM per 100 BTU for gas. A good residential insert runs $300 to $900 and includes the blower, baffle filters, and lighting.
Choose an insert with dishwasher-safe stainless baffle filters rather than mesh, since baffles trap grease better and clean up easily. Look for multiple fan speeds, bright LED task lighting, and a quiet blower rated in low sones — or an in-line/remote blower option for the quietest operation. Confirm the insert’s duct size and its required clearance to combustible materials before building a wood cover around it. The insert is the part that actually protects your kitchen air, so don’t let a beautiful cover tempt you into cheaping out on the machine inside it.
The Bottom Line
A range hood cover is how you turn functional ventilation into a custom design centerpiece. The one rule that matters most: choose a properly sized ventilation insert for your cooktop first, then build or buy a cover to enclose it, always respecting the insert’s clearance and duct specs — especially with a combustible wood cover. Pick a material that suits your kitchen, size the proportions to your range and ceiling, and decide honestly whether it’s a DIY build or a job for a cabinetmaker. Get it right and the hood cover becomes the detail people notice the moment they walk into your kitchen.