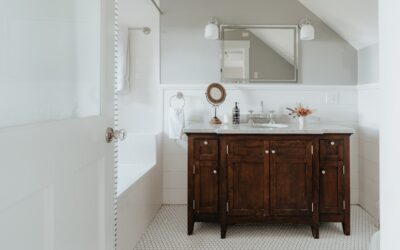
Learning to refinish bathroom vanity cabinets is one of the highest-impact, lowest-cost upgrades you can make to a bathroom. A dated oak or worn-out vanity can be transformed into a fresh, modern centerpiece for a fraction of the price of a new one, often for less than a hundred dollars in materials. The process is straightforward, but the bathroom environment is demanding, with moisture and humidity that punish sloppy work. The secret to a finish that lasts is in the prep, the right primer, and proper ventilation. This guide walks through every step so your refinished vanity looks professional and holds up for years.
Part of our Bathroom Remodeling & Flooring guide — explore the full guide →
- Why Refinish Instead of Replace
- Tools and Materials You Will Need
- Step One: Remove Hardware and Doors
- Step Two: Clean Thoroughly
- Step Three: Sand for Adhesion
- Step Four: Prime
- Step Five: Paint and Cure
- Tips for a Lasting Finish
- Refinishing Versus Restaining a Wood Vanity
- Handling Laminate and Thermofoil Vanities
- Staining Bathroom Cabinets: Gel Stain or Strip and Stain
- Final Thoughts
Why Refinish Instead of Replace
Replacing a vanity means buying the cabinet, possibly a new top and sink, and paying for plumbing and installation. Refinishing keeps everything in place and simply updates the look, which saves significant money and labor.
A refinish also lets you keep a solid, well-built cabinet that may be sturdier than a budget replacement. As long as the vanity box is structurally sound and not water-damaged or swollen, refinishing is almost always the smarter choice. If the cabinet is rotting or falling apart, though, replacement is the better path.
Tools and Materials You Will Need
Gather everything before you start so you can work in clean stages. A typical vanity refinish calls for the following.
- Degreaser or TSP substitute for cleaning
- Sandpaper in medium and fine grits, plus a sanding sponge for detailed areas
- A bonding primer suited to slick or previously finished surfaces
- Cabinet-grade or trim paint, ideally an enamel that cures hard
- Quality angled brush and a small foam roller
- Painter’s tape, drop cloths, screwdriver, and a dust mask
Choosing a durable cabinet or door-and-trim enamel matters in a bathroom, since these finishes resist moisture and handle far better than ordinary wall paint.
Step One: Remove Hardware and Doors
Start by emptying the vanity and removing the doors, drawers, and all hardware. Label hinges and place screws in a bag so reassembly is easy.
Working on the doors and drawer fronts flat, on a table or sawhorses, gives a smoother finish than painting them in place. Protect the floor and surrounding surfaces with drop cloths and tape off the wall, countertop, and any areas you are not painting.
Step Two: Clean Thoroughly
Bathroom vanities accumulate soap scum, hairspray, lotion, and grease that will sabotage adhesion if left on. Clean every surface with a degreaser or TSP substitute, then rinse and let it dry fully.
This step is non-negotiable. Paint and primer will not bond to a grimy surface no matter how good the product, and skipping it is the top reason refinished cabinets peel.
Step Three: Sand for Adhesion
Scuff-sand all surfaces with medium grit to dull the existing finish and give the primer something to grip. You are not stripping to bare wood, just roughening the surface, so a light, even sanding is enough.
Wear a dust mask and work in good ventilation, since sanding old finishes creates fine dust. After sanding, wipe away all dust with a tack cloth or a damp rag, since leftover dust ruins a smooth finish. For heavily grained wood like oak, fill the grain with a wood filler if you want a perfectly smooth painted look, sanding it flush when dry.
Step Four: Prime
Apply a quality bonding primer designed to stick to glossy and previously finished surfaces. Primer is what makes the topcoat adhere and resist peeling in a humid bathroom, so do not skip it even if your paint claims to be self-priming.
Use thin, even coats with a brush for detailed areas and a foam roller for flat panels. Let the primer dry fully, then lightly sand it with fine grit and wipe clean before painting. Keep the bathroom ventilated with a fan or open window throughout, and wear your dust mask when sanding primer.
Step Five: Paint and Cure
Apply your cabinet enamel in thin, even coats, again using a brush for recesses and a foam roller for flat surfaces to minimize brush marks. Two to three thin coats produce a far better, more durable result than one thick coat.
Let each coat dry the full recommended time and sand lightly between coats for glass-smooth results. After the final coat, allow the paint to cure, which can take several days to a couple of weeks depending on the product, before heavy use. Reattach the hardware and rehang the doors only after the paint has dried enough to handle, and be gentle until it fully cures.
Tips for a Lasting Finish
A few extra steps pay off in durability. Consider updating the hardware to new knobs and pulls for an even bigger visual change at little cost. Use a moisture-resistant enamel and keep the bathroom ventilated during and after the project to help the finish cure hard.
Avoid using the vanity for spills and heavy contact until the paint has fully cured, and wipe it down gently afterward rather than scrubbing. With proper prep and a quality enamel, a refinished vanity holds up beautifully to daily bathroom use.
Refinishing Versus Restaining a Wood Vanity
You have two main directions when refinishing a wood vanity: paint over it or restain the wood. Painting, covered in the steps above, gives you any color you want and hides grain and dated wood tones, which is why it is the most popular choice for outdated oak.
Restaining keeps the natural wood look but changes the tone, which suits vanities with attractive grain you want to showcase. Restaining is more involved, since you must strip or thoroughly sand off the old finish to bare wood before applying new stain and a protective topcoat. It also only works on real wood, not laminate or thermofoil surfaces. Decide based on your vanity’s material and the look you want, then choose paint for the easiest, most forgiving transformation or stain for a refreshed natural finish.
Handling Laminate and Thermofoil Vanities
Not every vanity is solid wood, and the surface material changes your approach. Many modern vanities have a laminate or thermofoil finish over a composite core, which paint can struggle to adhere to without the right products.
These slick surfaces demand thorough cleaning, a light scuff sanding, and a high-quality bonding primer formulated specifically for laminate and glossy surfaces. Skipping the bonding primer almost guarantees peeling. Thermofoil that is already lifting or peeling is harder to refinish successfully and may need the loose material addressed first. With proper prep and the correct primer, you can repaint laminate vanities effectively, but set realistic expectations and follow the primer manufacturer’s directions closely, since adhesion is the entire challenge with these materials.
Staining Bathroom Cabinets: Gel Stain or Strip and Stain
Staining bathroom cabinets keeps the warmth of wood while changing a dated tone, and there are two very different ways to do it. One goes over the current finish with a thick gel stain. The other removes the old finish down to bare wood and starts fresh. The right path depends on the condition of the cabinets, how dramatic a color change you want and how much time you can give the project.
Gel Stain Over the Existing Finish
Gel stain is thick, almost like pudding, and sits on the surface instead of soaking deep into the wood. That makes it possible to darken cabinets without stripping. Clean the boxes and doors with a degreaser to remove soap film and hairspray residue, then scuff the finish lightly with fine sandpaper so the stain can grip. Wipe the gel on with a cloth or foam brush, work it in the direction of the grain and remove excess before it gets tacky. Two or three thin coats build richer color. Gel stain is best for going darker, such as honey oak to espresso. It cannot make wood lighter, and it partially hides grain as coats build.
Strip and Stain for a True Wood Finish
Stripping removes the old topcoat so a penetrating stain can soak into open grain. Apply a chemical stripper, let it soften the finish, scrape it off with a plastic scraper and clean the residue as the label directs. Sand with progressively finer grits, keeping the sanding consistent so the stain absorbs evenly. Softwoods and maple can blotch, so use a pre stain conditioner on those species. This route takes much longer but gives the clearest grain and the widest choice of colors, including lighter tones. It works only on solid wood or real wood veneer, not laminate or thermofoil.
Choosing a Moisture Resistant Topcoat
Stain adds color but no protection, and bathrooms throw steam, splashes and cleaning products at every surface. Seal with a durable clear coat. Water based polyurethane dries fast, stays clear and has low odor, which suits light stains. Oil based polyurethane adds an amber glow and a tough film but takes longer to dry. Apply at least two or three thin coats, sanding lightly between them with very fine paper, and pay extra attention to the bottom edges of doors and the area under the sink where water collects. Let the finish cure fully before heavy use and run the exhaust fan during showers afterward.
Ventilation and Chemical Safety
Bathrooms are small and often poorly ventilated, so move doors and drawers to a garage or covered outdoor space when possible. Open windows, run fans that exhaust outdoors and wear chemical resistant gloves and eye protection. Use the respirator type listed on the stripper or finish label. Never mix strippers, stains or cleaners. Keep vapors away from water heater and furnace pilot lights, and lay used rags flat outdoors to dry or seal them in a water filled metal can, because oil soaked rags can catch fire on their own.
Final Thoughts
Refinishing a bathroom vanity is a weekend project that delivers a dramatic, money-saving upgrade. The result lives or dies on preparation: clean thoroughly, sand for adhesion, and prime with a bonding primer before applying a durable cabinet enamel in thin coats. Ventilate the space, wear a dust mask while sanding, and give the finish time to cure. Follow these steps and you will turn a tired vanity into a fresh focal point that lasts for years.
Prefer to explore on your own?
See how new flooring looks in your actual room in seconds — free, no signup.
Try the free Floor Studio →