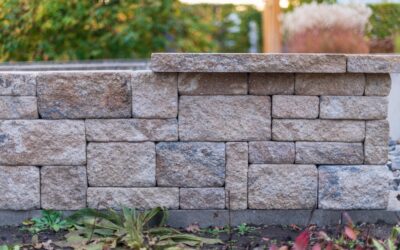
A retaining wall is one of the biggest visual features in a landscape, and lighting it transforms the entire yard after dark. Well-placed retaining wall lights wash a warm glow across the block face, define steps and edges for safety, and extend your usable outdoor hours well past sunset. The best part is that most of these fixtures tuck completely out of sight, so you see the light, not the hardware.
Whether you are building a new wall or retrofitting an existing one, here is how to choose the right fixtures, space them correctly, and wire them without hiring an electrician.
- Why Light a Retaining Wall
- Types of Retaining Wall Lights
- Low-Voltage Versus Solar
- How Many Lights and What Spacing
- Installing Under-Cap Hardscape Lights
- Choosing Color Temperature
- Sizing the Transformer
- Wiring Runs and Voltage Drop
- Seasonal Care and Troubleshooting
- Design Techniques for a Custom Look
- Budgeting Your Project
Why Light a Retaining Wall
Lighting serves two jobs at once. First, safety: a wall often borders a patio, steps, or a change in grade where a misstep in the dark means a fall. Second, atmosphere: grazing light across textured block or natural stone reveals depth and shadow that daylight flattens out.
There is also a resale angle. Landscape lighting consistently ranks among the higher-return exterior upgrades, and a lit wall reads as a finished, custom feature rather than a raw retaining structure.
Types of Retaining Wall Lights
Fixture choice depends on whether the wall is already built and where you want the light to fall. Here are the main options I install:
- Hardscape lights — flat, low-profile bars that mount under a cap stone and throw light downward across the block face. The most popular choice for a hidden, glare-free wash.
- Cap or surface lights — small pucks that sit on top of the wall or on pillar caps to mark corners and columns.
- Recessed paver lights — units set into the wall face or adjacent steps, flush with the surface, ideal for stair risers.
- In-grade well lights — placed at the base to uplight the wall and any plantings above it.
For most projects, hardscape lights tucked under the coping stone give the cleanest result because the fixture disappears entirely and only the glow remains.
Low-Voltage Versus Solar
You have two power paths. Low-voltage systems run on 12 volts from a transformer plugged into a GFCI outlet, delivering bright, consistent, all-night performance you can control on a timer. Solar fixtures need no wiring at all but depend on daily sun, dim as batteries age, and often fade by the early morning hours.
For a permanent, polished installation, low-voltage wins every time. I reserve solar for quick, temporary, or hard-to-wire spots. A quality 12-volt LED hardscape light draws only 2 to 4 watts, so a single 150-watt transformer easily powers a dozen or more fixtures.
How Many Lights and What Spacing
Spacing controls whether your wall looks evenly washed or spotty. As a rule of thumb, place hardscape lights 6 to 8 feet apart along the length of the wall. Tighten that to 4 to 6 feet if you want a brighter, more continuous band of light or if the wall is tall.
For steps, put a light at every landing and at any turn. Count your linear footage, divide by your chosen spacing, and add one fixture for each corner or column. A 40-foot wall at 8-foot spacing needs roughly five to six lights.
Installing Under-Cap Hardscape Lights
Retrofitting an existing capped wall is straightforward if the cap stones are set with adhesive you can break loose. On a new build, you simply run the wire before you glue the caps down.
- Lay out fixture positions and mark them along the top course.
- Run 12-gauge or 14-gauge low-voltage cable along the back of the top block, hidden behind the cap overhang.
- Connect each fixture with waterproof gel-filled connectors to prevent corrosion.
- Tuck the fixture and wire under the lip of the cap stone so nothing is visible from the front.
- Re-adhere the caps with a masonry-rated construction adhesive like Loctite PL 500.
- Bury the home-run cable and connect it to the transformer at a GFCI outlet.
Set the transformer on a photocell or astronomic timer so the lights come on at dusk automatically.
Choosing Color Temperature
Color temperature dramatically changes the mood. For natural stone and warm-toned block, stick with 2700K to 3000K, a soft warm white that flatters earth tones and feels inviting. Cooler 4000K light looks harsh and clinical on residential hardscape and should be avoided unless you specifically want a modern, bluish cast.
Lumen output matters too. For a subtle wall wash, 80 to 120 lumens per fixture is plenty. Going brighter often creates hot spots and glare rather than an even glow.
Sizing the Transformer
Getting the transformer right keeps your lights bright and your system reliable. The transformer steps household 120-volt power down to the safe 12 volts that low-voltage fixtures use, and it must be large enough to handle the combined wattage of every light you connect.
Add up the wattage of all your fixtures, then choose a transformer rated at least 20 to 30 percent above that total to leave headroom. A dozen 3-watt LED hardscape lights draw only 36 watts, so a 60-watt transformer would technically cover them, but a 150-watt unit gives you room to expand later. Look for a transformer with a built-in photocell or astronomic timer so the lights switch on at dusk and off at a set hour automatically, with no thought on your part.
Wiring Runs and Voltage Drop
Voltage drop is the silent problem that makes the last light on a long run look dimmer than the first. As current travels down the cable, it loses a little voltage, and fixtures far from the transformer can end up noticeably darker. On a modest wall it rarely matters, but on a long run it does.
Two techniques solve it. Use a heavier gauge cable, 12-gauge instead of 14-gauge, to reduce resistance over distance. Or wire the fixtures in a hub or loop layout rather than one long daisy chain, so power reaches the far lights more evenly. For most residential walls under 100 feet with efficient LEDs, a single 12-gauge run keeps every fixture even and bright.
Seasonal Care and Troubleshooting
Low-voltage systems are famously low-maintenance, but a little seasonal attention keeps them looking their best. A few times a year, walk the wall and wipe grime off the lenses, since dirt dims the output far more than people expect.
- Clear leaves and mulch that pile against fixtures and block the light
- Check that gel-filled connectors are still sealed and corrosion-free
- Trim back plantings that have grown to shade or hide the fixtures
- Test the timer and photocell each season and reset the on-time as daylight shifts
If a single light goes dark, suspect a loose or corroded connector before the fixture itself. If a whole section fails, check the connection back at the transformer. Because LEDs last 25,000 hours or more, an outright fixture failure is rare; loose connections cause nearly all the problems you will see.
Design Techniques for a Custom Look
Placement is where a lighting job goes from functional to genuinely beautiful. The best installers think about how light interacts with the wall’s texture, not just how to make things visible. A few techniques deliver an outsized payoff.
Grazing is the workhorse move for a rock or block wall. By mounting lights close to the surface and aiming them along it, you rake light across the stone, and every bump and joint casts a small shadow that reveals the wall’s texture and depth. A flat wash from far away flattens that same wall into a featureless plane, so keep the fixtures tight to the surface.
- Combine under-cap grazing with a few uplights at the base for layered dimension
- Light the steps and any grade changes first, since safety comes before drama
- Mark columns and corners with a subtle cap light to define the wall’s shape
- Avoid over-lighting; gaps of shadow between pools of light create rhythm and interest
- Extend the same warm color temperature to nearby path and tree lights for a cohesive scene
Resist the temptation to make everything bright and even. A wall lit with intentional light and shadow reads as a designed landscape feature, while one flooded uniformly looks like a parking lot. Aim for pools of warm glow separated by quiet darkness, and the whole yard gains a sense of depth after dusk.
Budgeting Your Project
Costs stay reasonable for a DIY install. Quality low-voltage hardscape lights run $25 to $50 each, a 150-watt transformer is about $80 to $130, and direct-burial cable adds roughly $0.40 per foot. A typical 40-foot wall project lands around $300 to $500 in materials.
Hiring a landscape lighting contractor pushes that to $1,500 or more for the same wall, largely in labor. Since the wiring is low voltage and safe for homeowners to handle, this is a project well worth doing yourself. Thoughtfully placed retaining wall lights deliver an outsized payoff for a modest weekend of work.