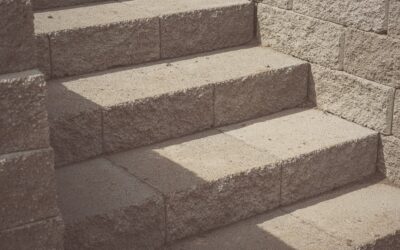
A sloped yard that forces you to scramble up a muddy grade is begging for a set of stairs built into the hillside. Well-designed retaining wall steps turn an awkward slope into a usable, handsome transition between levels, tying your terraces together while holding back the soil that would otherwise wash across your path. The engineering isn’t complicated, but it is unforgiving: get the base prep, the rise-and-run, and the drainage right, and the stairs will outlast the house. Get them wrong, and they’ll heave, tilt, and trip you within a season.
Planning the Rise and Run
Comfortable, code-friendly stairs live within a narrow range of dimensions, and your whole layout flows from them. Aim for a rise of 6 to 7 inches per step and a tread depth (run) of at least 12 inches, with 16 to 18 inches feeling generous and relaxed for outdoor stairs. Measure the total vertical drop of your slope, divide by your target rise, and round to a whole number of steps. That number sets everything else.
Keep the rise consistent from step to step. The human body memorizes a stair’s rhythm within the first two treads, so a single odd step is where people stumble. Once you know the count and the run, stake out the run of the staircase on the ground so you can see the footprint before you dig. Longer runs feel more like a garden path; shorter, steeper flights save space but demand a handrail.
Excavation and the All-Important Base
Every failure I’ve seen in DIY retaining wall steps traces back to a shortcut in the base. Dig out the bottom step’s footing below the frost line for your region, or at minimum 6 to 8 inches, and wider than the block by several inches front and back. Fill that trench with 4 to 6 inches of compacted, angced crushed stone (often called Class II road base or 3/4-inch minus), leveled and tamped in 2-inch lifts.
Compaction is not optional. Rent a plate compactor and run it until the gravel stops moving under the plate. This base does two jobs: it spreads the load so the steps don’t sink unevenly, and it drains water away so freeze-thaw cycles can’t lift the blocks. A perfectly level first course is the reference for the entire staircase, so spend real time getting it right with a long level.
Choosing Your Materials
Several block systems build attractive, durable steps, each with trade-offs in cost and labor:
- Segmental retaining wall (SRW) block: interlocking concrete units, $3 to $8 each, no mortar, DIY-friendly
- Large stone slabs or treads: natural bluestone or granite, striking but heavy and pricey
- Poured concrete: monolithic and strong, but requires forming and finishing skill
- Timber (pressure-treated 6×6): fast and affordable, $20 to $40 per timber, 15 to 20-year lifespan
SRW block is the most forgiving for a homeowner because the units interlock and self-align, and manufacturers like Belgard, Techo-Bloc, and Pavestone make matching wall block and step treads so the whole project reads as one design. Timber steps go in fastest and cost the least but won’t last as long as concrete or stone.
Building the Steps Course by Course
Start at the bottom and work up, because each step sits partly on the one below it. Set the first course of block on your compacted base, check it dead level in both directions, and backfill behind it with drainage gravel. The tread of the first step becomes the base for the back of the second step, so you’re building a staircase of overlapping shelves into the hillside.
Use a construction adhesive rated for masonry between capstones and treads so they can’t shift underfoot. As you climb, keep checking level and consistent rise; a small error compounds over eight steps into an obvious lean. Batter, or set each course back slightly, if your steps double as a retaining structure holding significant soil, which improves stability against the load pushing from behind.
Drainage: The Hidden Half of the Job
Water is what destroys hillside stairs, and it attacks from behind and below. Behind each step, backfill with clean 3/4-inch gravel rather than native soil, and separate the gravel from the surrounding dirt with landscape fabric so silt doesn’t clog the drainage over time. For taller staircases doubling as retaining walls, run a perforated drain pipe (a French drain) along the base to carry water out to daylight.
Slope every tread a slight 1/8 to 1/4 inch per foot toward the front so rain sheds off instead of pooling. Standing water freezes, expands, and jacks the treads loose, and it also makes stone slick. Good drainage is invisible when it works, which is exactly why so many homeowners skip it and pay for it later.
Safety, Codes, and Finishing Touches
Check your local code before you build. Many jurisdictions require a handrail once a flight exceeds a certain number of risers, commonly four, and walls over 3 or 4 feet often need an engineered design or a permit. Even where it isn’t required, a rail on a long flight is a wise addition for wet weather and older family members.
Finish by capping the wall alongside the steps, adding low-voltage step lights for safety after dark, and planting the flanking terraces to soften the hardscape and lock the soil with roots. Done well, retaining wall steps become the spine of the landscape, a permanent, inviting route through the yard that adds real value and gets used every single day.
Tools, Materials, and Cost to Budget
Pricing a set of retaining wall steps depends heavily on the material and whether you rent the right equipment. For an SRW block staircase of six to eight steps, plan on roughly $600 to $1,500 in block, base gravel, drainage stone, and adhesive, plus rental costs. Timber steps come in cheaper at $300 to $800, while natural stone treads can push the material bill past $2,500. Hiring a contractor for the same project typically runs $2,500 to $6,000 depending on height and access.
Don’t skimp on rentals; a plate compactor and a hand tamper are non-negotiable for a lasting base, and a masonry saw or a grinder with a diamond blade makes clean cuts on block and cap. You’ll also want a long level, a line level and mason’s string, a rubber mallet, a wheelbarrow, and a sturdy shovel and mattock for excavation. Order about 10 percent extra block to cover cuts and the odd broken unit, and have the gravel delivered rather than hauling dozens of bags.
Landscaping and Long-Term Care
Finished steps look best when they’re integrated into the surrounding grade rather than left as a bare concrete intrusion. Plant the flanking terraces with low, spreading groundcovers and shrubs whose roots help lock the soil and soften the hardscape’s edges. Creeping juniper, liriope, and ornamental grasses all knit a slope together and reduce erosion at the wall’s base, and a bed of mulch keeps weeds down between plantings.
Maintenance is light but worth doing. Each spring, walk the staircase and check for any block that has shifted or a tread that’s begun to tip, catching movement early before it worsens. Keep the drainage outlets clear of leaves and silt so water still escapes, and top off the polymeric or gravel joints if they’ve washed low. Re-level any capstone that’s loosened with a fresh bead of masonry adhesive. A few minutes of attention a year keeps retaining wall steps safe and true for decades.
Final Word
Retaining wall steps reward patience over speed. Nail the rise-and-run math, over-build the base, respect drainage, and work bottom to top with constant level checks. Do that, and you’ll build a flight that stays true through decades of freeze-thaw, turning a difficult slope into one of the most useful and attractive features on the property.