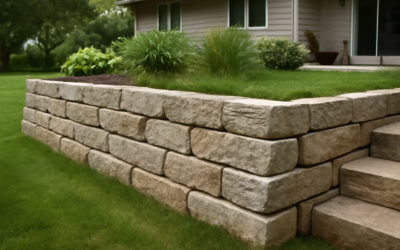
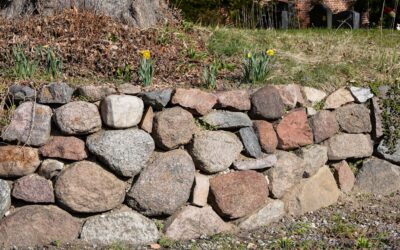
A sandstone block retaining wall brings natural, timeless beauty to a landscape while doing the serious structural work of holding back soil, controlling erosion, and creating usable level areas on a sloped property. Sandstone’s warm earth tones and organic texture make it one of the most sought-after materials for garden walls, terraced beds, and hardscape features. This guide covers everything American homeowners need to understand, from design and drainage to construction methods, costs, and the decisions that determine whether a wall lasts for decades.
- Why Choose Sandstone
- Understanding Retaining Wall Basics
- Dry-Stack vs. Mortared Construction
- Planning and Design
- The Critical Role of Drainage
- Step-by-Step Construction Overview
- Cost Considerations
- DIY vs. Hiring a Professional
- Maintenance and Longevity
- Choosing and Sourcing Your Sandstone
- Working With Sloped and Curved Layouts
- Building Something That Lasts
Why Choose Sandstone
Sandstone stands out for both its looks and its workability. Formed from compressed sand over millions of years, it offers a range of natural colors, from buff and tan to red, gold, and brown, that blend beautifully with plantings and other stone. It splits into relatively flat, stackable pieces, making it easier to build with than rounded fieldstone. Sandstone is also durable when properly installed, resisting weathering while developing an attractive patina over time. For homeowners who want a wall that looks like it belongs in the landscape rather than a manufactured concrete product, natural sandstone is a premium choice.
Understanding Retaining Wall Basics
A retaining wall’s job is to resist the enormous lateral pressure of the soil behind it, which increases with height and water content. That pressure is why proper engineering matters. Key principles apply to any material:
- The wall must have a solid, compacted base to prevent settling.
- Drainage behind the wall is essential; trapped water multiplies soil pressure and causes failure.
- Taller walls need a batter, a slight backward lean, or a reinforced design.
- Walls over a certain height, often 3 to 4 feet, typically require a permit and engineering.
Ignoring these fundamentals is the number one reason retaining walls bulge, lean, and collapse within a few years.
Dry-Stack vs. Mortared Construction
Sandstone retaining walls are built two main ways. A dry-stack wall relies on the weight, friction, and careful fitting of the stones with no mortar, allowing slight flexibility and natural drainage between joints. Dry-stack walls have a rustic, informal look and are forgiving of minor ground movement. A mortared wall bonds the stones with mortar for a solid, formal appearance and greater strength, but it requires weep holes for drainage and a proper concrete footing below the frost line. Dry-stack suits lower garden walls, while mortared construction is common for taller or more formal installations.
Planning and Design
Good planning prevents costly mistakes. Start by determining the wall’s purpose and height, then check local codes; many jurisdictions require permits and engineered drawings for walls taller than 3 or 4 feet. Call 811 to have underground utilities marked before any digging. Consider whether a single tall wall or a series of shorter terraced walls better suits your slope; terracing reduces the load on each wall and can be more visually appealing and easier to build. Sketch the layout, calculate the square footage of the wall face, and estimate the stone tonnage needed, remembering that sandstone is sold by weight or pallet.
The Critical Role of Drainage
Drainage is the single most important factor in a lasting sandstone wall. Water building up behind the wall dramatically increases pressure and, in cold climates, freezes and expands, heaving the stones. A proper drainage system includes:
- A layer of crushed gravel backfill directly behind the wall face.
- A perforated drain pipe (French drain) at the base, sloped to daylight or a drain, to carry water away.
- Landscape fabric separating the gravel from the native soil to keep fines from clogging the drainage.
- Weep holes in mortared walls to let water escape through the face.
Skimping on drainage guarantees eventual failure no matter how well the stone is stacked.
Step-by-Step Construction Overview
Building a sandstone retaining wall follows a logical sequence:
- Excavate the trench for the base, digging wide and deep enough for a compacted gravel footing, typically 6 to 8 inches deep and wider than the wall.
- Build the base, filling the trench with crushed stone, then compacting and leveling it carefully; a level first course is critical.
- Set the first course of the largest, flattest stones, checking level in every direction. This foundation row determines the whole wall.
- Stack subsequent courses, staggering the joints like brickwork so no vertical seams line up, and battering the wall slightly back into the slope.
- Backfill with gravel and install the drain pipe as you build up, compacting behind each course.
- Cap the wall with broad, flat capstones for a finished look and to shed water.
Patience with the base and joint staggering makes the difference between a wall that lasts and one that doesn’t.
Cost Considerations
Sandstone retaining walls sit at the premium end of the price spectrum. Natural sandstone material typically costs $30 to $60 per square foot of wall face installed, though prices vary by region and stone quality. A professionally built wall, including excavation, base, drainage, and labor, often runs $40 to $75 per square foot or more, since natural stone masonry is labor-intensive. DIY construction saves substantially on labor but requires renting a plate compactor, moving heavy stone, and investing significant time. Budget extra for drainage materials, delivery of heavy stone, and permits where required.
DIY vs. Hiring a Professional
A short dry-stack garden wall under 3 feet is achievable for a fit, determined DIYer with time and the right tools, and it can be very rewarding. However, sandstone is heavy, the work is physically demanding, and mistakes in the base or drainage are expensive to fix. Taller walls, mortared construction, walls near structures, and anything requiring engineering are best left to an experienced mason or landscape contractor. A professional brings the equipment, knowledge of local codes, and craftsmanship that ensures the wall performs and looks right for decades.
Maintenance and Longevity
A well-built sandstone wall needs little upkeep, but a few habits extend its life. Keep the drainage outlets clear so water always has an escape path. Inspect after heavy rains and freeze-thaw cycles for any bulging, leaning, or shifted capstones, addressing small movements before they worsen. Sandstone is somewhat porous, so in harsh climates a breathable stone sealer can reduce water absorption and spalling, though many homeowners prefer the natural aging. Keep large tree roots and burrowing pests from undermining the base.
Choosing and Sourcing Your Sandstone
The stone you select shapes both the wall’s appearance and how easily it goes together, so it pays to shop thoughtfully. Sandstone is sold in several forms: rough quarried blocks with irregular faces for a rustic dry-stack look, sawn or dimensioned blocks with flat, uniform surfaces for a tidier appearance, and thinner flagging pieces better suited to veneer than structural walls. When buying, look for stone that splits cleanly along flat beds, since flat pieces stack far more stably than rounded ones. Color varies by quarry and even by batch, so order all your stone at once and from the same source to keep the tones consistent across the wall. Sandstone is heavy, typically sold by the ton or by the pallet, and delivery of several tons requires a truck with offloading equipment, so factor delivery access and cost into your planning. Buying about 10 percent extra accounts for breakage, culling of unsuitable pieces, and the inevitable need for shaping stones to fit.
Working With Sloped and Curved Layouts
Real yards rarely offer a flat, straight run, so understanding how to handle slopes and curves matters. On sloping ground, the base course should be stepped rather than following the grade, keeping each section of the foundation level and creating a series of level shelves that the courses above build on. This stepped footing prevents the stones from sliding downhill and keeps the wall structurally sound. For curved walls, which look beautiful winding through a garden, work with smaller stones that accommodate the radius, and adjust each piece to maintain tight joints along the curve. Gentle curves are more forgiving and stronger than tight ones, which concentrate stress. Whether stepping up a slope or bending around a bed, the same core rules hold: keep every course level, stagger the vertical joints, batter the face slightly back into the hill, and never sacrifice drainage. Taking extra care with the base on uneven terrain is the surest way to keep a sandstone wall standing straight for decades.
Building Something That Lasts
A sandstone block retaining wall rewards careful construction with decades of natural beauty and reliable slope control. Success comes down to fundamentals: a solid compacted base, meticulous drainage, staggered joints, a slight backward batter, and respect for height limits and permits. Whether you build a modest garden terrace yourself or hire a mason for a larger structural wall, investing in proper design and drainage from the start ensures your sandstone wall stays straight, sound, and stunning for generations to come.