Shiplap went from an obscure builder term to a mainstream design staple in under a decade, and the trend shows no signs of fading. The right shiplap wall ideas add texture, dimension, and character to any room without the commitment or cost of a full renovation. Whether you prefer the rustic farmhouse look or a clean contemporary application, shiplap adapts to your style.
Types of Shiplap Material
Before picking a design, understand what you are working with. True shiplap has a rabbet joint cut into the edges so boards overlap and interlock. Many modern “shiplap” products are actually nickel-gap or tongue-and-groove boards that create a similar look with different joint profiles.
- Solid pine shiplap — $1.50-$3.00 per sq ft. The classic choice. Takes paint and stain well. Available in 1×6 and 1×8 widths at most lumber yards.
- MDF shiplap panels — $1.00-$2.00 per sq ft. Pre-primed and ready to paint. Not suitable for bathrooms or high-moisture areas.
- PVC shiplap — $2.50-$5.00 per sq ft. Waterproof and ideal for bathrooms, laundry rooms, and exterior applications.
- Peel-and-stick shiplap — $3.00-$6.00 per sq ft. No tools required. Renter-friendly but less durable long-term.
- Reclaimed wood shiplap — $5.00-$12.00 per sq ft. Authentic patina that cannot be replicated with stain. Source from reputable salvage dealers to avoid hidden pests.
Living Room Accent Walls
The fireplace wall is the most popular spot for shiplap in living rooms, and for good reason. Horizontal white-painted boards flanking a fireplace surround create depth and frame the focal point naturally. Run the shiplap from floor to ceiling for maximum impact, wrapping around the mantel and any built-in shelving.
For a more modern take, try vertical shiplap in a dark tone like charcoal or deep navy behind your main seating area. Vertical orientation draws the eye upward, making 8-foot ceilings feel taller. Pair dark shiplap with light furniture and metallic accents to keep the room from feeling heavy.
Bedroom Shiplap Wall Ideas
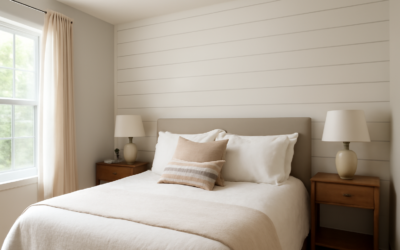
Behind the headboard is the natural placement in bedrooms. A wall of white or soft gray shiplap provides texture without competing with bedding and artwork. Extend the boards behind flanking nightstands and up to the ceiling line for a cohesive look.
Consider painting the shiplap the same color as the remaining walls for a tone-on-tone effect. This adds texture and dimension without the contrast of a typical accent wall. It works especially well in smaller bedrooms where a bold color change might feel choppy.
Bathroom Applications
Shiplap in bathrooms demands moisture-resistant material. PVC boards are the safest bet, though properly sealed pine works in half-bath and powder room settings where humidity stays lower. Avoid MDF entirely in any bathroom.
Install shiplap in bathrooms as wainscoting at 36-48 inches high rather than full-height coverage. This keeps the material away from direct shower splash zones while adding character below towel bar height. Top the wainscoting with a simple cap rail for a finished edge. White shiplap below with a painted upper wall in sage green, navy, or warm gray is a combination that always delivers.
Ceiling Applications
Shiplap on the ceiling is an underused trick that transforms plain rooms. A vaulted living room or a flat bedroom ceiling wrapped in whitewashed pine shiplap adds architectural interest where there was none. Expect to pay 20-30% more in labor for ceiling installation compared to walls because of the overhead work involved.
Use 1×6 boards on ceilings rather than 1×8. Narrower boards scale better overhead and create more visual lines per square foot. For exposed beam ceilings, run the shiplap perpendicular to the beams to emphasize the structural elements.
Installation Tips for DIYers
Find and mark your studs before starting. A brad nailer with 2-inch 18-gauge nails is the essential tool. Nail through the top of each board into studs, with one nail per stud crossing. Use a level on every third board to catch any drift before it compounds.
Leave a nickel’s width gap between boards for the classic shadow line. Some boards come with built-in spacing, but if yours do not, use actual nickels or 1/16-inch spacers as gauges. Start from the bottom of the wall and work up, cutting the final top board to fit against the ceiling.
For outlets and switches, measure and cut openings carefully with a jigsaw. Purchase outlet box extenders ($1 each) since the shiplap adds 3/4 inch of depth to the wall surface. Forgetting extenders is a code violation and a fire hazard.
Paint and Finish Options
Bright white remains the most popular shiplap finish, but a flat or matte sheen looks more authentic than semi-gloss. Benjamin Moore Simply White (OC-117) and Sherwin-Williams Extra White (SW 7006) are both reliable choices that avoid yellow or blue undertones.
For natural wood looks, a clear matte polyurethane preserves the grain while protecting against dust and fingerprints. Whitewash effects use watered-down paint (50/50 with water) brushed on and wiped back, letting grain show through for a coastal or Scandinavian aesthetic.