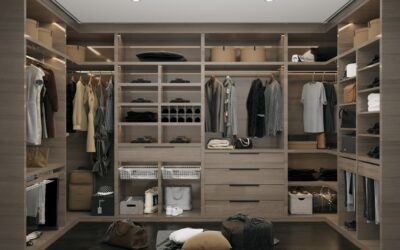
Count the pairs in your entryway and you will probably find twice what you thought, most of them heaped on the floor where they scuff, curl, and disappear. A shoe closet organizer fixes the pile by giving every pair a defined spot, off the ground, visible, and sorted, which is the difference between a five-second grab and a daily hunt. Beyond looks, keeping shoes off a damp floor and out of a jumble genuinely extends how long they last.
A shoe closet organizer can be anything from a simple tiered rack to a full built-in system of cubbies, adjustable shelves, and cabinets. The best choice depends on how many pairs you own, the space you have, and whether you want them hidden or on display.
Why a Shoe Closet Organizer Is Worth It
The obvious benefit is a tidy entry, but the practical wins run deeper. Shoes stored flat and supported keep their shape instead of creasing at the toe or flattening at the heel. Getting them off a garage or mudroom floor protects leather from moisture and lets air circulate, which cuts down on odor and mildew.
There is a real efficiency gain too. When every pair has a home, mornings speed up, and you stop buying duplicates of shoes you forgot you owned. A household of four can easily accumulate 40 to 60 pairs, and without a system that many quickly overwhelms any entry.
Measuring Your Space and Shoe Count
Start with numbers before you buy anything. Count your pairs by category, everyday, dress, athletic, seasonal boots, and measure your available space in inches. A typical adult shoe needs about 7 to 9 inches of width, 12 inches of depth, and 6 to 7 inches of vertical clearance per pair on a flat shelf.
Boots and heels change the math. Tall boots need 15 to 18 inches of vertical space or a dedicated boot shelf, and cleats or work boots run deeper. Sketch your closet or wall, note the total linear inches of shelving you can fit, and divide by roughly 8 inches to estimate capacity. Plan for growth by leaving 15 to 20 percent spare.
Types of Shoe Organizers
There is a format for every budget and space. The common options:
- Tiered floor racks: Inexpensive metal or bamboo racks holding 9 to 20 pairs, $25 to $80. Great for a small entry or closet floor.
- Cubby units: Individual compartments that keep pairs separated and dust-free, ideal for dress shoes.
- Adjustable closet shelving: Wire or wood shelves on a track system, reconfigurable as your collection changes.
- Over-the-door organizers: Fabric pockets that reclaim unused door space for flats and sandals, $15 to $40.
- Cabinets and benches with storage: Hidden storage that doubles as a place to sit and put shoes on.
- Rotating or pull-out systems: Premium hardware that maximizes a deep or awkward closet.
Many homeowners mix formats, cubbies for nice shoes, an open rack for daily sneakers, and a boot tray for wet-weather footwear.
Built-In Systems Versus Ready-Made
You can buy a freestanding solution or build in a custom system, and the right call depends on permanence and budget. Ready-made racks and modular units from stores like The Container Store, IKEA, or a home center install in an hour and can move with you, typically costing $30 to $300.
A built-in system, adjustable shelving mounted to the wall or a carpentered set of cubbies, looks integrated and maximizes every inch, but costs more and stays with the house. Expect $500 to $2,500 for a professionally installed closet system, or a few hundred in materials if you build it yourself. If you rent, or think you might rearrange, start with modular pieces.
Building a Simple DIY Cubby System
A basic plywood cubby unit is a satisfying weekend project. Here is a straightforward approach:
- Decide on cubby size, roughly 9 inches wide by 12 inches deep by 7 inches tall works for most adult shoes.
- Cut 3/4-inch plywood into vertical dividers and horizontal shelves sized to your closet width; a common unit is 3 columns by 4 rows.
- Use a dado joint or simple butt joints with glue and 2-inch wood screws to assemble the grid.
- Anchor the finished unit to wall studs so it cannot tip, especially if children will climb near it.
- Sand, prime, and paint or seal for a wipeable surface that shrugs off scuffs and moisture.
Angle the bottom row slightly forward, or add a shallow lip, so shoes are easy to slide out. A small unit like this holds a dozen pairs and costs under $80 in materials.
Organizing Strategy: Sort Before You Store
The organizer is only half the job; how you load it matters. Purge first, be honest about pairs you have not worn in a year, then sort by frequency and season. Keep daily shoes at eye or waist height where they are easiest to grab, dress shoes in protected cubbies, and out-of-season boots up high or in bins.
Store shoes heel-to-toe to fit more per shelf, and use clear boxes or a labeled system for special-occasion pairs you rarely touch. A boot tray or a mat under the everyday zone catches mud and melting snow so it does not pool on the closet floor. For anyone with a large collection, arranging by color within each category makes finding a specific pair almost instant.
Solutions for Specific Spaces
Different footprints call for different tactics. In a narrow entryway with no closet, a shallow shoe cabinet just 7 to 9 inches deep, with tilt-out drawers that store shoes on angled shelves, hides a dozen pairs against the wall without eating floor space. In a mudroom, a bench with cubbies underneath doubles as seating and keeps wet boots on a wipeable tray. For a reach-in closet, adding a second shelf near the floor and a row of shelves up high instantly doubles capacity over a single rack.
Walk-in closets and garages have room for more ambitious systems. Adjustable wall-mounted shelving lets you dedicate a full column to shoes and reconfigure the spacing seasonally, tightening it for flats and opening it up for boots. In a garage, wall-mounted or overhead racks keep muddy yard shoes and sports cleats off the car bay floor. Match the depth of any shelf to a 12-inch shoe so pairs do not hang over the edge or get lost at the back.
Protecting Shoes in Storage
Storage is also about preservation, not just tidiness. Boot shapers or rolled magazines keep tall boots upright so they do not flop over and crease at the ankle, and cedar shoe trees wick moisture and hold the shape of leather dress shoes between wearings. For seasonal footwear you are packing away, clear labeled bins with a silica gel packet keep dust and dampness out.
Sunlight and heat are quiet enemies. Storing leather and colored fabric shoes out of direct sun prevents fading and drying, so an enclosed cabinet beats an open rack for anything valuable. Let athletic shoes and boots air out for a day before returning them to a closed cubby, trapping damp shoes in an enclosed space is how odor and mildew take hold.
Keeping It Neat Long Term
Maintenance keeps the system from sliding back into a pile. Adopt a one-in, one-out habit so the collection does not creep past capacity. Wipe shoes before they go back and let wet pairs dry on the tray before returning them to their spot. A cedar block or a small deodorizer in the closet controls odor, and cedar naturally repels moisture.
If you share the closet with a partner or the whole family, give each person a defined zone so the system does not blur into a communal pile again. Assign shelves or columns by household member, and reserve the easiest-to-reach spots for the shoes worn daily. A small labeled bin near the door for shoes coming off keeps the transition tidy on busy evenings, so nobody drops footwear in the middle of the floor on the way in.
Measure your space, count your pairs honestly, and match the format to how you actually live, hidden cabinets for a formal entry, open racks for a busy family mudroom. Revisit the collection each season, rotating current footwear to the front and boxing what is out of use, so the system keeps working instead of slowly overflowing. Set up right, a shoe closet organizer turns the messiest corner of the house into the one that always looks put together.