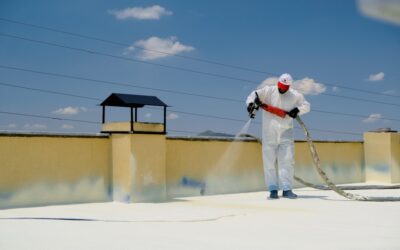
Professional spray foam crews charge thousands to insulate a home, but for smaller jobs a DIY spray foam insulation kit puts that same air-sealing power in your own hands for a few hundred dollars. These self-contained kits pack the two chemical components, hoses, and a spray gun into portable canisters, letting you seal rim joists, insulate a small addition, or fill hard-to-reach cavities without hiring a contractor. Used correctly, they deliver an airtight, high-R-value barrier. Used carelessly, they waste expensive product and make a sticky mess. Here is how to get professional results from a kit.
How DIY Kits Work
A spray foam kit contains two pressurized tanks, an A side (isocyanate) and a B side (resin blend), that stay separate until they meet at the spray gun’s mixing tip. When you pull the trigger, the two chemicals combine, react, and expand within seconds into rigid or semi-rigid foam that sticks to almost any surface and cures hard.
Because the reaction is one-way, timing and technique matter. The mixing tip clogs if you pause too long, so once you start spraying a section you commit to it. Kits come in sizes rated by board feet, a board foot being one square foot covered one inch thick, so a “600 board foot” kit covers 600 square feet at one inch, or 300 square feet at two inches.
Open-Cell vs Closed-Cell Foam
The two foam types behave very differently, and choosing the right one for the job is the most important decision you will make. Most consumer kits are closed-cell.
- Closed-cell foam: Dense and rigid at about R-6.5 per inch, it air-seals, adds structural strength, and blocks water vapor, making it a vapor barrier. Best for rim joists, basements, and anywhere moisture is a concern.
- Open-cell foam: Lighter and spongier at about R-3.7 per inch, it air-seals and dampens sound but is vapor-permeable and absorbs water. Better for interior walls in dry conditions and sound control.
For most homeowner projects, closed-cell delivers the biggest bang: more R-value per inch, an air seal, and a moisture barrier in a single application.
Best Uses for a DIY Kit
Kits shine on targeted, moderate-sized jobs where hiring a pro would be overkill. They are less suited to insulating an entire house, where professional rigs are more economical.
- Sealing and insulating rim joists in a basement, one of the biggest air-leak sources in a home.
- Insulating a small addition, garage, or workshop wall.
- Filling gaps around windows, doors, and penetrations.
- Insulating a van, camper, or shed.
- Air-sealing an attic hatch or knee wall.
What a Kit Costs
DIY foam is not cheap per board foot, but for small jobs it beats a contractor’s minimum service charge. Prices vary by size and formulation.
- Small kit (around 200 board feet): $300 to $400.
- Medium kit (around 600 board feet): $600 to $900.
- Large kit (around 1,000+ board feet): $1,000 to $1,500.
- Professional spray foam, for comparison: $1 to $3 per board foot with a minimum job charge.
The math favors a kit when your job is too small to hit a contractor’s minimum but too big for a few cans of gap-filler foam.
Preparing to Spray
Preparation makes or breaks a foam job. The chemicals are temperature-sensitive and unforgiving of a dirty or wet surface, so set yourself up before you pull the trigger.
Warm the tanks to the temperature range on the label, usually around 75 to 85°F, because cold tanks spray poorly and yield less foam. The surfaces you spray should also be within the recommended temperature range and completely dry and dust-free, since foam will not bond to a damp or dirty substrate. Mask off everything you do not want coated, because cured foam does not come off. Cover the floor, wear disposable coveralls, and have everything within reach, since you cannot stop mid-section without risking a clogged tip.
Application Technique
Good technique means thin, even passes rather than one thick blast. Foam expands fast, and over-applying wastes product and creates a bulging, uneven surface you will have to trim.
Hold the gun a consistent distance from the surface, usually 12 to 18 inches per the instructions, and spray in a steady sweeping motion. Apply closed-cell foam in lifts of no more than two inches, letting each pass rise and cure before adding the next, since a too-thick layer traps heat and can scorch or pull away. Keep the gun moving to avoid puddling. If you must stop for more than about 30 seconds, swap in a fresh mixing tip when you resume, because the old one will have set.
Safety Precautions
Spray foam chemicals demand respect. The isocyanate component can sensitize your lungs and skin, so protection is not optional.
- Wear a properly fitted respirator with organic vapor cartridges, not just a dust mask.
- Cover all skin with disposable coveralls, gloves, and eye protection.
- Ventilate the space well and keep other people and pets out during and after spraying.
- Follow the re-entry time on the label before occupying the space.
- Keep the product away from open flames, since uncured foam and its propellants are flammable.
Common Mistakes to Avoid
Most first-time failures come from cold tanks, thick passes, or poor prep. Spraying with cold canisters is the top culprit, producing off-ratio foam that stays sticky and never fully cures. Applying too thick in one pass is a close second, trapping heat and causing the foam to shrink or delaminate. And spraying onto a damp or dusty surface guarantees poor adhesion. Read the full instructions before you start, do a small test spray to confirm the foam rises and cures firm, then work steadily through your planned sections.
Calculating How Much Foam You Need
Kits are rated in board feet, and estimating your needs prevents the frustration of running dry mid-job or overbuying an expensive kit. One board foot equals one square foot of coverage at one inch of thickness. To estimate, measure the square footage of the surface you want to insulate and multiply by your target thickness in inches.
Say you are sealing rim joists totaling 120 square feet and you want two inches of closed-cell foam. That is 120 times 2, or 240 board feet, so a 200-board-foot kit falls short and you would step up to a larger size. Always build in a 10% to 15% cushion, because real-world yield is lower than the label’s ideal-condition rating; cold tanks, overspray, and less-than-perfect technique all eat into coverage. It is far cheaper to have a little left over than to stop halfway and wait days for a second kit to arrive.
Curing, Trimming, and Cleanup
Once sprayed, closed-cell foam becomes tack-free within minutes and fully cures over the following hours. Resist the urge to touch or trim it too soon; give it the time on the label to reach full strength. If the foam expanded past where you want it, you can shave the excess flush with a handsaw or a long serrated knife after it hardens, which is handy when a rim joist bay bulges proud of the framing.
Cleanup is unforgiving because cured foam does not dissolve. Wipe fresh, uncured overspray immediately with acetone before it sets, and keep rags and solvent within reach while you work. Once foam hardens on a surface, mechanical removal, scraping or sanding, is the only option. This is exactly why thorough masking beforehand pays off, and why you should never spray near anything you cannot afford to permanently coat. Dispose of empty tanks and used tips according to the manufacturer’s instructions and local hazardous-waste rules.
Is a Kit Right for Your Project?
For rim joists, a small addition, or targeted air-sealing, a DIY spray foam insulation kit delivers contractor-grade results at a homeowner-friendly price, provided you warm the tanks, prep the surface, spray in thin passes, and gear up for safety. For insulating a whole house or any large area, get quotes from professional installers, whose truck-mounted rigs are more economical at scale. Match the kit to the job, respect the chemistry, and you will seal and insulate like a pro.