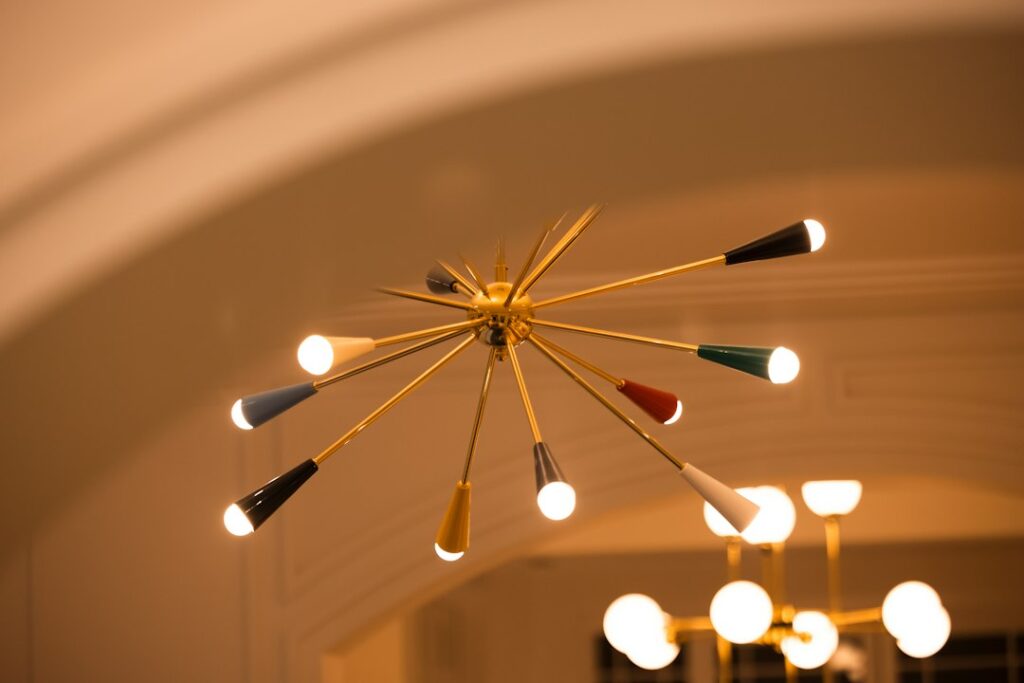
A sputnik chandelier is easy to love in a photo and surprisingly easy to get wrong in a real room. The starburst shape spreads wide, every arm ends in an exposed bulb, and a fixture that looked balanced online can end up crowding a small dining nook or blinding anyone who sits under it. The fixes are simple once you know them: choose the arm count and span for the room, use bulbs that tame glare, and hang it at a height that lets the silhouette show without putting light in people’s eyes.
Named after the 1957 satellite, the design became a signature of mid-century modern interiors and has stayed popular because it works in so many settings. A brass starburst warms a walnut dining room. A matte black version adds graphic contrast to a white kitchen. A chrome one looks right at home in a retro-styled bar area. The shape is the same; the room decides the details.
- Why a Sputnik Chandelier Works in So Many Rooms
- Arm Count and Span by Room
- Bulb Choice for Glare Control
- Pairing With Mid-Century Dining Sets
- Hanging Height and Installation Steps
- Troubleshooting Starburst Fixtures
- Cost Ranges and When to Call a Pro
- Frequently Asked Questions
- What size sputnik chandelier do I need for a dining table?
- How many arms should a starburst fixture have?
- How do I stop exposed bulbs from causing glare?
- Can a mid-century starburst work in a modern farmhouse room?
- Are sputnik fixtures hard to clean?
- Can I install a sputnik chandelier on a sloped ceiling?
Why a Sputnik Chandelier Works in So Many Rooms
Most chandeliers are built around a single central mass of light. Sputnik light fixtures do the opposite: they push light outward in every direction from a small central hub. That makes them excellent at lighting a whole room evenly from one point, but it also means the fixture’s visual footprint is defined by its arms, not its body. A 30-inch starburst with thin rods looks lighter than a 30-inch drum shade, yet it fills more of the air around it.
That airy quality is why a modern sputnik chandelier suits open-plan spaces, where a solid fixture might block sightlines between kitchen, dining and living areas. It is also why the style can overwhelm a small room with low ceilings if you pick too many arms or too wide a span.
Arm Count and Span by Room
Listings usually describe these fixtures by the number of arms (or “lights”) and the overall diameter. Use the room and the furniture beneath the fixture to set both numbers.
Dining rooms
Measure your table. A good span is one-half to two-thirds of the table’s width for a round table, or roughly half the length for a rectangular table, while staying at least 12 inches in from each edge. For a 42-inch round table, a 24- to 28-inch fixture with 6 to 12 arms looks proportional. For a 72-inch rectangular table, a 30- to 36-inch fixture with 12 to 18 arms holds its own. Very long tables often look better with two smaller starbursts than one enormous one.
Living rooms and open areas
Use the room-sum rule: add length and width in feet, and use that number in inches as your diameter. A 14 by 16 foot living room suggests about 30 inches. With no table below, clearance is the priority, so plan for at least 7 feet from the floor to the lowest bulb.
Entries and stairwells
Two-story foyers can take a larger fixture, 30 to 40 inches with 18 or more arms, because people see it from below and from the landing. A one-story entry under 8 feet usually wants a semi-flush starburst instead of a hanging version.
Bedrooms and small rooms
Choose a 6- to 8-arm fixture around 20 to 24 inches wide, and consider a semi-flush mount on ceilings under 9 feet. Fewer arms keep the room from feeling busy and make bulb glare easier to control.
Bulb Choice for Glare Control
Exposed bulbs are the signature of the style and the biggest complaint owners have. A 12-arm fixture with bright clear bulbs puts a dozen hot points of light at eye level for seated diners. Several strategies keep the look without the squinting:
- Lower lumens per bulb: with many arms, each bulb can be small. Bulbs in the 150 to 300 lumen range (roughly a 15 to 25 watt incandescent equivalent) are usually plenty when multiplied across 9 to 18 sockets.
- Frosted or opal globes: small frosted globe bulbs diffuse the light and look softer than clear filament bulbs.
- Half-chrome bulbs: silvered tips reflect light back toward the fixture and ceiling, cutting direct glare dramatically while adding a polished retro look.
- Warm color temperature: 2700K or slightly warmer keeps the light relaxed. Cool light from exposed bulbs feels harsh fast.
- Dimmer: pair the fixture with an LED-compatible dimmer so you can run it at full output for cleaning up and at 30 percent for dinner.
Check the socket type before you shop. Many starbursts use candelabra (E12) sockets, while others use standard medium (E26) bases or G9 pins. Mixing bulb shapes on one fixture almost always looks uneven, so buy one extra pack of matching bulbs for future replacements.
Pairing With Mid-Century Dining Sets
A mid century chandelier is only half of the look. The other half is the table and chairs beneath it, and the two should talk to each other without matching exactly.
- Tulip or pedestal tables: the single base and round top echo the radial shape of a starburst. A brass or white fixture keeps the look light.
- Walnut or teak rectangular tables: warm wood pairs naturally with brass or antique gold arms. Choose a fixture with a slightly elongated or oval spread if you can find one.
- Molded plastic or shell chairs: these read playful, so a black or white fixture with globe bulbs carries the mood.
- Upholstered chairs and heavier tables: pick a fixture with thicker arms or larger globes so it does not look spindly above substantial furniture.
For mid century dining room light that does not feel like a period set, mix one modern element in. A starburst over a simple contemporary table, or a sleek linear fixture over a classic walnut set, keeps the room from looking like a museum exhibit.
Hanging Height and Installation Steps
Over a dining table, set the lowest bulbs 30 to 36 inches above the tabletop with an 8-foot ceiling, and add about 3 inches for each extra foot of ceiling height. In walk-through areas, keep at least 7 feet of clear headroom.
If you are swapping an existing fixture, the job is manageable for a careful DIYer:
- Turn off the breaker for the circuit and confirm power is off at the ceiling box with a non-contact voltage tester. Never work on wiring that is still powered.
- Remove the old fixture and check the electrical box. Note its weight rating; large starbursts with metal globes can be heavier than they look.
- Install the new mounting strap supplied with the fixture.
- Set the downrod or chain length on the ground first, using the measurements from your table or floor.
- Have a helper support the fixture while you connect the wires: black to black, white to white, and the ground to the green screw or bare copper ground.
- Tuck the connections into the box, secure the canopy and thread on each arm or bulb carefully. Many starbursts ship with arms that screw into the hub; tighten them evenly so the fixture balances.
- Restore power and test at low and high dimmer settings.
Use a stable ladder and avoid reaching overhead while balancing a heavy fixture alone. Call a licensed electrician if there is no box at the ceiling, if you need a new switch or dimmer location, or if the house wiring looks damaged, aluminum or very old.
Troubleshooting Starburst Fixtures
- Fixture tilts to one side: one or more arms are not fully threaded, or the globes are uneven in weight. Tighten each arm and confirm the downrod is plumb.
- Some bulbs flicker: check that each bulb is seated, then make sure the dimmer is rated for LED loads and set its low-end trim if it has one.
- Too much glare at the table: lower the lumen output, switch to frosted or half-chrome bulbs, or raise the fixture an inch or two.
- Arms collect dust quickly: dust with a soft brush monthly; rods and globes show dust more than enclosed shades do.
- Fixture feels too big: remove some arms if the design allows, or exchange it for the next size down before installing permanently.
Cost Ranges and When to Call a Pro
Starburst fixtures range from budget versions with thin plated arms to designer pieces in solid brass with hand-blown glass globes. Budget models are fine for secondary rooms, but in a dining room you look at every night, better finishes and sturdier arm joints tend to pay off. Bulbs add up as well, since a 12-arm fixture needs a dozen of them; dimmable LED globes cost more upfront but last many years.
Professional installation of a fixture on an existing box typically falls in the low hundreds of dollars, with higher costs for tall ceilings, added bracing or new wiring. Hire a licensed electrician for any new circuit, a new switch location or a ceiling with no box, and anytime the fixture weight exceeds the box rating.
Frequently Asked Questions
What size sputnik chandelier do I need for a dining table?
Aim for one-half to two-thirds of a round table’s width, or about half the length of a rectangular table, while keeping the fixture at least 12 inches in from each edge.
How many arms should a starburst fixture have?
Six to 8 arms suit small rooms and tables, 9 to 12 suit most dining rooms, and 18 or more work in large open spaces and two-story entries.
How do I stop exposed bulbs from causing glare?
Use low-lumen bulbs, choose frosted globe or half-chrome shapes, stay at 2700K or warmer, and add an LED-compatible dimmer.
Can a mid-century starburst work in a modern farmhouse room?
Yes. A black or aged brass fixture with simple globes can complement a farmhouse table, especially when other fixtures in the room stay quiet.
Are sputnik fixtures hard to clean?
They take more dusting than enclosed shades because every rod and bulb is exposed. A soft brush or microfiber cloth used monthly, with power off and bulbs cool, keeps them looking sharp.
Can I install a sputnik chandelier on a sloped ceiling?
Many models include a swivel canopy or sloped-ceiling adapter. Check the maximum slope listed by the maker before buying.