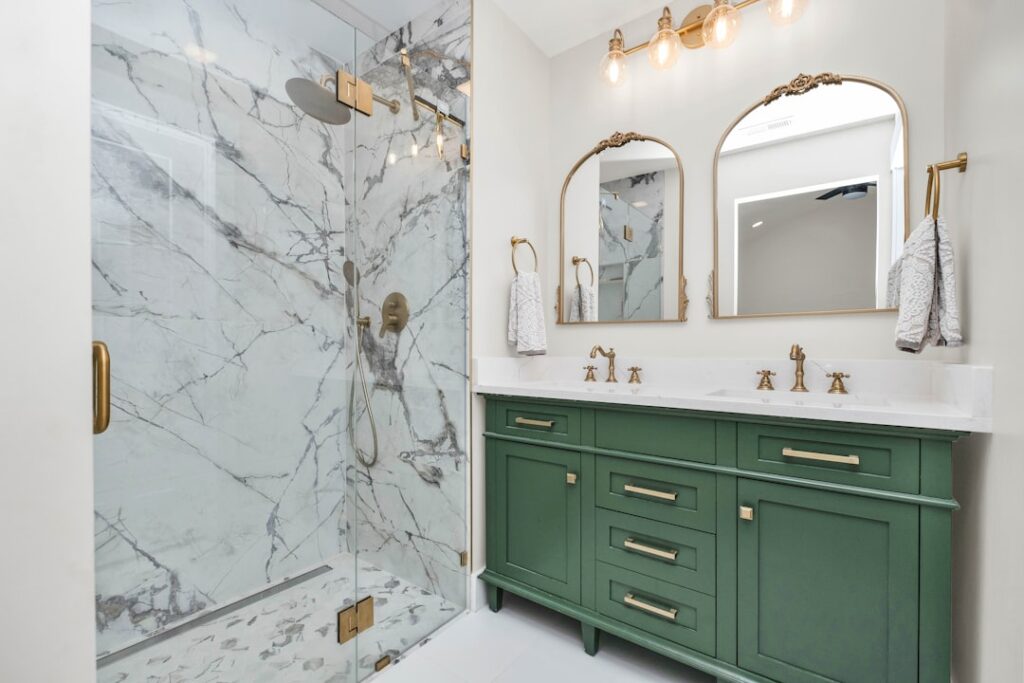
A tiled shower is one of the most impactful upgrades you can make to a bathroom. Unlike prefabricated shower inserts, a tiled shower offers unlimited design possibilities, superior durability, and the kind of premium look and feel that elevates your entire bathroom. However, a tiled shower is also one of the most technically demanding home improvement projects, where mistakes in waterproofing, drainage, or tile installation can lead to costly water damage.
Part of our Bathroom Remodeling & Flooring guide — explore the full guide →
This guide walks you through every aspect of planning, designing, and maintaining a tiled shower, from choosing the right tile material to ensuring a watertight installation that lasts decades.
Choosing Tile for Your Shower
Not all tile is suitable for shower use. The constant exposure to water, humidity, cleaning chemicals, and temperature changes demands tile materials with specific properties. Here are the best options for tile flooring and wall applications in wet environments.
Porcelain Tile
Porcelain is the most popular choice for tiled showers, and for good reason. It is made from refined clay fired at temperatures exceeding 2,300 degrees Fahrenheit, producing a dense, hard tile with a water absorption rate below 0.5 percent. This near-imperviousness to water makes porcelain ideal for every surface in a shower.
- Best for: Shower walls, floors, ceilings, benches, and niches
- Water absorption: Less than 0.5%
- Price range: $2.00 – $15.00 per square foot
- Available sizes: Mosaics to large format (up to 48×48 inches)
- Finishes: Matte, polished, textured, wood-look, stone-look, concrete-look
For shower floors, always choose porcelain with a textured or matte finish rated for wet floor use. Polished porcelain is dangerously slippery when wet and should only be used on walls.
Ceramic Tile
Ceramic tile is made from the same basic materials as porcelain but is fired at lower temperatures, producing a softer, more porous tile. Standard ceramic has a water absorption rate of 3 to 7 percent, which means it absorbs more water than porcelain.
- Best for: Shower walls in well-waterproofed assemblies
- Water absorption: 3% – 7%
- Price range: $0.75 – $8.00 per square foot
- Considerations: Not recommended for shower floors or steam showers due to higher water absorption. Best used on walls with a proper waterproofing membrane behind it.
Natural Stone Tile
Natural stone brings unmatched beauty and uniqueness to a tiled shower. Each piece is one-of-a-kind, with natural variation in color, veining, and texture. Popular shower stones include marble, travertine, slate, and granite.
- Marble: Elegant and classic but requires regular sealing (every 6 to 12 months). Susceptible to etching from acidic cleaners. $5.00 – $25.00 per square foot.
- Travertine: Warm, earthy tones with natural pitting that provides slip resistance. Requires sealing. $3.00 – $15.00 per square foot.
- Slate: Naturally textured and slip-resistant. Excellent for shower floors. Requires sealing. $3.00 – $12.00 per square foot.
- Granite: Extremely durable and water-resistant but heavy and expensive. $5.00 – $20.00 per square foot.
Natural stone in showers requires more maintenance than porcelain and must be sealed regularly to prevent water absorption, staining, and mold growth. For an in-depth look at stone options, see our natural stone flooring guide.
Glass Tile
Glass tile adds luminosity and depth to a shower that no other material can match. It is completely non-porous (0% water absorption), stain-proof, and available in a spectacular range of colors and finishes. Glass tile is typically used as an accent rather than covering the entire shower.
- Best for: Accent strips, niches, feature walls, mosaics
- Water absorption: 0%
- Price range: $7.00 – $30.00+ per square foot
- Considerations: Requires white thinset (gray shows through translucent glass). Harder to cut than ceramic or porcelain. Scratches more visibly than opaque tiles.
Tile Sizes and Layouts for Showers
Popular Tile Sizes
- Mosaic (1×1 to 2×2 inches): Ideal for shower floors due to the many grout lines providing slip resistance. Also used for niches and decorative accents. Available in sheets for easier installation.
- Subway (3×6 inches): The classic shower wall tile. Timeless, affordable, and available everywhere. Can be installed in running bond, herringbone, or stacked patterns.
- Medium format (4×12 to 6×24 inches): A modern upgrade from subway that reduces grout lines while remaining manageable for wall installation.
- Large format (12×24 to 24×48 inches): Creates a sleek, contemporary look with minimal grout lines. Requires a very flat substrate and experienced installation. Heavier tiles may need mechanical support on walls during thinset cure.
Popular Layout Patterns
- Running bond (brick pattern): The most common layout, with each row offset by half a tile. Works with any tile size and complements both traditional and modern styles.
- Stacked (straight set): Tiles aligned in a perfect grid. Creates a clean, modern aesthetic. Requires very consistent tile sizing and precise installation.
- Herringbone: Rectangular tiles arranged in a V-pattern. Adds visual interest and works beautifully on feature walls or shower floors.
- Vertical stack: Subway tiles installed vertically rather than horizontally. A trendy modern look that makes ceilings appear taller.
- Chevron: Similar to herringbone but with angled tile ends that create a continuous zigzag line. More complex to install but visually striking.
- Basketweave: An alternating horizontal and vertical pattern that creates a woven appearance. Best with small to medium rectangular tiles.
Waterproofing: The Most Critical Step
Waterproofing is what separates a tiled shower that lasts 30 years from one that develops mold, rot, and structural damage within 5. The tile and grout themselves are not waterproof barriers. Water penetrates grout lines and tile joints, so a dedicated waterproofing system behind the tile is mandatory.
Sheet Membrane Systems
Schluter Kerdi: The most widely used sheet membrane system. A thin polyethylene membrane bonded to the backer board or drywall with unmodified thinset. The Kerdi system includes pre-formed corners, pipe seals, and curb components for a complete waterproof envelope. Cost: $1.50 to $2.50 per square foot for the membrane.
Laticrete Hydro Ban Sheet Membrane: A fabric-reinforced sheet membrane applied with Laticrete thinset. Provides a strong, flexible waterproof layer. Cost: $1.75 to $2.75 per square foot.
Liquid-Applied Membranes
Custom Building Products RedGard: The most popular liquid waterproofing membrane. Applied by roller or brush in two coats over cement board or fiber cement board. Cures to a flexible, waterproof rubber membrane. Cost: $0.50 to $1.00 per square foot.
Laticrete Hydro Ban: A liquid-applied membrane that is ready for tile once cured (no waiting for a separate sealer). Offers excellent crack isolation. Cost: $0.75 to $1.25 per square foot.
Foam Board Systems
Schluter Kerdi-Board and Wedi Board: These are fully waterproof foam backer boards that serve as both substrate and waterproof membrane. They eliminate the need for a separate waterproofing step. Cost: $3.00 to $5.00 per square foot.
Waterproofing Best Practices
- Waterproof the entire shower enclosure: all walls from floor to at least 3 inches above the showerhead (many professionals waterproof to the ceiling).
- Pay special attention to corners, seams, and penetrations (valve, showerhead, drain). Use pre-formed accessories designed for these locations.
- Conduct a flood test before tiling: plug the drain, fill the shower pan with 2 inches of water, and check for leaks after 24 hours.
- Never rely on grout or caulk as your waterproof barrier. These materials crack and fail over time.
Shower Pan and Drainage
Pre-Made Shower Pans
Prefabricated shower bases from Schluter (Kerdi-Shower-Kit), Wedi, and others provide a pre-sloped, waterproof base ready for tile. These eliminate the need for a traditional mud bed and dramatically reduce the risk of installation errors. Prices range from $300 to $800 for standard sizes.
Traditional Mud Bed
A mortar bed (deck mud) built on-site over a waterproof liner. This method allows for completely custom shapes and sizes but requires significant skill to achieve proper slope (1/4 inch per foot toward the drain) and a watertight connection to the drain assembly. This is the domain of experienced tile professionals.
Linear Drains
Linear (channel) drains sit along one edge of the shower floor rather than the center, allowing the entire floor to slope in one direction. This simplifies large-format tile installation on the shower floor and creates a sleek, modern look. Linear drains cost $150 to $500+ depending on size, brand, and finish.
Grout Selection
Epoxy Grout
Epoxy grout is the gold standard for shower applications. It is waterproof, stain-proof, chemical-resistant, and does not require sealing. The downsides are higher cost ($5 to $12 per pound versus $0.50 to $2.00 for cement grout) and a more difficult, time-sensitive application process.
Cement-Based Grout (Sanded and Unsanded)
Traditional cement grout is more affordable and easier to work with but is porous and requires sealing. Use sanded grout for joints wider than 1/8 inch and unsanded for narrower joints. Seal cement grout within 48 to 72 hours of installation and reseal annually in showers.
Urethane Grout
Urethane grout (like Bostik TruColor or QuartzLock) offers a middle ground: easier to apply than epoxy with similar stain and water resistance. It comes pre-mixed and requires no sealing. Cost falls between cement and epoxy grout.
Caulk vs. Grout at Change of Plane
Where shower walls meet the floor, walls meet each other at corners, and tile meets fixtures, use color-matched silicone caulk rather than grout. These joints need flexibility to accommodate building movement. Grout at change-of-plane joints will crack, allowing water infiltration.
Design Tips for Tiled Showers
- Create a focal point: Use a feature wall, decorative niche, or accent strip to draw the eye. This is where you can splurge on premium tile without breaking the budget.
- Consider maintenance: Dark grout hides dirt better but shows soap scum. Light grout looks clean but requires more frequent cleaning. Epoxy grout eliminates most maintenance concerns regardless of color.
- Plan your niche: Recessed shower niches should be sized to hold standard bottles and placed at a comfortable reaching height. Tile the niche interior with a contrasting or accent tile for visual interest. Slope the bottom shelf toward the shower to prevent standing water.
- Use large tiles to make small showers feel bigger: Fewer grout lines and larger tile surfaces create an illusion of more space.
- Extend tile to the ceiling: Floor-to-ceiling tile looks more polished and intentional than stopping the tile partway up the wall.
- Incorporate a bench: A tiled bench adds function and a luxury spa feel. Floating (cantilevered) benches or corner seats save floor space in smaller showers.
Tiled Shower Cost Breakdown
A complete tiled shower installation involves multiple cost components:
- Tile material: $300 – $2,000+ (depends on tile type, shower size, and design complexity)
- Backer board: $100 – $300
- Waterproofing membrane: $75 – $400
- Shower pan/base: $200 – $800 (prefab) or $300 – $600 (mud bed materials)
- Drain: $50 – $500 (center drain to linear drain)
- Grout and thinset: $50 – $200
- Professional labor: $1,500 – $5,000 (varies enormously by region and complexity)
- Total range: $2,500 – $9,000+ for a typical 35 to 50 square foot shower
High-end materials (natural stone, glass mosaic, linear drain, frameless glass door) can push the total well above $10,000 for a luxury tiled shower.
Maintenance and Cleaning
Daily and Weekly Care
- Squeegee walls after each use to reduce water spots and soap scum buildup
- Run the bathroom exhaust fan during and 15 to 20 minutes after showering to remove humidity
- Wipe down glass doors weekly with a glass cleaner or white vinegar solution
Monthly Deep Cleaning
- Scrub tile and grout with a non-abrasive bathroom cleaner and a stiff brush
- For cement grout, use a grout-specific cleaner or a baking soda paste
- Clean the drain cover and remove any hair or debris from the drain
- Inspect caulk joints for separation, cracking, or mold growth
Annual Maintenance
- Reseal cement grout (not needed for epoxy or urethane grout)
- Reseal natural stone tile per manufacturer recommendations
- Replace any cracked, peeling, or moldy caulk with fresh silicone
- Inspect for any cracked tiles, loose tiles, or soft spots that could indicate water intrusion behind the tile
Common Tiled Shower Mistakes
- Skipping waterproofing: Tile and grout are not waterproof. Without a proper membrane, water reaches the framing and causes rot and mold.
- Using drywall in the shower: Regular drywall and even moisture-resistant drywall (green board) are not appropriate substrates for shower tile. Use cement board, fiber cement board, or waterproof foam board.
- Incorrect shower floor slope: The shower floor must slope at 1/4 inch per foot toward the drain. Improper slope causes standing water, which accelerates mold growth and grout deterioration.
- Polished tile on the shower floor: Polished or glossy tile on the shower floor is a serious slip hazard. Always use textured, matte, or mosaic tile on shower floors.
- Grouting change-of-plane joints: Wall-to-wall corners and wall-to-floor joints must be caulked, not grouted. Grout in these locations will crack.
- Not planning tile layout: Dry-lay tiles on the floor before installation to plan cuts and avoid slivers (narrow tile cuts that look unprofessional). Center the layout so cut tiles at the edges are equal and at least half a tile wide.
Frequently Asked Questions
How long does a tiled shower last?
A properly installed and maintained tiled shower can last 20 to 50 years or more. The tile itself is essentially permanent. Grout and caulk require periodic maintenance and replacement, and the waterproofing membrane is the long-term limiting factor.
Can I tile over an existing tiled shower?
It is possible if the existing tile is firmly bonded, the surface is flat, and there are no moisture problems behind the existing tile. However, it adds weight and thickness that can create issues with fixtures, doors, and transitions. In most cases, removing the old tile and starting fresh produces a better result.
What is the best tile size for a shower floor?
Mosaic tile (1×1 or 2×2 inches) is the best choice for shower floors because the many grout lines conform to the sloped surface and provide excellent slip resistance. Larger tiles on shower floors require precise substrate slope and careful installation to avoid lippage and ponding.
How long does it take to tile a shower?
A professional can typically complete a standard shower tile installation in 3 to 5 days: one day for prep and backer board, one day for waterproofing (with cure time), one to two days for tile setting, and one day for grouting and caulking. Add time for custom designs, large showers, or complex patterns.
Final Thoughts
A tiled shower combines beauty, durability, and customization in a way that no other shower option can match. The keys to success are choosing appropriate tile materials, installing a reliable waterproofing system, ensuring proper slope and drainage, and committing to regular maintenance. Whether you go with classic subway tile and a center drain or full-slab porcelain with a linear drain, the investment in quality materials and skilled installation pays dividends for decades of daily use.
Prefer to explore on your own?
See how new flooring looks in your actual room in seconds — free, no signup.
Try the free Floor Studio →