One of the most common attic mistakes is rolling a new layer of paper-backed batts over existing insulation and trapping moisture between the two. That is exactly the situation where unfaced attic insulation is the right choice. Unfaced batts and rolls have no kraft paper or foil vapor retarder attached, so they let moisture pass freely and can be stacked, layered, and squeezed around obstacles without creating a hidden condensation plane. Knowing when to skip the facing, and how to install the product correctly, can save you a moldy mess and a lot of wasted money.
- What Is Unfaced Attic Insulation?
- Faced vs. Unfaced: How to Choose
- How Much R-Value Does Your Attic Need?
- Preparing the Attic Before You Insulate
- How to Install Unfaced Batts Over Existing Insulation
- Unfaced Batts vs. Blown-In Insulation
- Cost of Unfaced Attic Insulation
- Common Mistakes to Avoid
- When to Call a Licensed Professional
What Is Unfaced Attic Insulation?
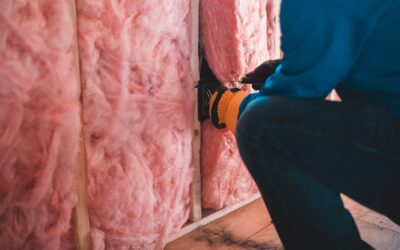
Unfaced insulation is simply fiberglass or mineral wool in batt or roll form with no attached facing. Faced products carry a kraft paper or foil layer on one side that acts as a vapor retarder and gives installers a flange for stapling to studs. Remove that layer and you get a product that is slightly cheaper, easier to cut, and much more forgiving in layered attic applications.
Fiberglass is the most common option on store shelves and usually the least expensive. Mineral wool, often called rock wool, is denser, holds its shape well, repels water, and resists fire better. Both are sold in widths designed to fit between framing at 16 or 24 inches on center, and in thicknesses that correspond to R-values such as R-13, R-19, R-30, and R-38.
Faced vs. Unfaced: How to Choose
The facing decision comes down to vapor control. In most cold and mixed climates, building codes and manufacturers call for a vapor retarder on the warm-in-winter side of the insulation, which in an attic means against the ceiling drywall. Only one vapor retarder should exist in a given assembly. Adding a second one creates a sandwich where moisture can get trapped.
| Situation | Better Choice |
|---|---|
| Adding a layer over existing attic insulation | Unfaced |
| Bare joists in a cold climate, no existing vapor control | Faced (paper toward the living space) |
| Hot-humid climate, local guidance discourages interior vapor retarders | Often unfaced; follow local code |
| Around recessed lights, chimneys, and flues | Unfaced mineral wool, with required clearances |
Climate and local code both matter here, so check with your building department or a local insulation contractor if you are insulating bare joists. For the very common job of topping up an existing attic, though, unfaced is almost always the answer.
How Much R-Value Does Your Attic Need?
The U.S. Department of Energy publishes attic R-value recommendations by climate zone. In broad terms, homes in the warmest parts of the country are advised to have roughly R-30 or more in the attic, while most of the country falls in a range of about R-38 to R-60. Many older homes have only R-11 to R-19 up there, which is a fraction of today’s targets.
To estimate what you already have, measure the depth of existing insulation in several spots. Loose fiberglass and fiberglass batts deliver very roughly R-2.5 to R-3.5 per inch, and cellulose around R-3.2 to R-3.8 per inch. If you have 5 inches of old batts, you are likely somewhere near R-15, which means another R-30 unfaced layer on top would bring you into a reasonable range for many climates. Confirm your local code minimum, since some jurisdictions require specific levels when you permit an energy upgrade.
Preparing the Attic Before You Insulate
Insulation works best when the attic floor is sealed first. Warm, moist indoor air leaking into the attic carries both heat and humidity, and no amount of fluffy insulation stops air on its own.
- Air seal the ceiling plane. Seal gaps around wiring and plumbing penetrations with fire-rated caulk or foam. Cover large openings like dropped soffits and chases with rigid material before insulating. Use fire-rated sealant around chimneys and flues, never ordinary foam.
- Install baffles. Ventilation chutes at every rafter bay along the eaves keep insulation from blocking soffit vents and maintain airflow up the underside of the roof deck.
- Build a dam around the attic hatch. A simple box of plywood or rigid foam around the opening keeps insulation from spilling out. Weatherstrip the hatch and insulate the back of the panel.
- Identify obstacles. Mark recessed light fixtures, junction boxes, bath fan housings, and any chimney or metal flue so you can maintain proper clearances.
- Lay walking boards. Planks across the joists give you a safe path. Step only on framing, never between joists, or your foot will go through the drywall ceiling.
How to Install Unfaced Batts Over Existing Insulation
When the existing insulation already fills the joist bays to the top of the framing, the new layer goes on perpendicular to the joists. That orientation covers the tops of the joists, which otherwise act as thermal bridges pulling heat straight through the wood.
- Start at the far end of the attic and work back toward the hatch so you are not crawling over finished areas.
- Unroll batts across the joists, butting ends snugly together without compressing them. Compressed insulation loses R-value.
- Cut with a sharp utility knife against a straightedge, compressing the batt with a board as you cut. Trim to fit around braces and wiring rather than stuffing insulation behind them.
- Split batts around wires lengthwise so the cable runs through the middle instead of squashing the batt flat.
- Keep the insulation back from soffit baffles so the ventilation channel stays open.
- Stop at the required distance from chimneys, flues, and non-IC-rated fixtures, and use the clearances printed on the fixture or appliance label.
If the existing insulation sits below the tops of the joists, first fill the bays level with unfaced batts laid parallel to the joists, then run your second layer perpendicular. The result is a continuous blanket with no gaps at the framing.
Protective Gear
Wear a properly fitted N95 respirator or better, safety glasses, gloves, a long-sleeve shirt, and a cap. Fiberglass and mineral wool fibers irritate skin, eyes, and lungs. Attics also get dangerously hot in summer, so schedule the work early in the morning or on a cool day, and bring water.
Unfaced Batts vs. Blown-In Insulation
Blown-in fiberglass or cellulose is often faster for large, open attics, fills around obstacles well, and can be very cost effective when a contractor does the work. Home centers frequently loan the blowing machine free with a minimum insulation purchase. Unfaced batts shine in attics with plenty of headroom, simple joist layouts, and homeowners who want tidy, easily inspected coverage.
You can combine them. Some homeowners lay unfaced batts in accessible areas and blow loose-fill into tight eaves. What matters is continuous coverage at the target depth with no gaps, compressed spots, or blocked vents.
Cost of Unfaced Attic Insulation
Material prices vary by region and product, but unfaced fiberglass batts typically run about $0.40 to $1.20 per sq ft depending on R-value, with mineral wool costing more. Adding an R-30 layer over a 1,000 sq ft attic floor might cost roughly $600 to $1,200 in materials for a DIY job, plus baffles, sealant, and safety gear.
Professional installation generally adds labor on top, and many contractors quote air sealing as a separate line item. It is worth paying for, since sealing leaks often delivers as much comfort improvement as the insulation itself. Energy-efficiency incentives for insulation and air sealing do exist in many areas, so check with your utility and a qualified installer about what currently applies to your home.
Common Mistakes to Avoid
- Laying faced insulation on top of an existing layer, creating a double vapor retarder.
- Covering soffit vents and cutting off attic ventilation.
- Compressing batts to fit a shallow space, which reduces R-value.
- Burying non-IC-rated recessed lights or packing insulation against chimneys and metal flues.
- Skipping air sealing and relying on thickness alone.
- Leaving the attic hatch uninsulated, which acts like an open window in the ceiling.
When to Call a Licensed Professional
Some attics should not be a DIY project. Stop and bring in a pro if you find any of the following:
- Vermiculite insulation: Gray-brown, pebble-like loose fill may contain asbestos. Do not disturb it; have it tested by an accredited lab and handled by a licensed abatement contractor if needed.
- Knob-and-tube wiring: Many electrical codes and insurers restrict covering this older wiring with insulation. Have a licensed electrician evaluate it first.
- Mold, rot, or active roof leaks: Fix the moisture source before adding insulation.
- Chimneys, gas flues, and heating equipment in the attic: Clearance requirements and combustion air matter for safety; a licensed HVAC or chimney professional can confirm them.
- Signs of pests: Droppings or nesting material should be cleaned and the entry points closed before new insulation goes in.
Handled correctly, unfaced attic insulation is one of the simplest, most cost-effective upgrades available. Seal first, keep vents open, respect clearances, and lay the new layer perpendicular to the joists, and your attic will do a far better job of keeping conditioned air where it belongs.