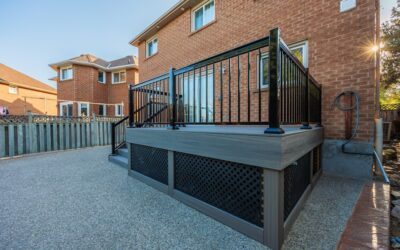
Building or replacing a deck railing used to mean cutting and fitting dozens of individual wood parts, then committing to years of sanding and repainting. Vinyl deck railing kits changed that by packaging everything you need into a pre-engineered system that bolts together in an afternoon and never needs staining. The PVC components resist rot, insects, and fading, hold their bright finish for decades, and meet building code out of the box. If you want a clean, safe, low-maintenance railing without the fabrication headache, this guide covers what is in a kit, what it costs, and how to install it.
Part of our Decks & Outdoor guide — explore the full guide →
What Comes in a Kit
The whole point of a kit is that the components are matched and pre-sized, so you are not guessing at part compatibility. A typical vinyl railing kit includes the major pieces you need for one section:
- Top and bottom rails: the horizontal members that span between posts, often with a reinforcing aluminum or steel insert in the top rail for rigidity.
- Balusters: the vertical infill pieces, pre-cut and spaced to meet the 4-inch sphere code requirement.
- Brackets and connectors: the hardware that fastens rails to posts at the correct height.
- Post sleeves and caps: vinyl covers that slip over structural posts, plus decorative caps to finish the tops.
- Spacers and mounting screws: everything to assemble the section without hunting for extra parts.
Kits are sold in standard section lengths, commonly 6-foot and 8-foot, and in heights of 36 inches for residential decks and 42 inches for elevated decks or commercial applications. You buy the number of sections your railing run requires, plus posts and gates as needed.
Meeting Code Requirements
Railing is a safety system first and a design element second, and code enforces that. For most residential decks, guardrails are required when the deck surface sits more than 30 inches above grade, and the railing must be at least 36 inches tall. Elevated and commercial decks often require 42 inches. Baluster spacing must reject a 4-inch sphere, and the bottom rail gap must also stay under 4 inches.
Vinyl kits are engineered to satisfy these rules when installed as directed, which is a major advantage over building from scratch, where it is easy to space balusters wrong. Just as important is load: a guardrail must resist a 200-pound concentrated force in any direction. That requirement is met through the post connections, which is why proper post installation matters as much as the kit itself.
Vinyl vs Wood vs Aluminum
Choosing the material comes down to maintenance, cost, and look. Here is how vinyl stacks up against the alternatives:
- Vinyl (PVC): $25 to $60 per linear foot installed. No painting ever, resists rot and insects, bright finish, can look slightly less premium than metal up close.
- Wood: $20 to $45 per linear foot installed. Lowest upfront cost and natural look, but needs staining every 2 to 3 years and eventually rots.
- Aluminum: $40 to $70 per linear foot installed. Slim sightlines, very strong, modern look, higher cost, can dent.
Vinyl hits the sweet spot for homeowners who want to install once and forget about it. Over a 20-year span its no-maintenance nature usually makes it cheaper than wood despite the higher initial price.
Installing a Vinyl Railing Kit
Kits are designed for DIY, and the assembly itself is straightforward. The critical work is in the posts, which carry all the structural load. Follow this sequence:
- Install the structural posts first. These are usually 4×4 pressure-treated wood or metal posts bolted to the deck framing with through-bolts, not just deck screws, spaced no more than 6 to 8 feet apart.
- Confirm each post is plumb and solid; a wobbly post means a failed railing, so add blocking in the deck framing if needed.
- Slip the vinyl post sleeves over the structural posts and set the decorative caps.
- Measure and cut the top and bottom rails to fit between posts if the kit is not pre-cut to your span, and insert the reinforcing bar into the top rail.
- Attach the rail brackets to the posts at the code height, then set the bottom rail, insert the balusters, and lower the top rail over them.
- Secure all brackets, install baluster spacers, and check that the section is level and rigid.
Leave small expansion gaps where the kit specifies, since vinyl expands and contracts with temperature. Rails fastened with no room to move can bow on hot days.
Handling Stairs and Angles
Stair railings are the trickiest part of any railing project, and quality kits include adjustable or angle-capable brackets for exactly this. The stair rail follows the pitch of the stringer, and swivel brackets let the rails and balusters set at that angle while keeping the balusters vertical, or plumb, as code prefers. Measure the stair angle carefully and dry-fit the section before final assembly. If your kit does not include stair brackets, most manufacturers sell a matching stair kit separately, so buy the right one rather than forcing standard brackets to work on an incline.
What You Will Spend
Cost depends on the length of your railing run, height, and whether you install it yourself. Materials for a straightforward run typically cost $20 to $40 per linear foot, with professional installation pushing the total to $25 to $60 per linear foot. Posts, post sleeves, and caps add up on a railing with many corners, and each gate runs $150 to $400. For a typical deck needing 60 linear feet of railing, expect roughly $1,500 to $3,600 installed, or considerably less if you do the labor yourself.
Maintenance and Longevity
This is where vinyl earns its keep. There is no staining, sealing, or painting. An occasional rinse with a garden hose and a wipe with soapy water for stubborn grime is the entire maintenance routine. Quality vinyl includes UV inhibitors that prevent yellowing, and most kits carry 20-year to lifetime warranties. In extreme cold vinyl becomes more brittle, so avoid sharp impacts in freezing weather, but under normal use a vinyl railing holds its clean, bright appearance for decades with virtually no effort.
Mounting Posts the Right Way
Everything about a vinyl railing’s safety depends on how the structural posts attach to the deck, and this is the step where corners get cut most often. A vinyl post sleeve is decorative and carries no structural load, so inside or beneath it there must be a solid post anchored to the deck framing. There are two proven methods. The first is a surface-mounted metal post base bolted through the decking into a blocked and reinforced joist below, using through-bolts or heavy structural screws rated for the application. The second is a wood 4×4 post that runs down past the deck framing and bolts to the rim joist or a doubled joist with carriage bolts.
Whichever method you use, the framing behind the post must be beefed up. A post lag-screwed only to a single rim joist can lever that joist loose under load, so add solid blocking between the joists at each post location and bolt through it. Building code requires the finished guardrail to withstand a 200-pound force applied in any direction at the top rail, and only a properly blocked and through-bolted post connection meets that standard. Test each post by leaning your weight into it before you sleeve it; any flex means the connection needs reinforcement.
Weather, Expansion, and Long-Term Performance
Vinyl moves with temperature more than wood or metal, and accounting for that movement is what keeps a railing looking crisp for decades. A rail installed tight on a cold winter day can bow outward when summer heat expands it, so follow the manufacturer’s specified expansion gaps at the rail ends inside the post brackets. These small gaps, often hidden inside the connectors, give the rail room to grow and shrink without buckling. Fastening balusters and rails too rigidly is a leading cause of warped-looking railings a year after installation.
Cold-weather brittleness is the other seasonal factor. In freezing temperatures vinyl becomes more rigid and can crack under a sharp impact, so avoid banging into rails with snow shovels or heavy objects in winter. On the durability side, quality vinyl with UV inhibitors resists the yellowing and chalking that plague cheap PVC, so buy from a reputable manufacturer offering a 20-year or lifetime warranty. With proper post anchoring, correct expansion gaps, and a quality UV-stable product, a vinyl railing shrugs off sun, rain, and freeze-thaw cycles while asking for nothing more than an occasional rinse.
Vinyl deck railing kits deliver code-compliant safety, a crisp finish, and freedom from ongoing maintenance in a package designed for a weekend install. Anchor your structural posts properly, respect the expansion gaps, use the right stair kit for inclines, and you will have a railing that stays safe and good-looking long after a wood railing would have needed its third coat of stain.