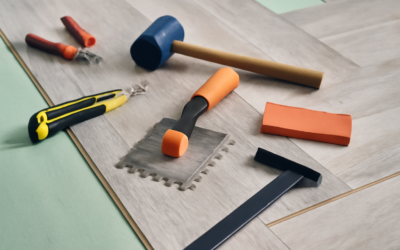
Before your first plank ever clicks into place, the right tools decide whether the job takes a weekend or drags into a frustrating week of gapped seams and chipped edges. A vinyl plank flooring installation kit bundles the three specialty tools most DIYers lack—a tapping block, a pull bar, and expansion spacers—into one inexpensive package that usually runs $20 to $60. That small purchase protects planks that can cost $2 to $7 per square foot, so it pays for itself the first time it saves a single board. Here is exactly what belongs in your kit, what you can skip, and how to shop smart.
- What’s Actually Inside a Vinyl Plank Installation Kit
- Tools the Kit Won’t Include (But You Still Need)
- Kit vs. Buying Tools Individually
- Click-Lock vs. Glue-Down: Different Tools
- Underlayment and the Subfloor Question
- Expansion Gaps, Spacers, and Transitions
- Safety Gear Worth Adding
- Your Buying Checklist
What’s Actually Inside a Vinyl Plank Installation Kit
Most off-the-shelf kits from brands like Roberts, QEP, and Bora contain the same core trio. The differences come down to material quality and how many spacers you get. Here is the standard contents list and what each piece does on the floor.
- Tapping block: A hard plastic or nylon block you strike with a mallet to seat plank edges together without denting the click profile. Good blocks have a lip that grips the plank tongue instead of crushing it.
- Pull bar: A flat steel bar bent at both ends. It reaches into the final row against a wall where a tapping block won’t fit, letting you draw the last plank tight.
- Spacers: Small wedges or fixed 1/4-inch blocks that hold the expansion gap around the room’s perimeter. Kits usually include 20 to 30.
- Rubber mallet: A white or non-marking mallet, typically 16 oz, used to strike the tapping block. A steel hammer will crack the block and the planks.
Premium kits ($40 to $60) add a heavier tapping block, a reinforced pull bar, and sometimes a set of knee pads. Budget kits ($20 to $30) still cover the essentials but use thinner plastic that can crack after a few hundred square feet.
Tools the Kit Won’t Include (But You Still Need)
No kit is truly complete. To go from bare subfloor to finished room, gather these additional tools before you start. Most homeowners already own half of them.
Cutting and Measuring
- Utility knife: A sharp retractable knife with extra blades. Vinyl plank up to about 5 mm thick scores and snaps cleanly—no saw required for straight cuts.
- T-square or speed square: A 24-inch drywall T-square gives you dead-straight score lines across a 6-inch to 9-inch wide plank.
- Tape measure and pencil: A 25-foot tape is plenty for most rooms.
- Jamb saw (or oscillating multi-tool): Undercuts door casings so planks slide beneath the trim for a professional look. A hand jamb saw runs $15 to $25.
Layout and Cleanup
- Chalk line: Snaps a reference line to keep rows running true across a wide room.
- Shop vacuum: The subfloor must be spotless; a single grain of grit under a plank telegraphs through as a bump.
For thicker rigid-core SPC planks (6 mm to 8 mm) or lots of angled cuts around cabinets, add a compound miter saw or a jigsaw. A fine-tooth blade prevents chipping the wear layer.
Kit vs. Buying Tools Individually
The math is simple for a one-time install. A tapping block alone is $8 to $12, a pull bar $10 to $15, and a bag of spacers $6 to $9. Buy them separately and you’re already near the price of a bundled vinyl plank flooring installation kit, minus the convenience and the included mallet. For a single room, the kit wins on price and simplicity.
Buy individually only when you install floors regularly and want a contractor-grade tapping block or a longer pull bar than kits provide. Pros often replace the flimsy kit spacers with rigid 1/4-inch composite spacers that don’t compress under plank pressure. If this is your one and only floor, the kit is the smarter buy.
Click-Lock vs. Glue-Down: Different Tools
The installation method changes what you need. Standard kits are built for floating click-lock floors, which make up the majority of DIY vinyl plank sold today.
Click-Lock (Floating)
This is the kit’s home turf. Planks snap edge to edge and float over the subfloor with no adhesive. You’ll lean entirely on the tapping block, pull bar, and spacers. Expect to lay 200 to 400 square feet in a day once you find your rhythm.
Glue-Down
Glue-down vinyl plank—common in high-moisture or high-traffic commercial spaces—needs a different toolset the kit ignores. You’ll want a 1/16-inch V-notch trowel to spread the adhesive, a 100-lb floor roller (usually rented for $25 to $40 per day) to press planks into the glue, and mineral spirits or the manufacturer’s recommended cleaner for squeeze-out. Skip the tapping block here; the planks don’t lock together.
Underlayment and the Subfloor Question
Many rigid-core SPC and WPC planks ship with an attached pad, so you install directly over the subfloor. If your planks don’t include a pad and the manufacturer allows one, a 1 mm to 1.5 mm IXPE or cork underlayment costs $0.30 to $0.70 per square foot and softens the feel underfoot while quieting the floor.
A moisture meter is the tool people forget. Over concrete, readings should sit below the plank maker’s limit—commonly under 3 to 4 pounds of moisture emission per 1,000 square feet per 24 hours, or below roughly 75% relative humidity by in-situ probe. A pinless meter runs $30 to $60 and can save you from a buckled floor months later. Also confirm the subfloor is flat to within 3/16 inch over a 10-foot span; grind high spots and fill low ones with a leveling compound before laying a single plank.
Expansion Gaps, Spacers, and Transitions
Vinyl expands and contracts with temperature swings, so every floating floor needs a perimeter gap—typically 1/4 inch to 3/8 inch, per the manufacturer. That’s what the kit spacers hold. Set them every 18 to 24 inches along each wall and at every fixed object like a door casing or kitchen island.
Where the floor meets carpet, tile, or another room, you’ll cap the gap with a transition strip. Plan for these before you buy:
- T-molding: Joins two floors of equal height, like vinyl to vinyl in a doorway.
- Reducer: Steps down from vinyl to a lower surface such as vinyl sheet or low-pile carpet.
- End cap / square nose: Finishes an edge at a sliding door or hearth.
- Stair nose: Wraps the leading edge of a step.
Transition strips typically cost $12 to $30 each for a 3-foot to 4-foot length. Quarter-round or base shoe molding, at $0.75 to $2 per linear foot, hides the expansion gap along the baseboards once the spacers come out.
Safety Gear Worth Adding
Vinyl plank work is low-risk, but a few items make it far more comfortable and protect you from the sharp edges you’ll create.
- Knee pads: You’ll spend hours on the floor. Gel or foam pads at $15 to $30 are the best money you’ll spend all project.
- Safety glasses: Snapping planks and cutting with a jigsaw send chips flying.
- Cut-resistant gloves: Fresh-cut vinyl edges are razor sharp.
- Dust mask: Saw cuts on SPC release fine stone-plastic dust.
Your Buying Checklist
Before you check out, run down this list so nothing stalls your install once the boxes are open and acclimating.
- A vinyl plank flooring installation kit with tapping block, pull bar, spacers, and a non-marking mallet ($20 to $60).
- Utility knife plus a 10-pack of replacement blades.
- 24-inch T-square and a 25-foot tape measure.
- Jamb saw or oscillating multi-tool for undercutting casings.
- Jigsaw or miter saw with a fine-tooth blade for thick or angled cuts.
- Pinless moisture meter and a 10-foot straightedge for the subfloor check.
- Underlayment (only if your planks lack an attached pad).
- Transition strips and quarter-round molding, matched to your color.
- Knee pads, safety glasses, gloves, and a dust mask.
- A shop vacuum and 5% to 10% extra flooring for waste and future repairs.
Let the flooring acclimate in the room for 48 hours at 65°F to 85°F before you start, keep your tools within arm’s reach, and you’ll spend your energy on clean seams instead of hunting for the one tool you forgot. A modest kit and a short shopping list turn an intimidating project into a satisfying weekend upgrade.
Prefer to explore on your own?
See how new flooring looks in your actual room in seconds — free, no signup.
Try the free Floor Studio →