The difference between a vinyl floor that looks factory-installed and one that gaps, peaks, and clicks underfoot usually comes down to a $150 pile of gear, not skill. Having the right vinyl flooring installation tools on hand before you open the first box saves hours of frustration and prevents the rookie mistakes that ruin planks. Whether you’re laying click-lock LVP or gluing down sheet vinyl, this guide covers exactly what to buy, what to rent, and what you can skip.
From tight powder rooms to 1,200 sq ft basements, the kit below covers the job.
Measuring and Layout Tools
Good layout starts long before you cut a plank. A 25-foot tape measure with a wide, stiff blade lets you span a room without a helper, and a carpenter’s square keeps your first row dead straight. Snap a chalk line down the room to establish a reference; even a half-degree of drift compounds into a visible wedge by the far wall.
Add a moisture meter if you’re going over concrete. A basic pinless meter runs $30 to $60 and can flag a slab that’s still curing, which is the leading cause of adhesive and plank failure. Spending $40 here beats tearing out a $2,000 floor later.


Cutting Tools for Vinyl Plank
You have three real options for cutting planks, and the right one depends on your budget and volume:
- Utility knife (score and snap): $10 to $20. Score the wear layer, bend the plank, and it snaps clean. Perfect for straight cross-cuts and small rooms.
- Vinyl plank cutter (guillotine): $40 to $90. A single-lever shear that cuts planks dust-free and fast. Ideal for big open floors.
- Miter saw or jigsaw: $100 and up. Necessary for angled cuts, door casings, and thick SPC planks. Use a fine-tooth blade to avoid chipping.
For notches around pipes and irregular obstacles, a jigsaw with a downward-cutting laminate blade produces the cleanest edge. Keep a fresh utility blade nearby regardless; a dull blade tears the wear layer and leaves a fuzzy edge.
Installation and Fitting Tools
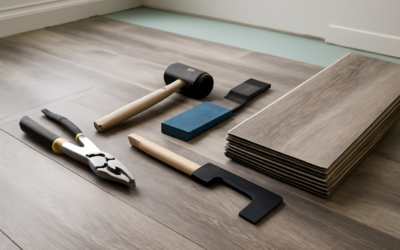
This is where cheap kits earn their keep. A vinyl installation kit, typically $25 to $40, bundles the three things you actually need: a tapping block, a pull bar, and spacers. The tapping block closes seams without damaging the click edge, the pull bar locks the final row against a wall you can’t reach, and the spacers hold your expansion gap.
Use a white rubber mallet rather than a metal hammer so you don’t mar or crack rigid planks. A quarter-inch spacer set keeps the required expansion gap consistent around the room’s perimeter. Skipping spacers is how floors buckle when the material expands in summer heat.
Subfloor Prep Tools
Vinyl telegraphs every flaw beneath it, so prep tools matter more than most beginners expect. A long straightedge or 6-foot level reveals dips and humps; industry tolerance is roughly 3/16 inch over 10 feet. For high spots on concrete, a handheld grinder with a diamond cup wheel shaves ridges quickly, though it throws serious dust, so wear a respirator.
Low spots get filled with a self-leveling compound, which you’ll mix in a bucket with a paddle on a drill and spread with a gauge rake or squeegee. On wood subfloors, an oscillating multi-tool undercuts door jambs so planks slide neatly beneath them for a clean, professional edge.
Tools for Glue-Down and Sheet Vinyl
Glue-down installs need a notched trowel sized to the adhesive spec, usually a 1/16-inch V-notch for LVT. After spreading and setting the planks, a 100-pound flooring roller presses out air pockets and guarantees full adhesive contact; most home centers rent one for about $20 a day.
Sheet vinyl adds its own tools. A hook blade cuts curves without gouging, and a wall trimmer or straightedge helps you scribe the material tight to irregular walls. Double-cut overlapping seams with a straightedge and seal them with the manufacturer’s seam sealer for a watertight finish that lasts.
Safety Gear and Consumables
Don’t overlook the small stuff. Knee pads are non-negotiable; you’ll spend the entire job on the floor, and gel or hard-cap pads prevent the ache that makes people rush the final rows. Keep these on hand too:
- Safety glasses for cutting and grinding
- A dust mask or respirator for concrete prep
- Extra utility and jigsaw blades
- A pencil, a fine-tip marker, and a speed square for marking cuts
- A shop vacuum to keep the subfloor spotless between rows
Even one grain of grit under a floating plank can create a squeak, so vacuuming as you go is worth the interruptions.
Building Your Kit on a Budget
A complete DIY setup for a single room runs about $120 to $200 if you own basic hand tools already. Buy the installation kit, spacers, mallet, and a sharp utility knife outright since they’re cheap and reusable. Rent the expensive one-time items, a floor roller for glue-down or a concrete grinder for prep, from a home center rather than buying.
The right vinyl flooring installation tools pay for themselves on the first job by preventing wasted planks and callbacks. Assemble the kit before you start, keep it organized in a bucket at your side, and the install goes faster, cleaner, and with far less swearing than doing it half-equipped.
Rent vs. Buy: A Cost Breakdown
Deciding what to own outright and what to rent hinges on how often you plan to lay floors. For a one-time weekend project, renting the big-ticket items and buying only the hand tools keeps your total under $100. Do the math before you head to the register.
- 100-lb flooring roller: $18 to $25 a day to rent versus $180 to $300 to buy. Rent unless you’re doing glue-down floors monthly.
- Concrete grinder with dust shroud: $50 to $75 a day rental versus $250-plus to own. Rent every time for a single slab.
- Bostitch or DeWalt jigsaw: $70 to $110 to buy. Worth owning; you’ll use it on every job.
- Roberts or Bullet Tools vinyl cutter: $40 to $90 to buy. Cheaper than renting twice, and it lives in the truck.
Home Depot and Lowe’s both run tool rental desks with a four-hour minimum, so schedule your prep and your roller pass for the same day to avoid paying two rental fees. Return the roller clean; a $15 cleaning charge is easy to dodge.
Common Tool Mistakes That Ruin a Floor
Most callbacks trace back to two or three predictable errors, and all of them are avoidable with the right gear used correctly. Watch for these:
- Tapping directly on the plank edge. A metal hammer on a bare click edge crushes the locking profile. Always seat the tapping block first, then strike with a white rubber mallet.
- Reusing a dull utility blade. A blade that’s cut 40 planks tears the wear layer. Snap a fresh segment every 10 to 15 cuts; blades are pennies apiece.
- Skipping the moisture meter on concrete. A slab reading above 4 pounds per 1,000 sq ft on a calcium chloride test will delaminate adhesive within a season. Test before you spread a drop.
- Wrong trowel notch for glue-down. Too big a notch leaves ridges that telegraph through; too small starves the bond. Match the 1/16-inch V-notch spec on the adhesive bucket exactly.
Keep a torpedo level in your back pocket and check your first three rows constantly. Catching a drift at row two costs five minutes; catching it at row twenty costs the whole floor.
Tool FAQ
Do I need a table saw for LVP?
No. A vinyl cutter handles cross-cuts and a jigsaw covers rips and notches. A table saw is faster for long rip cuts on big jobs, but it’s optional for a single room.
What’s the one tool beginners forget?
An oscillating multi-tool for undercutting door jambs. Trying to notch planks around casings instead of sliding them under looks amateur every time. A Fein or DeWalt oscillating tool runs $80 to $150 and pays off on the first doorway.
Prefer to explore on your own?
See how new flooring looks in your actual room in seconds — free, no signup.
Try the free Floor Studio →