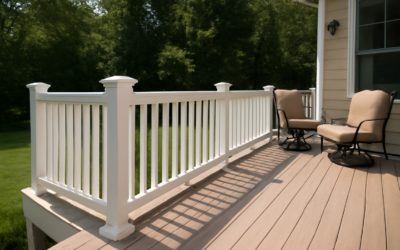
Wood railings rot, peel, and demand repainting every few years; metal rusts. A vinyl porch railing sidesteps both problems with a maintenance-free material that holds its color and never needs sanding or staining. For homeowners tired of the endless upkeep cycle, vinyl is one of the easiest upgrades a porch can get. This guide covers the styles available, the building-code rules you must follow, how installation works, what it costs, and how to keep it looking sharp.
Why Choose Vinyl
Vinyl railing is made from rigid PVC, often reinforced with aluminum or metal inserts inside the top and bottom rails for strength. The material will not rot, splinter, rust, or attract insects, and the color runs through the surface so scratches do not stand out the way chipped paint does. A quick rinse with a hose is usually all the maintenance it needs.
The trade-offs are a more limited color palette, traditionally white, tan, and a few neutrals, and a look that some people find less premium than real wood or wrought iron. For most porches, the durability and zero-upkeep payoff win out.
Common Styles and Components
Vinyl railing systems are modular, mixing a few core parts to create the look you want.
- Top and bottom rails — the horizontal members that carry the balusters and provide structure.
- Balusters or spindles — vertical infill, available square, turned, or as colonial profiles.
- Posts and post sleeves — structural supports, often a vinyl sleeve over a treated wood or metal post.
- Caps and trim — decorative post caps and base trim that finish the look.
- Glass or cable infill — upgrade options for an open, modern view.
Most systems come as kits in standard 6-foot and 8-foot sections, with separate stair-rail kits that install at an angle.
Building Codes and Heights
Railing is a safety feature, so it is governed by building code. Requirements vary by locality, but the common standards are a helpful baseline.
- Guardrails on a porch are typically required when the deck or porch surface is more than 30 inches above grade.
- Guardrail height is usually a minimum of 36 inches for residential porches, though some jurisdictions require more.
- Baluster spacing must prevent a 4-inch sphere from passing through, which protects small children.
- Railings must withstand a specified lateral load, which is why posts must be anchored properly.
Always confirm the requirements with your local building department and pull a permit if one is needed. Vinyl systems are engineered to meet code when installed per the manufacturer’s instructions, especially regarding post spacing.
How Installation Works
Vinyl railing is one of the more DIY-friendly porch projects because the parts are pre-cut and the connections are simple.
- Set and anchor the posts securely, spacing them per the manufacturer’s maximum span, often 6 feet on center.
- Attach the bottom rail brackets to the posts, keeping everything level.
- Insert the balusters into the pre-drilled bottom rail, then fit the top rail over them.
- Secure the top and bottom rails into the post brackets and snap on the cover trim.
- Add post caps and check that the whole run is plumb and rigid before walking away.
Post anchoring is the critical step. Surface-mounted posts use heavy-duty base plates and lag bolts into solid framing; core-drilled posts set into concrete. A wobbly post means a railing that fails code and safety.
What It Costs
Vinyl railing is moderately priced. Material costs generally run roughly $20 to $40 per linear foot for the railing sections, with posts and caps adding to that. A typical DIY porch railing project lands around $25 to $50 per linear foot in materials. Professional installation adds labor, bringing the installed cost to roughly $40 to $80 per linear foot depending on your region and the complexity of stairs and corners.
Glass-panel and cable infill upgrades cost more. Even so, vinyl usually beats the long-term cost of wood once you factor in years of paint and repair.
Care and Maintenance
Maintenance is minimal, which is the whole point. Wash the railing once or twice a year with a garden hose, and for stubborn dirt or mildew use a soft brush with soapy water or a mix of water and white vinegar. Avoid abrasive pads and harsh solvents that can dull the finish.
Inspect the posts and connections each spring to make sure nothing has loosened. In very hot, sunny climates, lower-quality vinyl can become slightly brittle or chalky over many years; choosing a UV-stabilized product from a reputable maker minimizes that risk.
Vinyl vs Other Railing Materials
It helps to see vinyl alongside its competitors. Wood is the most affordable upfront and offers the warmest, most customizable look, but it demands regular painting or staining and eventually rots or splinters. Aluminum is strong, slim, and low-maintenance, with a more modern profile, but it costs more and offers fewer traditional styling options. Composite blends wood fiber and plastic for a wood-like look with less upkeep, at a higher price.
Vinyl’s sweet spot is zero painting, solid weather resistance, and a moderate price. Its main concessions are a limited color palette and a look some find less premium than aluminum or real wood. For homeowners who prize low maintenance above all, vinyl is hard to beat.
Choosing a Quality Vinyl Railing
Not all vinyl railing is created equal, so a few details separate a railing that lasts decades from one that yellows and sags. Look for UV-stabilized vinyl, which resists fading and brittleness in strong sun. Confirm the rails have internal aluminum or metal reinforcement, since that is what gives the system the strength to pass code and resist sagging over long spans.
Check the warranty as well; reputable manufacturers back their railing for many years against fading, cracking, and peeling. Buying a complete system from one maker, rather than mixing parts, ensures the components fit together correctly and meet the engineered load ratings.
Final Thoughts
A vinyl porch railing delivers the look of a clean, classic railing without the constant upkeep of wood or the rust of metal. Confirm your local code heights and spacing, anchor the posts solidly, and you get a safe, attractive railing that asks for nothing more than an occasional rinse for decades to come.
Prefer to explore on your own?
See how new flooring looks in your actual room in seconds — free, no signup.
Try the free Floor Studio →