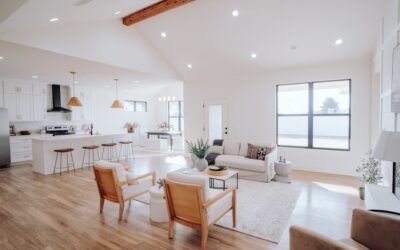
Wooden tile flooring gives you the warm, natural appearance of real wood with the waterproof durability of porcelain or ceramic tile. These planks are designed to mimic the grain patterns, colors, and textures of popular hardwood species, and in 2026, the best wood-look tiles are so realistic that most people cannot tell the difference from standing height.
Part of our Tile & Grout guide — explore the full guide →
If you want hardwood aesthetics in spaces where real wood struggles, such as bathrooms, kitchens, basements, and laundry rooms, wooden tile flooring is one of the most practical solutions available. This guide covers everything you need to know, from choosing the right product to picking grout colors and understanding how it compares to actual hardwood.
What Is Wooden Tile Flooring?
Wooden tile flooring refers to porcelain or ceramic tiles manufactured in plank shapes that replicate the look of real wood. The wood grain pattern is digitally printed onto the tile surface using high-definition inkjet technology, and many products include textured surfaces that mimic the feel of wire-brushed or hand-scraped wood.
Porcelain wood-look tiles are more common than ceramic versions because porcelain is denser, harder, and better suited for floors. However, ceramic wood-look tiles exist at lower price points and work well in low-traffic areas.
Porcelain vs. Ceramic Wood-Look Tiles
Porcelain tiles are fired at higher temperatures, making them denser and more moisture-resistant. They have a water absorption rate below 0.5 percent, which makes them suitable for both indoor and outdoor use. Ceramic tiles absorb more water and are softer, so they are better limited to interior dry areas.
For tile flooring in kitchens, bathrooms, and entryways, porcelain is the clear winner. In a bedroom or home office where moisture is not a concern, ceramic can save you money without sacrificing appearance.
Popular Sizes and Formats
Wooden tile flooring comes in plank shapes designed to look like real wood boards. The most common sizes include:
- 6 x 24 inches: The most widely available size, comparable to standard hardwood plank widths
- 8 x 48 inches: A popular wide-and-long format that creates fewer grout lines and a more seamless look
- 6 x 36 inches: A mid-length option that balances ease of installation with a plank-like appearance
- 9 x 48 inches: Extra-wide planks trending in 2026 for a modern, open feel
- 4 x 24 inches: Narrower planks that create a more traditional strip-flooring look
Longer and wider planks create a more realistic wood effect because they reduce the number of grout lines. However, they are heavier, more prone to lippage during installation, and require a perfectly flat subfloor. If you are doing a DIY installation, 6 x 24 or 6 x 36 tiles are easier to handle.
Realistic Options: What to Look For
Not all wood-look tiles are created equal. Here is what separates a convincing wooden tile from a cheap imitation:
High-Definition Inkjet Printing
Premium tiles use advanced inkjet technology with multiple print heads and dozens of unique face designs. This means tiles in the same box have different grain patterns, just like real wood planks would. Cheaper tiles may only have four or five unique faces, which creates a noticeable repeating pattern on the floor.
Textured Surfaces
The best wooden tile flooring features registered embossing, where the surface texture aligns with the printed grain pattern. When you run your hand across the tile, you feel grooves where the grain lines are. This makes the tile look and feel remarkably like real wood.
Color Variation
Real wood has natural color variation from plank to plank. High-quality wood-look tiles replicate this with slight tone differences between tiles. Mix tiles from multiple boxes during installation to distribute color variation naturally across the floor.
Matte and Low-Sheen Finishes
Glossy wood-look tiles look obviously fake. The most realistic options use matte, satin, or lightly textured finishes that replicate the low sheen of natural or oiled hardwood. Avoid high-gloss versions if realism is your priority.
Installation Guide for Wooden Tile Flooring
Subfloor Preparation
Tile requires a flat, stable subfloor. The industry standard is no more than 1/8 inch variation over 10 feet. For plank-format tiles, an even flatter surface is needed because longer tiles are more susceptible to lippage, where one edge sits higher than its neighbor.
Over concrete subfloors, apply a self-leveling compound to fill low spots. Over wood subfloors, install cement backer board or use a crack isolation membrane. Never install tile directly over plywood without proper preparation.
Layout Planning
Dry-lay several rows of tiles before applying any mortar. This lets you check the pattern, ensure color variation looks natural, and plan your cuts. Stagger the joints by at least one-third of the tile length, just as you would with real wood planks.
Popular layout patterns for wooden tile flooring include:
- Straight lay with staggered joints: The most common and easiest to install
- Herringbone: Creates a classic high-end look but requires more cuts and careful alignment
- Chevron: Similar to herringbone but with tiles cut at angles for a V-shaped pattern
- One-third offset: Each row is offset by one-third of the tile length for a natural random look
Mortar and Trowel Selection
Use a large-format tile mortar (also called medium-bed mortar) for planks longer than 15 inches. Standard thinset may not provide adequate coverage and support for longer tiles. Apply mortar to both the subfloor and the back of each tile (back-buttering) to achieve at least 95 percent coverage.
Use a 1/2 x 1/2 inch square-notch trowel for most wood-look plank tiles. This provides enough mortar depth to support the tile while allowing you to flatten out ridges that cause lippage.
Spacers and Leveling Systems
Tile leveling clips and wedges are highly recommended for plank tiles. They force adjacent tiles to sit flush with each other, eliminating lippage. Standard cross spacers work for positioning, but a leveling system is essential for a professional result with long planks.
Choosing the Right Grout Color
Grout color is one of the most important decisions when installing wooden tile flooring. The wrong grout color can destroy the wood-plank illusion.
Match the Grout to the Tile
For the most realistic wood look, choose a grout color that closely matches the dominant color of your tiles. This minimizes the visibility of grout lines and makes the floor look like continuous wood planks. Light oak tiles pair with tan or beige grout. Dark walnut tiles pair with brown or espresso grout.
Use Narrow Grout Lines
Keep grout joints as narrow as possible, typically 1/16 to 1/8 inch. Wider grout lines scream “tile” and break the wood illusion. Some rectified (precision-cut) tiles can be installed with minimal grout joints as narrow as 1/16 inch.
Consider Epoxy Grout
Epoxy grout does not stain, does not need sealing, and maintains its color over time. It costs more than standard sanded grout but keeps the grout lines looking clean for years. This is especially valuable with light-colored grout that would otherwise discolor.
Wooden Tile Flooring vs. Real Wood
Understanding the trade-offs between wooden tile and hardwood flooring helps you make an informed decision.
Advantages of Wooden Tile
- Waterproof: Porcelain tile handles water, humidity, and spills without damage. Real wood warps and stains when exposed to moisture.
- Scratch-resistant: Tile does not scratch from pet claws, furniture, or foot traffic. Hardwood scratches easily, especially softer species.
- Low maintenance: Sweep and mop with any cleaner. No need for refinishing, special cleaners, or humidity control.
- Works everywhere: Install in bathrooms, kitchens, basements, mudrooms, and even outdoor covered patios. Real wood is limited to dry, above-grade spaces.
- Color does not fade: Tile color is permanent. Hardwood changes color over time with UV exposure.
Advantages of Real Wood
- Warmth underfoot: Wood feels warmer and softer than tile. Tile can be cold, especially in cooler climates, unless you add radiant heat.
- Can be refinished: Solid hardwood can be sanded and refinished multiple times over decades. Tile cannot be refinished and must be replaced if damaged.
- Authentic feel: Despite advances in printing, wood-look tile does not feel like real wood when you walk barefoot on it. The hard, cool surface gives it away.
- Resale value: Real hardwood still commands a premium with many buyers and appraisers.
- Easier on the body: Standing on hard tile for extended periods is more fatiguing than standing on wood, which has slight give.
For a compromise, engineered wood flooring offers real wood appearance and feel with better moisture resistance than solid hardwood, though it still cannot match tile in wet areas.
Cost of Wooden Tile Flooring
Material costs for quality wood-look porcelain tile typically range from $3 to $8 per square foot. Budget options start around $1.50 per square foot but usually lack realistic textures and have fewer unique face designs.
Installation costs run higher than other flooring types because tile work is labor-intensive. Expect to pay $6 to $12 per square foot for professional installation, including mortar, grout, and labor. A 300-square-foot room might cost $2,700 to $6,000 fully installed.
Best Rooms for Wooden Tile Flooring
- Bathrooms: The number one application. Get the warmth of a wood look with zero moisture concerns.
- Kitchens: Handles spills, dropped dishes, and heavy foot traffic without issue.
- Laundry rooms: Waterproof and easy to clean if a hose bursts or the washer leaks.
- Basements: No concern about moisture wicking through the concrete slab.
- Mudrooms and entryways: Stands up to dirt, boots, and wet shoes.
- Open-concept spaces: Run the same floor from the kitchen through the living area for a seamless look without worrying about water damage zones.
Maintenance Tips
Wooden tile flooring is one of the lowest-maintenance flooring options available. Sweep or vacuum regularly to remove grit that could scratch the surface over time. Mop with warm water or any tile-safe cleaner. The tile itself needs no sealing, but standard cement grout should be sealed annually. If you used epoxy grout, no sealing is required.
If a tile does crack from a heavy impact, individual tiles can be removed and replaced without disturbing the surrounding floor, as long as you kept leftover tiles from the original installation.
Final Thoughts
Wooden tile flooring is one of the smartest flooring choices available in 2026. It combines the warm, natural look of hardwood with the waterproof, scratch-proof, and low-maintenance performance of porcelain tile. The key to a great result is choosing a high-quality tile with realistic printing and texture, using the right grout color to minimize visible lines, and ensuring your subfloor is perfectly flat before installation.
Whether you are tiling a single bathroom or running wood-look planks through your entire home, this material delivers durability and beauty in equal measure.
Prefer to explore on your own?
See how new flooring looks in your actual room in seconds — free, no signup.
Try the free Floor Studio →