A 100 amp sub panel is the most common way to add serious capacity to a garage, workshop, finished basement or detached building without replacing the main service. The short answer on wiring: a typical 100A sub panel is fed by #3 copper or #1 aluminum conductors for the two hots, a matching neutral, and a separate equipment ground, all protected by a 100 amp two-pole breaker in the main panel. Most homes with a 200 amp service can support one, but only after a load calculation confirms the existing panel has room to spare.
That summary hides a lot of decisions. Run length changes the wire size, the location changes the grounding rules, and the neutral must stay isolated from the ground inside the subpanel. Get any of those wrong and the panel may pass a quick glance but fail inspection, overheat a feeder, or leave metal enclosures energized during a fault. The sections that follow walk through each choice in the order an electrician would make it.
- What a 100 Amp Sub Panel Actually Does
- Feeder Wire Size: Copper vs Aluminum
- The Feeding Breaker and the Subpanel Itself
- 4-Wire Feeders and Neutral-Ground Separation
- Can a 200 Amp Service Support a 100A Sub Panel?
- Planning the Install Step by Step
- Cost Ranges for a 100 Amp Subpanel
- Troubleshooting Common Subpanel Problems
- When to Call a Licensed Professional
- Frequently Asked Questions
- What size wire do I need for a 100 amp sub panel?
- Can I put a 100 amp subpanel on a 200 amp main panel?
- Does a subpanel need a main breaker?
- Why are the neutral and ground separated in a subpanel?
- Do I need ground rods for a subpanel in a detached garage?
- Is aluminum wire safe for a 100A sub panel feeder?
One note before anything else: feeder and panel work involves conductors that can carry enough current to kill. Treat everything here as planning knowledge for talking with a licensed electrician and pulling a permit, not as a substitute for one.
What a 100 Amp Sub Panel Actually Does
A subpanel is a secondary load center that takes one large circuit from your main panel and splits it into many smaller branch circuits. The 100 amp sub panel does not add power to your house. It redistributes capacity that already exists at the main service, putting breakers closer to where the loads are. That saves long home runs of branch wiring and gives you a local place to shut off a shop, an addition, or an outbuilding.
People usually choose the 100A size for a few reasons:
- Detached garages and shops with welders, compressors, table saws and a heater or mini-split.
- Additions and ADUs that need their own kitchen, laundry or HVAC circuits.
- Basement finishes where the main panel is already full of breakers.
- EV charging plus other loads in a garage, where a 40 or 50 amp charger circuit would eat most of a smaller subpanel.
Smaller 60 amp subpanels are fine for a lightly used garage with lights and a few outlets. Once you add a 240-volt tool, an electric heater and a charger, the 100 amp size starts to make sense, and the cost difference in the panel itself is modest. The feeder wire is where the real price jump happens.
Feeder Wire Size: Copper vs Aluminum
The feeder is the set of conductors running from the 100 amp breaker in your main panel to the subpanel lugs. For a standard residential installation with terminals rated at 75°C, the usual sizes look like this:
| Conductor | Copper | Aluminum |
|---|---|---|
| Hots (2) | #3 AWG | #1 AWG |
| Neutral (1) | #3 AWG | #1 AWG |
| Equipment ground (1) | #8 AWG | #6 AWG |
Those are starting points, not final answers. A few factors push sizes up:
- Distance. On runs longer than roughly 100 to 150 feet, voltage drop becomes noticeable. Many electricians upsize one gauge (for example #2 copper or 1/0 aluminum) to keep drop near 3 percent so motors start cleanly.
- Cable type. Some cable assemblies have lower ampacity ratings than individual conductors in conduit. Cable rated at 60°C cannot be sized from the 75°C column.
- Conditions of use. Hot attics, bundled conductors and rooftop conduit all reduce allowable ampacity.
Aluminum feeder is extremely common now and is perfectly safe when installed correctly. Modern aluminum alloy conductors, terminated in lugs rated for aluminum, torqued to the panel maker’s spec and coated with antioxidant compound where the lug instructions call for it, perform well for decades. Aluminum costs noticeably less per foot than copper at this size, which matters on a long run to a detached building. Copper is smaller in diameter and easier to bend in a tight panel, so some electricians prefer it for short indoor runs.
A common mistake is borrowing the reduced conductor sizes allowed for a whole-house service feeder. That allowance applies only to conductors carrying the entire load of a dwelling. A subpanel feeder does not qualify, so size it from the standard ampacity table.
The Feeding Breaker and the Subpanel Itself
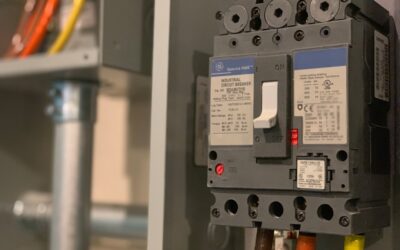
In the main panel, the feeder lands on a 100 amp double-pole breaker of the same brand and type the panel is listed for. Mixing breaker brands is a frequent inspection failure, so match the label inside the panel door. That breaker is what protects the feeder wire, which is why its rating has to match the conductor ampacity.
At the other end, you can choose between a main-lug-only subpanel or one with its own main breaker. If you are shopping, a 100 amp load center with a main breaker is often the better choice. It costs a little more, but it gives you a local disconnect, which is required for a detached building and handy anywhere else. Pay attention to space count as well. A 100 amp panel with 20 or 24 spaces leaves room for growth, while a cramped 12-space unit fills up after a couple of 240-volt circuits.
Check three ratings on the subpanel label before you buy:
- Bus rating of at least 100 amps (a 125 amp bus is common and fine).
- Lug range that accepts your chosen feeder size, including aluminum if you use it.
- A separate, isolated neutral bar and a ground bar or space to add one.
4-Wire Feeders and Neutral-Ground Separation
Every modern subpanel gets a four-wire feeder: two hots, one neutral and one equipment grounding conductor. This is the rule people ask about most, and it is the one most often gotten wrong in older DIY work.
In the main panel, neutral and ground are bonded together at one point. In a subpanel, they must stay apart. That means:
- The neutral bar floats, mounted on insulators, with the bonding screw or strap removed.
- All bare and green conductors land on a separate ground bar fastened directly to the metal enclosure.
- No branch circuit neutrals touch the ground bar, and no grounds touch the neutral bar.
Why it matters: if neutral and ground are bonded again at the subpanel, normal return current splits and flows on the grounding wires, metal conduit, and even water pipes. That can energize metal surfaces and defeat the purpose of the ground path. Leaving the bonding screw in place is one of the easiest errors to make because most new panels ship with it installed.
For a detached garage or shop, you still run four wires, but the building also needs its own grounding electrode system, typically ground rods driven at the building and bonded to the subpanel ground bar. The neutral and ground remain separated. Older three-wire feeds to outbuildings exist, but new work is four-wire.
Can a 200 Amp Service Support a 100A Sub Panel?
Usually yes, and the reason surprises people. Breaker ratings do not have to add up to the service size. A 200 amp main panel can feed a 100 amp subpanel plus dozens of other breakers because loads rarely all run at full draw together. The real question is the calculated load, not the sum of breaker handles.
An electrician runs a load calculation that counts square footage for general lighting and receptacles, fixed appliances, the larger of heating or cooling, and any EV charging. A typical gas-heated home with a 200 amp service often calculates somewhere between 90 and 140 amps, leaving real room for a garage subpanel. An all-electric home with a heat pump, electric range, electric dryer, tank water heater and an existing EV charger may already sit near the limit.
If the numbers are tight, there are options short of a service upgrade:
- Size the subpanel feeder at 60 or 80 amps while still installing a 100 amp panel for its spaces.
- Use a load management device that pauses EV charging when the house load is high.
- Swap resistance heat for heat pump equipment to lower the calculated load.
A 100 amp service, on the other hand, rarely supports a 100 amp subpanel unless the home’s other loads are very light. In that situation a service upgrade usually comes first.
Planning the Install Step by Step
Here is how a typical project unfolds. Use it to understand the sequence and the questions to ask your electrician.
- Load calculation and permit. Confirm capacity, then pull an electrical permit. Many jurisdictions require a licensed electrician for feeder work.
- Choose the location. The subpanel needs a working space about 30 inches wide and 36 inches deep in front, headroom, and cannot go in a clothes closet or bathroom.
- Route the feeder. Plan a path through framing, conduit or a buried trench. Underground runs need proper burial depth and conductors rated for wet locations; call 811 before digging.
- Shut down safely. The electrician turns off the main breaker and confirms power is off at the work area with a non-contact voltage tester. Remember that the incoming service conductors and the line side of the main breaker stay energized even with the main off, which is a big reason this is professional work.
- Mount and wire the subpanel. Remove the bonding screw, land hots and neutral on their lugs, the ground on the ground bar, and torque every lug to the label value.
- Install the feeding breaker in the main panel and connect the feeder.
- Add branch circuits with the correct breaker types: GFCI protection for garage, basement, outdoor and wet-area receptacles, and AFCI where required for living spaces.
- Inspection, then energize. The inspector checks conductor sizes, torque, labeling, bonding and clearances before the panel goes live.
Cost Ranges for a 100 Amp Subpanel
Prices vary widely by region, distance and how hard the route is, but general ranges help with budgeting:
- Panel and breakers: a 100 amp load center plus a feeding breaker and a handful of branch breakers typically runs a few hundred dollars.
- Feeder wire: often the largest material cost; long copper runs can cost several times more than aluminum.
- Attached garage or basement install: commonly around $800 to $2,000 with labor and permit.
- Detached building with trenching: frequently $2,000 to $5,000 or more, depending on distance and conduit.
Surface conduit across a finished space, concrete cutting, or a service upgrade will push the total higher. Ask for itemized quotes so you can compare wire type and size between bids.
Troubleshooting Common Subpanel Problems
When a subpanel misbehaves, the cause is usually one of a short list. These are symptoms to describe to your electrician, not things to open up yourself:
- Feeding breaker trips under load: actual demand exceeds 100 amps, or a large motor is starting with other heavy loads running. Stagger tool use or revisit the load plan.
- Lights dim when a compressor or welder starts: voltage drop from undersized feeder over a long run, or a loose lug.
- Warm or discolored lugs: poor torque or aluminum terminations without proper prep. This needs prompt attention.
- GFCI breakers trip randomly: a shared neutral or a neutral landed on the ground bar.
- Tingle from metal tools or equipment: stop using the circuit and call a pro; this can point to bonding or grounding errors.
When to Call a Licensed Professional
For a 100 amp sub panel, the honest answer is almost always. Feeder work connects to the main panel, where service conductors remain live even with the main breaker off. Many areas require a licensed electrician and a permit for any new panel, and insurers may question unpermitted work after a fire. A licensed electrician will run the load calculation, size the feeder for distance, set up grounding for detached buildings, and handle inspection.
If you want to save money, ask whether you can handle non-electrical prep such as trenching (after calling 811), drywall patching or mounting backer boards. Never work on powered wires, and leave all connections inside the panels to the professional.
Frequently Asked Questions
What size wire do I need for a 100 amp sub panel?
Typical sizes are #3 copper or #1 aluminum for the hots and neutral, with a #8 copper or #6 aluminum equipment ground. Long runs often need one size larger to control voltage drop.
Can I put a 100 amp subpanel on a 200 amp main panel?
Usually yes. Breaker ratings do not need to add up to 200 amps. A load calculation determines whether the house has enough spare capacity for the new loads.
Does a subpanel need a main breaker?
Inside the same building, a main-lug panel is often allowed because the feeding breaker protects it. A detached building needs a local disconnect, so a panel with a main breaker is the simpler choice.
Why are the neutral and ground separated in a subpanel?
Separation keeps normal return current on the neutral only. Bonding them again at the subpanel lets current flow on ground wires and metal parts, which can create shock hazards.
Do I need ground rods for a subpanel in a detached garage?
Yes, a detached building typically needs its own grounding electrode system bonded to the subpanel ground bar, in addition to the four-wire feeder from the house.
Is aluminum wire safe for a 100A sub panel feeder?
Modern aluminum alloy feeder is safe and widely used when it lands on lugs rated for aluminum and is torqued to the manufacturer’s specification.