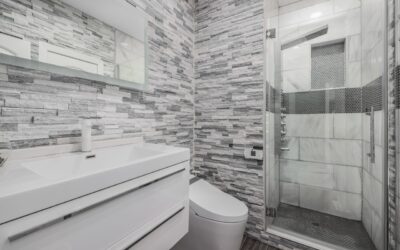
A basement bathroom remodel is the most technically demanding bathroom project in the average home, but it also returns more livability per dollar than almost any other renovation. The challenge is not aesthetic — it is plumbing, moisture, ventilation, and the simple fact that wastewater needs to flow downhill from your fixtures to the sewer. Get the rough-in right and the rest of the project is conventional carpentry. Get the rough-in wrong and you will be tearing concrete out a year later.
Part of our Bathroom Remodeling & Flooring guide — explore the full guide →
Start With the Rough-In Question
Houses built since the 1970s frequently include a basement bathroom rough-in: three or four PVC stubs sticking up out of the basement floor representing future toilet, sink, shower drain, and a vent. If you have this, your project just became dramatically easier — you can tie new fixtures into the existing drain lines without breaking concrete.
Houses without a rough-in face one of three paths:
- Cut and patch the slab: Saw the basement floor, dig trenches for drain lines, run new pipe to the building sewer, backfill, and pour new concrete. Adds $4,000 to $8,000 to the project but gives the cleanest end result
- Install an upflush macerating toilet system: Saniflo and Liberty Pumps make systems that grind waste and pump it up to the main sewer line. Avoid floor breaking entirely. $1,500 to $2,500 for the unit plus install
- Install a sewage ejector pump and basin: A below-floor basin collects gravity drainage from sink and shower, then pumps to the main sewer. Toilet still requires either a gravity connection or a separate macerator
Sewer Line Elevation Is the Critical Factor
Where the main sewer exits your house determines what fixture types you can use. In about 70 percent of US homes built after 1960, the main sewer leaves the foundation above the basement floor — making upflush or ejector pumps necessary for basement fixtures.
If the main exits below the basement floor, you can use conventional gravity-drain fixtures. Check by finding the cleanout in your basement and tracing the pipe. If the pipe slopes down and exits the foundation at a level below your concrete slab, you have gravity drainage potential.
Waterproofing First, Everything Else Second
Basements are damp by definition. Adding a bathroom multiplies the moisture problem. Before any rough-in work begins, address basement moisture in this order:
- Repair exterior drainage so water flows away from foundation walls (downspout extensions, regrading)
- Seal foundation walls with a vapor barrier like Drylok Extreme or apply Xypex crystalline waterproofing if there is hydrostatic pressure
- Install a perimeter drain tile with a sump pump if water actively enters the space
- Run a dedicated dehumidifier rated for the basement square footage (50 to 70 pint units typical for 500 to 1,500 sq ft)
Building a bathroom in a wet basement guarantees mold within 18 months. Fix the bulk water and humidity problems before framing the first wall.
Realistic Cost Ranges
Costs vary widely based on rough-in availability and whether you DIY or hire pros. 2026 price ranges for a 5×8 three-quarter bath:
- DIY with existing rough-in: $3,500 to $6,000 in materials only
- Pro install with existing rough-in: $12,000 to $20,000
- Pro install requiring slab break-up: $20,000 to $32,000
- Pro install with upflush system: $15,000 to $25,000
- Full primary suite (10×12 with separate shower/tub): $35,000 to $60,000
The single biggest cost variable is plumbing complexity. Existing rough-in saves $5,000 to $10,000 over jobs that require new drain runs.
Framing Around Existing Conditions
Basement framing has constraints you do not see in upstairs additions. Steel I-beams, ductwork, plumbing soffits, and electrical panels all intrude into the space. Plan around them rather than fighting them:
Frame interior walls 1 inch off concrete walls to allow airflow behind the drywall. This eliminates the mold problem that plagues walls glued or tight-stacked to basement walls. Use pressure-treated bottom plates anywhere wood meets concrete.
Plan ceiling height carefully. Ductwork is often 8 to 12 inches below the joists, so your finished ceiling may end up at 7’2″ rather than 7’10”. Local code requires minimum 7’0″ finished ceiling in bathrooms.
Ventilation Is Non-Negotiable
Basement bathrooms cannot rely on windows for ventilation. Install an 80 to 110 CFM exhaust fan ducted directly outside through a rim joist or basement wall. Never vent into a soffit, attic, or another basement space.
Run the duct in straight rigid metal pipe with as few elbows as possible. Each 90-degree elbow adds 15 feet of equivalent duct run and chokes airflow. Maximum total equivalent length for a 110 CFM fan should be under 50 feet to maintain rated performance.
Lighting and Electrical
Basements need more light than upper-floor bathrooms because there is rarely natural light. Plan for:
- Recessed ceiling lights spaced no more than 4 feet apart over the room
- Vanity sconces or lights at face height (60 to 64 inches from floor)
- A separate light over the shower with a sealed wet-location fixture
- GFCI protection on every outlet
- Dedicated 20-amp circuit for the bathroom required by NEC
Total wattage should target 6 to 8 watts per sq ft (LED equivalent), which works out to 240 to 320 watts for a 5×8 bath.
Material Choices for Below-Grade Conditions
Wood, paper-faced drywall, and porous flooring fail in basement bathrooms. Substitute:
- Wall surfaces: Cement backer board (Hardibacker, Durock) instead of standard drywall in wet areas. Paperless drywall (DensArmor) elsewhere
- Flooring: Porcelain tile or LVT (luxury vinyl tile) only. Wood flooring of any kind fails below grade. Sheet vinyl works but lacks resale appeal
- Vanity and trim: PVC or solid surface vanities resist humidity. Skip particleboard cabinets — they swell and fail within 5 years
- Insulation: Closed-cell spray foam on concrete walls before framing inside out. Stops vapor migration that ruins fiberglass batt insulation
Permits and Inspections
Every jurisdiction requires permits for a basement bathroom remodel involving plumbing, electrical, or new framing. Pulling the permit is not optional and not bureaucratic theater — the inspector catches mistakes that would otherwise become $20,000 problems three years later. Typical permit cost is $200 to $600 plus inspections at rough-in and final.
The payoff for getting it right is enormous. A finished basement with a true full bath converts unused square footage into living space that appraisers count toward the home’s value. For most houses, the bath is the project that makes the difference between “finished basement” and “permitted living area” in the listing.