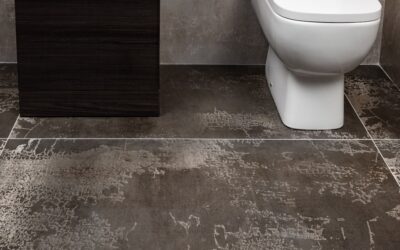
Bathroom vinyl floor tiles have become the go-to choice for homeowners who want a waterproof, stylish, and affordable bathroom floor. With today’s manufacturing technology, vinyl tiles replicate the look of ceramic, marble, slate, and other premium materials while providing 100 percent waterproof performance that real stone and ceramic cannot always guarantee.
Part of our Bathroom Remodeling & Flooring guide — explore the full guide →
This guide covers everything you need to know about choosing and installing bathroom vinyl floor tiles in 2026, from waterproof options and installation methods to design inspiration and practical tips.
- Why Vinyl Floor Tiles Are Perfect for Bathrooms
- Types of Bathroom Vinyl Floor Tiles
- Click-Lock vs Peel-and-Stick for Bathrooms
- Bathroom Vinyl Tile Design Ideas
- How to Install Bathroom Vinyl Floor Tiles
- Tips for Waterproofing Bathroom Vinyl Floors
- Bathroom Vinyl Floor Tile Cost Breakdown
- Maintenance Tips for Bathroom Vinyl Tiles
- Common Mistakes to Avoid
- Final Thoughts
Why Vinyl Floor Tiles Are Perfect for Bathrooms
Bathrooms are the most demanding environment in any home. Constant moisture, humidity, temperature swings, and wet bare feet create conditions that many flooring materials cannot handle. Here is why vinyl flooring excels in this space:
- 100 percent waterproof: Unlike laminate, hardwood, or even ceramic tile with grout gaps, quality vinyl tiles are completely waterproof. Water sitting on the surface, splashes from the shower, and even minor flooding will not damage them.
- Warm underfoot: Vinyl retains warmth far better than ceramic or porcelain tile, making it comfortable for bare feet on cold mornings.
- Slip-resistant: Most vinyl tiles have textured surfaces that provide traction when wet, reducing the risk of bathroom falls.
- Comfortable standing surface: Vinyl has some natural give, making it easier on your feet, knees, and back during grooming routines.
- Easy to clean: Vinyl surfaces resist soap scum, hard water stains, and mildew growth. A quick wipe keeps them looking fresh.
- Affordable: Vinyl tiles cost a fraction of ceramic, porcelain, or natural stone, especially when including installation costs.
- DIY-friendly: Both click-lock and peel-and-stick vinyl tiles can be installed by homeowners with basic skills and no special tools.
Types of Bathroom Vinyl Floor Tiles
Not all vinyl tiles are the same. Here are the main types suitable for bathrooms:
SPC (Stone Plastic Composite) Click-Lock Tiles
SPC vinyl tiles have a rigid, dense core made from limestone powder and PVC. They click together without adhesive, creating a floating floor. SPC is the most popular choice for bathroom floors in 2026 because it is completely waterproof, extremely stable (minimal expansion and contraction), and highly durable.
- Thickness: 4mm to 8mm (including wear layer)
- Wear layer: 12 to 28 mil
- Price: $2.50 to $6.00 per square foot
- Best for: Full bathroom floors, including near showers and tubs
WPC (Wood Plastic Composite) Click-Lock Tiles
WPC vinyl tiles have a softer, more cushioned core that includes a foaming agent. They are warmer and more comfortable underfoot than SPC but slightly less rigid. WPC is fully waterproof and an excellent choice for bathrooms where comfort is a priority.
- Thickness: 5mm to 8mm (including wear layer)
- Wear layer: 12 to 22 mil
- Price: $2.50 to $5.50 per square foot
- Best for: Bathrooms where comfort underfoot is a priority
Peel-and-Stick Vinyl Tiles
Peel-and-stick tiles have a self-adhesive backing that sticks directly to the subfloor. They are the easiest and most affordable vinyl tile option but have significant limitations for bathroom use. The adhesive can fail in high-humidity environments, and water that gets under the tiles can cause them to lift.
- Thickness: 1mm to 3mm
- Wear layer: 4 to 12 mil
- Price: $0.50 to $2.00 per square foot
- Best for: Half baths and powder rooms with minimal water exposure. Not recommended for full bathrooms with showers.
Glue-Down LVT (Luxury Vinyl Tile)
Glue-down LVT is installed using a full-spread adhesive. It creates a very thin, fully bonded floor that follows the contours of the subfloor. Glue-down is the preferred method for commercial bathrooms and is an excellent option for residential bathrooms over concrete subfloors.
- Thickness: 2mm to 5mm
- Wear layer: 12 to 28 mil
- Price: $2.00 to $6.00 per square foot (plus adhesive)
- Best for: Bathrooms over concrete, heated floor systems, and situations where minimal floor height is needed
Click-Lock vs Peel-and-Stick for Bathrooms
This is the most common question homeowners ask about bathroom vinyl floor tiles. Here is the definitive comparison:
Click-Lock: The Superior Choice
Click-lock SPC or WPC tiles are the clear winner for bathroom floors. The interlocking seams create tight joints that resist water penetration, and the rigid core prevents the tiles from shifting or lifting in humid conditions. Click-lock installation is slightly more involved than peel-and-stick but produces a floor that lasts 15 to 25 years in a bathroom environment.
Peel-and-Stick: Budget Option With Caveats
Peel-and-stick tiles are tempting for their low cost and extreme ease of installation. However, bathroom conditions stress the adhesive to its limits. Humidity can weaken the bond, water under the edges causes lifting, and temperature swings in bathrooms cause the thin tiles to expand and contract, pulling them apart at the seams.
If you use peel-and-stick in a bathroom, limit it to a half bath or powder room. Apply extra adhesive around the edges and near water sources. And understand that you may need to replace them in 3 to 5 years rather than the 10 to 15 years you would get in a dry room.
Bathroom Vinyl Tile Design Ideas
Vinyl floor tiles offer endless design possibilities for bathrooms. Here are the most popular looks in 2026:
Marble Look
White and gray marble-look vinyl tiles create a luxurious spa-like bathroom. Carrara and Calacatta patterns are the most requested, with their dramatic veining and luminous surface. Pair with white vanities and chrome fixtures for a timeless look, or with matte black hardware for a contemporary edge.
Slate and Stone
Dark slate or earthy stone-look vinyl tiles ground a bathroom with natural warmth. These designs work beautifully in rustic, farmhouse, and earth-toned bathroom schemes. The textured surfaces also provide excellent slip resistance.
Concrete and Industrial
Concrete-look vinyl tiles deliver the urban industrial aesthetic without the cold, porous surface of actual concrete. Available in light gray, charcoal, and warm taupe, concrete-look tiles pair well with modern, minimalist, and loft-style bathrooms.
Encaustic and Patterned
Bold patterned vinyl tiles inspired by Moroccan, Spanish, and Victorian floor tiles create stunning focal points in bathrooms. Use them on the entire floor for a dramatic statement or as an accent area in front of the vanity or tub. These designs transform a simple bathroom into a design showcase.
Wood Look
Wood-look vinyl planks in a bathroom create a warm, inviting atmosphere that ceramic tile cannot match. Popular options include weathered oak, whitewashed pine, and walnut patterns. Because vinyl is waterproof, you get the wood aesthetic without any risk of water damage.
Large Format Minimalist
Oversized vinyl tiles (18 x 36 or larger) in neutral colors with minimal grout lines create a clean, contemporary bathroom. The fewer seams and larger surface area make small bathrooms feel more spacious.
How to Install Bathroom Vinyl Floor Tiles
Here is a step-by-step guide to installing click-lock vinyl tiles in a bathroom:
Step 1: Prepare the Subfloor
The subfloor must be clean, dry, flat, and smooth. Fill any low spots with floor patch compound and sand down high spots. Remove the toilet and set it aside (you will reinstall it over the new floor). Remove baseboards if desired.
Step 2: Acclimate the Tiles
Let the vinyl tiles sit in the bathroom for 48 hours so they adjust to the room’s temperature. This prevents excessive expansion or contraction after installation.
Step 3: Plan the Layout
Measure the room and plan your tile layout starting from the center or from the most visible wall. Ensure you will not end up with tiny sliver cuts along any wall. For tile-format vinyl, decide on your pattern (straight, offset, diagonal) and snap reference chalk lines.
Step 4: Install the Tiles
Begin at your starting point and click tiles together row by row. For click-lock tiles, angle the long side into the previous row and press down to engage the end joints. Use spacers to maintain a 1/4-inch expansion gap at all walls and fixtures.
Step 5: Cut Around Obstacles
Use a utility knife and straight edge to cut vinyl tiles. For the toilet flange, make a paper template of the shape and transfer it to the tile. A jigsaw with a fine blade or an oscillating multi-tool makes curved cuts easier.
Step 6: Apply Silicone at Wet Areas
Run a bead of 100 percent silicone caulk around the bathtub, shower curb, and toilet flange where they meet the vinyl floor. This prevents water from seeping under the tiles at these critical points.
Step 7: Reinstall Toilet and Trim
Set the toilet on a new wax ring over the flange, reinstall baseboards or add quarter round, and install transition strips at doorways. Caulk the base of the toilet with silicone for a clean, waterproof seal.
Tips for Waterproofing Bathroom Vinyl Floors
While vinyl tiles are waterproof, the installation is only as waterproof as its weakest point. Follow these tips to maximize water protection:
- Seal the perimeter: Apply silicone sealant at every point where the floor meets a wall, tub, shower, toilet, or vanity.
- Do not skip the expansion gap: The 1/4-inch gap at walls allows tiles to expand and contract without buckling. Cover it with baseboard but seal it with silicone first.
- Choose SPC over peel-and-stick: SPC click-lock tiles provide vastly superior waterproof performance compared to peel-and-stick options.
- Address subfloor moisture: If installing over concrete, test moisture levels and use a vapor barrier if needed. Even though the vinyl is waterproof, trapped moisture can cause mold growth underneath.
- Consider a waterproof membrane: For bathrooms with heavy water exposure, applying a liquid waterproof flooring membrane under click-lock tiles provides an extra layer of protection for the subfloor.
Bathroom Vinyl Floor Tile Cost Breakdown
Here is what to budget for a bathroom vinyl tile floor in 2026:
Small Bathroom (40 sqft)
- SPC click-lock vinyl tiles: $100 to $240
- Underlayment (if needed): $16 to $40
- Trim and transitions: $30 to $60
- Silicone and supplies: $15 to $25
- DIY total: $161 to $365
- Professional installation add: $80 to $200
Standard Bathroom (75 sqft)
- SPC click-lock vinyl tiles: $188 to $450
- Underlayment: $30 to $75
- Trim and transitions: $45 to $90
- Silicone and supplies: $20 to $30
- DIY total: $283 to $645
- Professional installation add: $150 to $375
Master Bathroom (120 sqft)
- SPC click-lock vinyl tiles: $300 to $720
- Underlayment: $48 to $120
- Trim and transitions: $60 to $120
- Silicone and supplies: $25 to $35
- DIY total: $433 to $995
- Professional installation add: $240 to $600
Maintenance Tips for Bathroom Vinyl Tiles
Keep your bathroom vinyl floor tiles looking new with these simple maintenance practices:
- Wipe up standing water promptly, not because the vinyl will be damaged but to prevent water from sitting on seams for extended periods.
- Clean weekly with a damp mop and a pH-neutral vinyl floor cleaner.
- Avoid abrasive scrub pads that can scratch the wear layer.
- Never use wax or polish on vinyl floors, as these create a buildup that dulls the surface.
- Use bath mats in front of the shower and tub for safety and to catch excess water.
- Inspect silicone caulk joints twice a year and reseal if you see gaps or deterioration.
- Avoid harsh chemicals like bleach and ammonia, which can discolor vinyl over time.
Common Mistakes to Avoid
Steer clear of these common errors when installing bathroom vinyl floor tiles:
- Using peel-and-stick in a full bathroom: The adhesive fails in high-moisture environments. Use click-lock SPC or WPC instead.
- Skipping subfloor preparation: Bumps, dips, and debris under vinyl tiles show through and cause premature wear. Take the time to level and clean the subfloor.
- Not removing the toilet: Cutting vinyl around the toilet base creates an unprofessional look and leaves gaps where water collects. Always remove the toilet, install the flooring, and then reinstall.
- Forgetting expansion gaps: Vinyl expands and contracts with temperature changes. Without proper gaps at walls, the floor buckles.
- Using the wrong adhesive: If installing glue-down vinyl, use only the adhesive recommended by the manufacturer. The wrong adhesive can cause discoloration, bubbling, or failure.
Final Thoughts
Bathroom vinyl floor tiles offer the ideal combination of waterproof performance, beautiful design options, comfort underfoot, and budget-friendly pricing. For most homeowners, SPC click-lock tiles in a stone or marble look deliver the best results with the easiest installation. Take the time to prepare your subfloor properly, seal all perimeter joints with silicone, and choose a product with at least a 12-mil wear layer for lasting performance. Your bathroom will look stunning and stand up to years of daily use.
Prefer to explore on your own?
See how new flooring looks in your actual room in seconds — free, no signup.
Try the free Floor Studio →