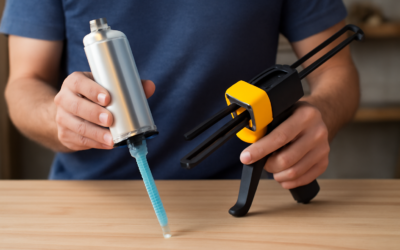
Squeeze a dual-cartridge adhesive without the right tip and you get two runny streaks that never harden. That failure traces back to one overlooked part: epoxy mixing nozzles. These disposable spiral tubes do the entire job of blending resin and hardener in the exact ratio the manufacturer intended, and getting the wrong one is the fastest way to waste a $20 cartridge. Whether you are anchoring a handrail, bonding countertop seams, or repairing rebar, the nozzle matters as much as the epoxy itself.
Part of our Epoxy, Concrete & Garage Floors guide — explore the full guide →
- What Epoxy Mixing Nozzles Actually Do
- The Main Types of Epoxy Mixing Nozzles
- Sizing and Element Count Explained
- How to Install and Use One Correctly
- Can You Reuse Epoxy Mixing Nozzles?
- Buying Guide: What to Look For
- Nozzles for Different Jobs Around the House
- Temperature, Storage, and Shelf Life
- Common Mistakes to Avoid
- Final Thoughts
What Epoxy Mixing Nozzles Actually Do
A static mixing nozzle is a clear or colored plastic tube packed with a twisting internal helix. As the two-part material is pushed through by a caulk gun or pneumatic applicator, the helix folds the resin and hardener over each other dozens of times. By the time the bead exits the tip, it is fully homogenized. There are no moving parts and no batteries; the mixing energy comes entirely from the pressure you apply on the plunger.
This is why hand-mixing in a cup is not equivalent for cartridge products. Two-part structural epoxies are formulated for a precise mix ratio, often 10:1 or 4:1 by volume, and the static mixer guarantees that ratio downstream of the cartridge outlet. Skip it and the cure will be soft, tacky, or non-existent.
The Main Types of Epoxy Mixing Nozzles
Not every tip fits every gun, and the internal geometry varies by application. Knowing the categories saves you a return trip to the hardware store.
- Square (helical) mixers: The most common style, with square baffle elements. Standard for construction adhesives like Simpson SET-3G and Hilti HIT anchoring epoxy.
- Round (bell) mixers: Smoother bore, used for lower-viscosity resins and some medical or electronics-grade adhesives.
- Quadro / fine-mix nozzles: Extra element count for high-precision bonding where color streaking cannot be tolerated.
- Bayonet vs. threaded bases: The bayonet twist-lock is typical on 50 ml and 200 ml cartridges; larger tubes may use a threaded collar. Match the base or the nozzle will blow off under pressure.
Sizing and Element Count Explained
Two numbers define a nozzle: the outlet diameter and the number of mixing elements inside. Common outlet diameters run from 3.5 mm up to 8 mm. A narrow tip gives you a fine bead for tight anchor holes; a wide tip flows fast for large countertop pours.
Element count is the quieter spec but arguably the more important one. Budget nozzles carry 12 to 16 elements, while premium mixers pack 24 or more. More elements mean more folds and a more thorough blend, which matters for stiff structural epoxies. As a rule, a 10:1 ratio product needs at least 16 elements to mix reliably, and a demanding 1:1 or 2:1 methacrylate may want 24-plus. When in doubt, use the exact nozzle the epoxy maker specifies on the label, because their cure data was validated with that part.
How to Install and Use One Correctly
Getting a clean bond is mostly about the first ten seconds. Rushing the purge is where most homeowners lose a cartridge.
- Open the cartridge and wipe both outlet ports clean.
- Push a tiny bead of raw material out first to confirm both sides flow evenly. If one port is clogged, clear it with a nail before attaching the nozzle.
- Twist or thread the nozzle on until it seats fully.
- Purge and discard the first 2 to 4 inches of output. The leading material has not yet reached a full mix ratio and will cure poorly.
- Dispense your working bead in a steady, continuous motion.
Work within the epoxy’s open time, which can be as short as 4 minutes for fast-set anchoring products at 75 degrees F and much longer in cold weather. Warm the cartridge to room temperature before starting; cold resin is stiff, hard to push, and mixes poorly.
Can You Reuse Epoxy Mixing Nozzles?
Usually not, and this trips up first-timers. Once material sits inside the tube, it begins to gel and will harden solid within the open time. If you plan to make several beads from one cartridge, leave the used nozzle attached between beads and it acts as its own cap, buying you a little time. But the moment the internal epoxy sets, that nozzle is trash.
Keep spares on hand. If you buy a 200 ml cartridge of anchoring adhesive expecting to set six bolts across an afternoon, budget for three or four nozzles at roughly $1 to $3 each. The nozzle is the cheapest part of the job, so never risk a failed anchor to save a dollar. Some pros extend a cartridge by removing a partly used nozzle, capping the ports, and fitting a fresh tip for the next session, but only if the exposed material at the outlet is still liquid.
Buying Guide: What to Look For
Match three things and you will rarely go wrong.
- Cartridge compatibility: Confirm the base style and diameter for your brand. Hilti, Simpson, DEWALT, and 3M each have preferred nozzle families, though many are cross-compatible.
- Ratio match: A 10:1 nozzle has offset inlet ports sized for that ratio. Using a 1:1 nozzle on a 10:1 product starves one side and ruins the mix.
- Length: Standard nozzles run about 5 to 6 inches. Extension tubes let you inject deep into anchor holes for rebar doweling, pushing material from the bottom up to avoid air pockets.
Expect to pay $8 to $20 for a pack of 6 to 12 generic nozzles, and slightly more for OEM-branded ones. Off-brand nozzles are fine for general bonding, but for engineered anchoring where a building inspector may check your work, stick with the manufacturer’s specified part number.
Nozzles for Different Jobs Around the House
The right tip changes with the task, and homeowners tackle a surprising range of two-part epoxy work. Matching the nozzle to the job improves both the result and how little material you waste.
- Setting anchor bolts and rebar dowels: Use a nozzle with an extension tube so you can fill the hole from the bottom up. This pushes air out ahead of the epoxy and prevents voids that weaken the anchor. A 16-element square mixer matched to a 10:1 anchoring adhesive is the standard combination.
- Bonding countertop and stone seams: A wider outlet, around 6 to 8 mm, flows the polyester or acrylic knife-grade adhesive fast so you can dress the seam before it skins over. Purge onto scrap and check the color match before touching the stone.
- Small crack injection and general repairs: A fine 3.5 to 4 mm tip gives you a controllable bead for filling hairline cracks or bonding trim. Warm the cartridge first so the thin outlet does not clog.
- Marine and structural laminating: Higher element-count mixers, 24 or more, guarantee a streak-free blend where the joint carries load.
Because a fresh nozzle costs so little, keeping two or three styles on the shelf means you are always ready without a hardware run mid-project. Store them in a sealed bag away from heat so the plastic bases do not warp.
Temperature, Storage, and Shelf Life
The nozzle only performs as well as the epoxy behind it, and both are temperature sensitive. Most cartridge epoxies want to be applied between about 40 and 100 degrees F, with 70 to 75 degrees F being the sweet spot for flow and cure. In cold weather, store the cartridge indoors overnight and, if the label allows, keep it in a warm pocket on the way to the work area. Cold, stiff resin is the leading cause of a blown-off nozzle because pressure spikes as you fight the viscosity.
Watch the cartridge expiration date too. An open cartridge with a used nozzle acting as a cap can often be reused within a day or two if the exposed material at the outlet is still liquid, but a nozzle that has fully gelled inside must be replaced before the next bead. Never try to drill out a hardened mixer; just swap in a fresh one.
Common Mistakes to Avoid
Even seasoned DIYers make these. Skipping the purge bead is the number one cause of a soft, streaky joint. Reusing a hardened nozzle wastes the cartridge behind it because pressure builds until the tube pops off. Pairing the wrong ratio nozzle to a cartridge produces material that looks mixed but never reaches full strength. And forcing stiff, cold epoxy through a fine 3.5 mm tip can rupture the nozzle mid-bead, spraying resin. Warm the material, choose an adequately sized outlet, and let the helix do its work.
Final Thoughts
For a part that costs a couple of dollars, epoxy mixing nozzles carry an outsized share of the responsibility for a strong, fully cured bond. Choose one that matches your cartridge base, mix ratio, and element-count needs, purge the first few inches every time, and keep spares within reach so a mid-job gel-up never stops you. Do that, and the epoxy will perform exactly the way the label promises, whether you are setting anchor bolts or sealing a seam.