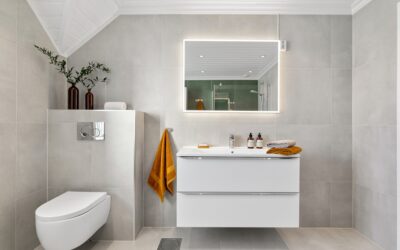
The design trick that makes a small bathroom feel dramatically larger is simpler than most people expect: get the cabinet off the floor. A floating bathroom vanity mounts directly to the wall with open space beneath it, and that visible stretch of floor tricks the eye into reading the whole room as bigger and airier. Beyond looks, it makes cleaning underneath effortless and lets you customize the mounting height to whoever uses the space. But because the entire weight of the cabinet, countertop, and sink hangs off your wall, installation demands proper structural support, and that is where DIY confidence meets real physics. Here is everything you need to plan and install one correctly.
Part of our Bathroom Remodeling & Flooring guide — explore the full guide →
Why Homeowners Choose Floating Vanities
The appeal starts with the visual payoff. Exposing the floor beneath the cabinet makes a cramped powder room or small primary bath feel open, which is why designers reach for floating vanities in tight spaces and modern remodels alike. Practical benefits follow close behind. Mopping under a wall-mounted cabinet takes seconds, with no toe-kick trapping grime. You can set the mounting height to suit tall or short users, or to clear a heating register or baseboard. And the clean, hovering line reads as contemporary and custom, an instant upgrade to a dated bathroom.
The trade-offs are real too. Floating vanities offer slightly less storage than floor-standing units of the same width because the base is open, and they require solid wall support that a freestanding cabinet does not. For most homeowners, the airy look wins those small compromises easily.
The Structure Behind the Wall Is Everything
This is the detail that separates a secure installation from a cabinet pulling out of the drywall. A floating vanity, loaded with a stone top, a sink, and water, can weigh well over 150 pounds, and all of it cantilevers off the wall. You cannot hang that on drywall anchors alone. The correct approach is to install solid wood blocking, typically a length of 2×8 or 2×10 lumber, between the wall studs at the mounting height, before the wall is closed up. That blocking gives you a continuous solid surface to drive the mounting bolts into, spreading the load across multiple studs.
If the wall is already finished and you did not plan ahead, you must either open the drywall to add blocking or locate the studs and bolt the vanity’s cleat directly into at least two studs with heavy lag screws. Never rely on hollow-wall anchors for a loaded floating vanity; they will eventually tear free.
Planning the Mounting Height
One of the best features of a floating vanity is that you choose the height, but that freedom means you have to get it right. Standard vanity height, measured to the top of the counter, runs 32 to 36 inches. A common comfortable target is around 34 inches, though taller households often go higher. Consider these factors when you decide:
- User height: Taller users appreciate 34 to 36 inches; shorter users or a kids’ bath may want lower.
- Clearance below: Leave enough open floor beneath to show off the floating effect, commonly 8 to 12 inches.
- Plumbing rough-in: Your drain and supply lines must exit the wall within the cabinet, so coordinate the height with existing or relocated plumbing.
- Vessel vs. undermount sink: A vessel sink sits on top and adds height, so lower the cabinet to keep the rim usable.
Handling the Plumbing
Floating vanities almost always require wall-mounted plumbing rather than floor-mounted, because the open base leaves the pipes visible if they run through the floor. That means your drain and water supply lines should exit through the wall, hidden behind the cabinet. If you are converting from a floor-standing vanity with floor plumbing, you will likely need to relocate the rough-ins into the wall, a job for a plumber unless you are experienced. Measure carefully so the drain and supply penetrations fall within the cabinet body and behind the drawers or false fronts. Getting the plumbing location right during rough-in prevents a lot of grief later.
The Installation Sequence
With blocking in place and plumbing roughed in, the install itself is manageable for a confident DIYer:
- Mark a level line at your chosen mounting height. Use a long level or a laser; a vanity hung even slightly out of level is glaringly obvious.
- Locate and mark the blocking or studs behind the drywall.
- Hold the cabinet to the line, mark the mounting holes, and drill pilot holes into the blocking or studs.
- Bolt the cabinet to the wall with heavy lag screws or the manufacturer’s mounting hardware, checking level as you tighten.
- Connect the drain and supply lines, set the countertop and sink, and seal the counter-to-wall joint with a bead of silicone.
Take your time confirming level and solid anchorage before you trust the cabinet with weight. A test tug on a securely mounted vanity should not produce any give.
Cost Breakdown
Floating vanities span a wide price range. A basic ready-to-assemble unit runs $200 to $600, a mid-range solid-wood cabinet with a stone top lands at $600 to $1,500, and high-end custom or designer pieces climb well beyond $2,000. Add $150 to $500 for a countertop and sink if not included. Professional installation typically costs $200 to $600, more if plumbing relocation or wall blocking requires opening the wall. Budget for a plumber if you are moving rough-ins, which can add $300 to $800.
Design Tips
To make the most of the floating look, add under-cabinet LED lighting, a strip mounted beneath the vanity that washes the wall and floor with a soft glow, which amplifies the hovering effect and doubles as a bathroom nightlight. Pair the vanity with a wall-mounted faucet for a fully floating aesthetic, or keep a deck-mounted faucet for simpler plumbing. Choose drawers over doors to maximize the reduced storage, and consider a narrow depth in tight rooms. A floating vanity paired with a large mirror and good lighting turns even a modest bathroom into something that looks designed.
Choosing the Right Size and Configuration
Floating vanities come in the same width range as floor-standing units, from compact 24-inch single-sink models up to 72-inch doubles, so the choice comes down to your bathroom’s size and your storage needs. In a small bathroom, a floating design is especially valuable because the exposed floor makes the room feel larger, but you sacrifice some storage to the open base, so favor drawers over open shelving to keep the reduced space organized. For a primary bath, a 60- or 72-inch double-sink floating vanity makes a striking, spa-like statement. Pay attention to depth as well: a standard 21-inch depth suits most rooms, but a shallow 15-to-18-inch model helps in tight layouts. Whatever the size, confirm your plumbing rough-ins fall within the cabinet body, since the open base leaves any misplaced pipes exposed to view.
Materials and Finishes That Last
Because a bathroom is humid and the vanity is a focal point, material choice affects both durability and looks. Solid wood and marine-grade plywood cabinets resist moisture far better than particleboard, which can swell if water reaches it repeatedly. Popular finishes range from natural wood tones that add warmth to high-gloss lacquers and matte painted surfaces in modern colors. For the countertop, quartz and solid surface are waterproof, stain-resistant, and need no sealing, making them ideal above a busy sink, while natural stone like marble looks luxurious but requires sealing and is prone to etching. Choose quality soft-close drawer glides and hinges rated for the damp environment, since cheap hardware is the first thing to fail in a bathroom. Investing a little more in materials pays off in a vanity that still looks and works well many years later.
Common Installation Mistakes
A handful of errors account for most floating-vanity problems, and all are avoidable. The biggest is inadequate wall support, relying on drywall anchors instead of solid blocking or stud anchoring, which lets the loaded cabinet slowly pull away from the wall. The second is hanging the vanity out of level, which is glaringly obvious on a horizontal cabinet and throws off the countertop and sink drainage. Mounting at the wrong height, too low for tall users or too high once a vessel sink is added, is another frequent regret, so plan the finished counter height carefully before drilling. Finally, forgetting to coordinate wall-mounted plumbing during rough-in leaves pipes visible beneath the open cabinet. Address these four points and the installation goes smoothly and stays solid for the life of the bathroom.
A well-installed floating bathroom vanity delivers a modern, spacious feel and easy cleaning that floor-standing cabinets simply cannot match. The one rule you cannot bend is structural support, so plan your blocking, anchor into solid framing, and coordinate the plumbing before you hang it. Nail those fundamentals and you will end up with a vanity that appears to float effortlessly and stays rock-solid for the life of the bathroom.