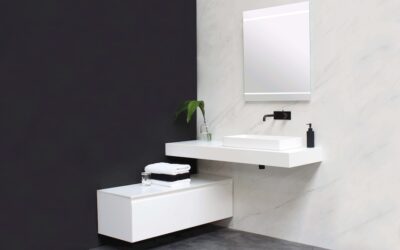
Nothing makes a small bathroom feel bigger for less money than getting the vanity off the floor. A wall-mount bathroom vanity, also called a floating vanity, hangs entirely from the wall with open space beneath, and that strip of visible floor tricks the eye into reading the whole room as larger. Beyond looks, it lets you clean the floor in one pass and set the counter to whatever height suits you. The catch is simple: the entire loaded weight, cabinet plus stone top plus a person leaning on it, transfers into the wall, so the framing behind it has to be right. Get the blocking correct and a floating vanity outlasts a floor cabinet.
Part of our Bathroom Remodeling & Flooring guide — explore the full guide →
Here is the honest rundown of the tradeoffs, plus the exact way I hang one.
The Real Advantages
The visual payoff is the headline, but the practical wins add up. A floating vanity exposes the floor, so a small bathroom reads as more open and mopping is effortless with no toe kick to catch grime. You also get to pick the mounting height instead of being locked to a 32- or 36-inch cabinet, which matters for tall users or a wheelchair-accessible layout. And because there is no base frame, the plumbing is easier to reach for repairs.
The Honest Drawbacks
Floating is not free of compromise. You lose the enclosed toe-kick storage a floor cabinet offers, so total storage is a bit lower. Installation is more demanding because you must hit solid framing or add blocking, and a botched mount can pull out of the wall under load. The exposed plumbing beneath the cabinet is visible unless you box it in or choose a design that hides it. Finally, wall-mount vanities cost a little more for equivalent quality because the bracket systems and reinforced backs add expense.
Blocking and Wall Support
This is the part that separates a vanity that lasts from one that ends up on the floor. The ideal support is horizontal 2-by blocking installed between the studs, behind the drywall, at the exact height of the mounting rail. When a wall is open during a remodel, I always add a run of 2×8 or 2×10 blocking across the vanity zone, screwed to the studs, so the cabinet can be lagged anywhere along it. If the wall is already closed and you cannot open it, you must locate the studs and land at least two heavy lag screws into solid framing, supplemented by rated toggle bolts in the field. Drywall anchors alone are never acceptable for a loaded vanity.
Mounting Height Guidelines
One of the perks of floating is choosing your height, but there are sensible ranges. Measure from the finished floor to the top of the counter:
- Standard comfort height: 34 to 36 inches to the counter top
- Traditional height: 32 inches for shorter users or a kids’ bath
- Vessel-sink setups: mount lower, around 30 to 32 inches, since the bowl adds 4 to 6 inches
- Clearance below: leave at least 6 to 10 inches of open floor for the floating effect and easy cleaning
Dry-fit the height with a helper holding the cabinet before you drill. Once it feels right for the primary user, mark the line with a level and commit.
Tools and Materials
Before you start, gather a 4-foot level, a stud finder, an impact driver, a drill with the right bit for your lag screws, heavy lag screws or the manufacturer’s mounting hardware, toggle bolts as backup, shims, and a helper. A second set of hands is not optional; a stone-topped cabinet held against the wall at chest height is awkward and heavy for one person.
Step-by-Step Installation
Here is the sequence I follow on every floating vanity:
- Locate and mark every stud in the vanity zone.
- Snap or draw a level line at your chosen mounting height for the top of the cabinet.
- If using a French cleat or mounting rail, screw it to the studs or blocking dead level.
- Hang the cabinet on the cleat, or hold it to the line and drive lag screws through the back rail into the framing.
- Check level in both directions and shim behind the cabinet at the wall if needed.
- Add toggle bolts in any spot that lacks a stud, per the maker’s instructions.
- Set the counter and sink, then connect the drain and supply lines.
- Caulk the top back edge to the wall to keep splash water out.
Handling the Plumbing
Because the base is open, your plumbing shows. Plan for it. Many floating vanities have a back panel with a cutout to hide the trap inside the cabinet, which is the cleanest look. If yours does not, a chrome or matte-black bottle trap and matching supply valves turn exposed plumbing into an intentional design detail. Keep the P-trap and supply stub-outs positioned so they clear the cabinet bottom, and confirm the drain height works with a wall-mount setup, since the cabinet floor may sit higher than a standard vanity.
Cost and Whether to DIY
A wall-mount vanity runs $250 to $700 for a stock unit and $700 to $1,800 for semi-custom, generally $50 to $150 more than a comparable floor model. Professional installation adds $150 to $400. A confident DIYer with framing behind the wall can do this in a half day, but if you are unsure whether solid blocking exists, that is the moment to open the wall or call a pro. The single biggest failure mode is anchoring into drywall instead of framing. Nail the support and a wall-mount bathroom vanity delivers the open, modern look of a high-end remodel for a mid-range price.
Choosing the Right Size and Style
Wall-mount vanities come in the same width range as floor models, from 18-inch single-sink units up to 72-inch doubles, so the size decision follows your bathroom just as it would for any vanity. Where floating designs differ is proportion; because the floor shows beneath, a wider, lower-profile vanity reads as more modern and intentional than a tall narrow one. Drawers tend to look cleaner than doors on a floating unit, and many designs run a single wide drawer with a U-shaped notch around the plumbing. Consider the sink style too: an integrated top or an undermount keeps the profile slim, while a vessel sink adds height and a design statement but raises the effective counter level, so you mount the cabinet lower to compensate.
Weight Capacity and Load Planning
Before you commit to a floating install, add up the real load the wall will carry. The cabinet itself might be 40 to 80 pounds, a stone top adds 30 to 60 pounds, a full sink of water is another 20 pounds, and a person leaning on the counter can add 100 pounds or more of dynamic force. Your mounting system needs to handle all of it with a safety margin, which is why 2-by blocking lagged into studs is the gold standard. Distribute the load across at least two studs where possible, and use the largest lag screws the cabinet’s mounting holes allow. If the manufacturer specifies a mounting rail or French cleat rated for a given weight, follow it exactly rather than improvising, because the rating assumes proper installation into framing.
Common Mistakes to Avoid
Most floating-vanity failures trace back to a handful of avoidable errors. Anchoring into drywall with plastic anchors is the worst, and it will pull out within months under normal use. Setting the cabinet before verifying the plumbing height is another; the drain and supply must clear the cabinet bottom, and on a floating unit the cabinet floor often sits higher than a standard vanity, so lines may need adjusting. Skipping the level check leads to doors and drawers that drift open on their own. And forgetting to caulk the back edge lets splash water run down the wall behind the cabinet, where it feeds mold you never see. Take the extra hour to do each of these right and the vanity performs flawlessly for decades.