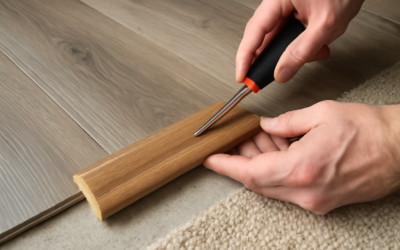
A clean install lives or dies at the edges. The right flooring end cap is the molding that hides exposed plank edges at doorways, sliding glass doors, fireplace hearths, stair landings, and any spot where one floor meets a wall, threshold, or different surface entirely. Skip it and the floor looks unfinished, plank edges chip, and the manufacturer warranty walks. Pick the wrong profile and you create a trip hazard. This guide covers when you need an end cap, what types are available, and what to budget per linear foot.
What an End Cap Actually Does
An end cap is a transition molding with one finished decorative edge that slopes or steps down to meet a non-flooring surface — carpet, sliding door track, brick hearth, exterior threshold, or concrete that stays exposed. It seals the cut edge of the plank, accommodates expansion movement on floating floors, and protects against impact damage. End caps differ from T-moldings (which join two equal-height floors) and reducers (which step from a thicker floor down to a thinner one).
Common End Cap Profiles
- Square edge end cap: 90-degree edge, flush vertical face — used at sliding door tracks and thresholds
- Slope/ramp end cap: tapered profile down to substrate — used at carpet edges and exterior doors
- Stair nosing end cap: rounded bullnose for stair landings and edges
- Hearth end cap: low profile, sometimes with mitered corner pieces, for fireplace transitions
- Rail end cap: Schluter-style aluminum profile that can be tiled into
Typical Sizes and Dimensions
Most residential end caps come in 78-94 inch lengths. Width on the visible face runs 1.5 to 2.5 inches, with overall thickness matching the parent flooring (5/16 inch up to 3/4 inch). Manufacturer-branded end caps from brands like Pergo, Mohawk, Bruce, and Shaw match their flooring SKUs exactly in color and grain pattern. Universal end caps from M-D Building Products and InvisiTrim cover broader use cases at lower prices but rarely match plank tones perfectly.
Materials and Pricing
- MDF with printed laminate or veneer: $4-9 per linear foot — matches laminate and engineered hardwood
- Solid hardwood: $7-15 per linear foot — standard for site-finished hardwood floors
- Aluminum or stainless: $6-25 per linear foot — Schluter Reno-RAMP, Reno-U for tile
- PVC and vinyl: $3-7 per linear foot — for LVP/SPC waterproof transitions
- Brass or bronze: $20-45 per linear foot — high-end residential, durable, traditional look
Pros of Using a Proper End Cap
The visible benefit is aesthetic — the floor reads finished, intentional, and professional. The hidden benefits matter more. End caps protect the plank’s most vulnerable edge from impact, water intrusion (especially at exterior doors), and warping. On floating floors, they accommodate the 5/16 inch expansion gap manufacturers require. Without that gap, the floor will buckle in summer humidity and gap in winter. They also reduce trip hazards by smoothly stepping the height down to adjacent surfaces.
Cons and Trade-Offs
End caps add to material cost — typically $50-200 for a whole-house install with multiple thresholds. Color matching can be imperfect. Manufacturer-branded end caps come in fewer SKUs than the parent flooring line, so if you choose a niche color you may end up with a near-match instead of an exact match. Aluminum profiles look industrial and read out of place in traditional homes.
End caps also wear differently than the floor they edge, especially at high-traffic doorways. Plan to replace one or two over a 15-20 year service life.
Where to Use Each Type
At sliding glass doors and patio thresholds, use a slope or square edge end cap to keep the floor out of weather and to provide a wear-resistant transition. At carpet boundaries, a slope end cap keeps the height differential under the 1/4 inch ADA threshold. At fireplace hearths, a hearth end cap (or mitered hardwood threshold) protects the floor from radiant heat and dropped logs. At stair landings, stair nosing end caps with bullnose profiles meet building code requirements for nosing depth.
Installation Step by Step
- Measure the opening from jamb to jamb or wall to wall
- Cut the end cap to length with a miter saw and 80-tooth blade for clean ends
- Verify the substrate is flat and clean — debris under the cap will telegraph or rock
- For floating floors, install over the expansion gap, never fasten through the floating plank
- Most end caps fasten with construction adhesive (Loctite PL Premium) plus 1.5-inch finish nails into the subfloor
- Wipe excess adhesive immediately with a damp cloth before it cures
- Caulk the joint with a color-matched silicone or paintable sealant if needed
Common Installation Mistakes
Nailing through the end cap into a floating laminate or LVP plank — locks the floor in place, defeats the floating system, causes seasonal cracking. Skipping the construction adhesive and relying on finish nails alone — the cap rocks loose within a year. Mixing manufacturer end caps with mismatched flooring brands without ordering samples first — color can be embarrassingly off. Cutting the cap too short and trying to caulk the gap — looks amateur, traps debris.
End Cap vs Other Transition Profiles
Threshold strips are similar but typically wider and used at exterior doors with weather seals. T-moldings join two equal-height floors at a doorway and are the wrong call where one side is carpet or exposed substrate. Reducers step down to a lower floor — useful when laminate meets vinyl, but again wrong at carpet or substrate edges. Use the matching cap for the actual condition; mixing them up is the most common floor-trim mistake homeowners make.
Where to Buy
Manufacturer-matched end caps come from the original flooring distributor — Lumber Liquidators, Floor & Decor, Home Depot Pro Desk, or Lowe’s special order. Universal options live at every home center, while Schluter aluminum profiles ship from tile supply houses like Tile Outlets of America. Always order one extra for cuts and replacements; manufacturer SKUs come and go, and a discontinued cap is hard to source two years later.
Bottom Line
A flooring end cap is a small line item that defines whether your install looks like a $300 weekend job or a $10,000 professional install. Match the profile to the actual transition condition, color-match to the parent flooring, and install with adhesive plus finish nails into the subfloor (never through floating planks). The 30 minutes per doorway it takes to install correctly pays back every day for the next 20 years.
Prefer to explore on your own?
See how new flooring looks in your actual room in seconds — free, no signup.
Try the free Floor Studio →