A full ceramic tile backsplash means thinset, spacers, a wet saw, and a weekend of grout haze under your fingernails. A kitchen backsplash peel and stick project skips all of it, letting you cover the wall between your counter and cabinets in an afternoon with nothing more than a utility knife and a level. For renters, first-time DIYers, and anyone who wants a fast refresh, these adhesive-backed tiles have gone from gimmicky to genuinely convincing over the last few years.
Part of our Kitchen Remodeling guide — explore the full guide →
- What Peel and Stick Backsplash Actually Is
- Common Material Types
- Surface Prep Makes or Breaks It
- Step-by-Step Installation
- What It Costs Compared to Real Tile
- Where Peel and Stick Falls Short
- Pros, Cons, and Bottom Line
- Common Mistakes That Cause Tiles to Peel
- Cutting Around Outlets and Odd Spots
- Cleaning and Maintenance
- Frequently Asked Questions
What Peel and Stick Backsplash Actually Is
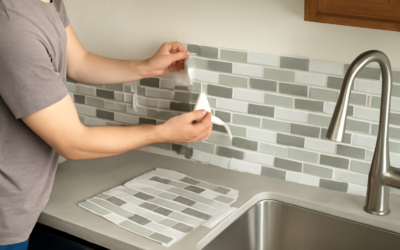
These are lightweight tiles or sheets with a pressure-sensitive adhesive on the back, protected by a peel-away liner. You position the sheet, press it against a clean wall, and the adhesive grips. There’s no mortar and, on many products, no separate grouting step because the grout lines are printed or molded right into the sheet.
Quality has improved sharply. Early versions were flat vinyl stickers that looked like wallpaper. Today you can buy gel-based tiles with real dimension, brushed-metal aluminum composite tiles, and even thin peel-and-stick real stone or glass mosaics that pass the squint test from a few feet away.
Common Material Types
- Vinyl/PVC sheets: the cheapest at $4 to $8 per sheet, printed patterns that mimic subway tile or moroccan designs. Best for low-splash areas.
- Gel or epoxy-coated tiles: raised, glossy, three-dimensional tiles that look and feel closest to real ceramic. Around $6 to $12 per sheet.
- Aluminum composite/metal: rigid tiles with a brushed or mirrored finish, heat-tolerant enough for behind a range. Roughly $8 to $15 per sheet.
- Real stone or glass mosaic: thin natural material on a mesh backing with adhesive, the premium option at $10 to $20 per sheet.
Surface Prep Makes or Breaks It
The adhesive can only grip what it touches, so the wall has to be smooth, clean, dry, and grease-free. Kitchen walls near a stove carry an invisible film of cooking oil that will cause tiles to peel within weeks if you don’t remove it.
- Wash the wall with a degreasing cleaner like TSP substitute or Krud Kutter, then rinse and let it dry fully.
- Fill any nail holes or dents with spackle and sand smooth. Peel and stick will telegraph every bump underneath.
- Lightly sand glossy paint so the adhesive has some tooth to grab.
- Wipe with rubbing alcohol as a final degrease and let the wall dry completely.
Textured or heavily orange-peel walls are the enemy. If your wall isn’t smooth, the tiles won’t fully bond and edges will lift. In that case, skim-coat the wall or reconsider whether peel and stick is right for the space.
Step-by-Step Installation
- Find your starting point. Mark a level line about one tile height above the counter and work up and out from a focal point, usually behind the sink or range.
- Dry-fit a few sheets first without removing the liner to plan cuts around outlets and cabinet edges.
- Peel the backing, align the sheet to your level line, and press from the center outward to push out air.
- Overlap or butt the interlocking edges as the product specifies so the pattern flows seamlessly.
- Cut around outlets with a sharp utility knife or scissors. Turn off the power and loosen the outlet cover so tile tucks behind it for a clean look.
- Roll the whole surface with a wallpaper seam roller or press firmly with a clean rag to maximize adhesion.
What It Costs Compared to Real Tile
A standard kitchen backsplash covers 30 to 40 square feet. Peel and stick materials run roughly $8 to $15 per square foot, so figure $250 to $600 for the whole job with no labor and almost no tools. Real ceramic or porcelain tile installed by a pro runs $15 to $40 per square foot installed once you factor in thinset, grout, and labor. Even DIYing traditional tile costs more in tools and time. Peel and stick wins decisively on speed and budget; it loses on permanence and resale appeal.
Where Peel and Stick Falls Short
Heat and moisture are the real limits. Directly behind a gas range, tiles can soften or discolor unless you buy a heat-rated metal or gel product. In a humid kitchen without a range hood, steam can eventually work under seams. And peel and stick is not a lifetime finish; expect 3 to 7 years before edges start to lift or the pattern dates. It also rarely adds resale value the way genuine tile does, and picky buyers can spot it up close.
Pros, Cons, and Bottom Line
- Pros: fast install, no special tools, renter-friendly and often removable, low cost, huge range of styles, no grout maintenance.
- Cons: demands a smooth clean wall, limited heat and moisture tolerance, shorter lifespan, seams can lift, less resale value than real tile.
For a quick, affordable kitchen facelift, especially in a rental or a room you plan to redo eventually, a kitchen backsplash peel and stick is hard to beat. Buy a gel or metal product rather than the flat vinyl, degrease that wall like your project depends on it (because it does), and you’ll get a result that genuinely looks like tile for a fraction of the effort. If you want a forever backsplash that survives a hard scrub and adds home value, invest in the real thing instead.
Common Mistakes That Cause Tiles to Peel
Almost every failed peel-and-stick job traces back to one of a handful of avoidable errors. Skipping the degrease is the number one killer near a stove, where airborne cooking oil coats everything. Installing over textured or freshly painted walls is a close second; latex paint needs a full 30 days to cure before adhesive will bond reliably, and orange-peel texture leaves the adhesive touching only the high spots.
- Starting in a corner instead of off a level line, which lets small errors compound into a visibly crooked run.
- Applying in a cold kitchen. Pressure-sensitive adhesive bonds best between 65 and 85°F; below 50°F it barely tacks.
- Not rolling the seams, so edges lift within days.
- Butting tiles too tight or leaving gaps, which throws off the printed grout pattern.
Cutting Around Outlets and Odd Spots
Outlets, window trim, and the ledge where cabinets meet the wall are where most beginners struggle. Kill the breaker before you loosen any outlet cover. Back the outlet out about a quarter inch on its screws so the tile edge tucks behind the cover plate for a factory-clean look, then reset the plate over the finished tile. For curves and tight notches, a sharp utility knife with a fresh blade beats scissors; score firmly, then snap or cut through. Warming a stubborn gel tile with a hair dryer for a few seconds makes it more pliable for tricky bends.
Cleaning and Maintenance
One genuine advantage over real tile is that there’s no porous grout to scrub. Wipe the surface with a damp microfiber cloth and a mild dish-soap solution. Skip abrasive pads and harsh solvents like acetone, which can dull or lift printed vinyl. For grease spatter behind the range, a little Krud Kutter on a soft cloth pulls it off without attacking the finish. When a single tile eventually lifts at a corner, a dot of clear silicone or a strip of double-sided mounting tape usually rescues it without redoing the wall.
Frequently Asked Questions
Is peel and stick removable without wrecking the wall? Usually, if you go slow. Warm each tile with a hair dryer to soften the adhesive, peel at a low angle, and clean off residue with an adhesive remover like Goo Gone. Fresh paint may still lift, so renters should test one tile first.
Can I put it behind a gas stove? Only with a heat-rated metal or gel product, and never directly over an open flame area. Flat vinyl can warp or discolor from range heat.
How long does it last? Plan on 3 to 7 years before edges start lifting or the style feels dated. Good prep and a quality gel or metal tile push you toward the top of that range.