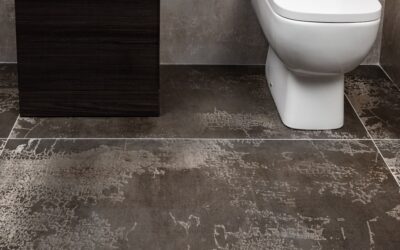
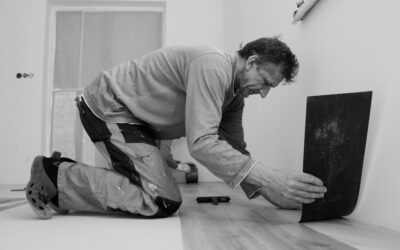
Installing LVT flooring in a bathroom gives you the look of natural stone or ceramic tile with superior comfort, easier installation, and complete waterproof protection. Luxury vinyl tile has become one of the most popular bathroom flooring choices, and for good reason — it solves nearly every problem that makes bathroom flooring selection so difficult.
Part of our Bathroom Remodeling & Flooring guide — explore the full guide →
This guide explains why LVT works so well in bathrooms, compares tile and plank formats, walks through design options and installation methods, and covers the grout question that trips up many homeowners.
Why LVT Is Ideal for Bathrooms
Bathrooms present the toughest conditions for any flooring material. Water from showers, baths, sinks, and toilets constantly challenges the floor surface. Temperature fluctuations from hot showers create humidity spikes. Bare feet demand a surface that feels warm and comfortable. LVT handles all of these conditions.
Waterproof Performance
Quality LVT is 100% waterproof at the surface level. Unlike laminate flooring, which can swell when moisture penetrates the core, LVT’s vinyl composition does not absorb water. Rigid-core SPC (stone polymer composite) and WPC (wood polymer composite) LVT maintain their dimensional stability even when exposed to standing water.
However, waterproof performance has a nuance that matters in bathrooms. The tiles themselves are waterproof, but the joints between click-lock tiles are not sealed unless grouted or installed with a glue-down method. Water that penetrates these joints reaches the subfloor, where it can cause mold, mildew, or damage over time.
Comfort and Warmth
Stepping onto cold ceramic tile after a shower is one of the least pleasant morning experiences. LVT feels noticeably warmer underfoot because vinyl does not conduct heat away from your body the way stone and ceramic do. Products with cork or foam backing add even more thermal comfort.
Slip Resistance
Most LVT products offer better slip resistance than polished ceramic or natural stone tiles, especially when wet. Textured LVT with embossed stone patterns provides additional grip. Always check the product’s slip resistance rating — look for a minimum R10 rating for bathroom use.
Easy Maintenance
Bathroom floors collect soap scum, toothpaste, hair products, and hard water deposits. LVT cleans easily with a damp mop and pH-neutral cleaner. There is no grout to scrub (unless you choose grouted installation), no sealing required, and no risk of staining from bathroom products.
Tile vs. Plank Format for Bathrooms
LVT comes in both tile (square or rectangular) and plank (long and narrow) formats. Both work in bathrooms, but each has advantages.
LVT Tile Format
- Sizes: 12×12, 12×24, 18×18, 24×24 inches
- Look: Mimics natural stone, marble, travertine, slate, or concrete
- Best for: Bathrooms where you want an authentic stone or ceramic tile appearance
- Advantage: Square tiles allow for pattern layouts like offset, herringbone, or basketweave
- Consideration: More joints per square foot than planks, meaning more potential water entry points
LVP Plank Format
- Sizes: 6×36, 7×48, 9×60 inches (typical)
- Look: Mimics hardwood — oak, walnut, hickory, reclaimed wood
- Best for: Bathrooms where you want a warm, wood-look aesthetic
- Advantage: Fewer joints per square foot and longer seams that are less prone to water penetration
- Consideration: A wood look in a bathroom is a style choice — some find it less natural than stone
For most bathrooms, the tile format creates the most convincing appearance because real bathrooms traditionally feature stone or ceramic tile. However, the wood-plank look has gained significant popularity, especially in farmhouse, coastal, and transitional design styles.
Design Ideas for Bathroom LVT
Marble Look
White or grey Carrara marble-look LVT is the most popular bathroom choice. Premium brands like Karndean and Amtico offer LVT with realistic veining that is nearly indistinguishable from real marble at floor level. Large-format 12×24 or 24×24 tiles with minimal grout lines create a sleek, spa-like look.
Slate and Stone Look
Dark slate or natural stone LVT adds drama to bathrooms and hides dirt well. Multi-tonal stone patterns with varied coloring between tiles create an organic, natural appearance. This look works especially well in master bathrooms and powder rooms.
Concrete Look
Polished concrete-look LVT suits modern and industrial bathroom designs. Large-format tiles in grey tones with subtle surface variation create a clean, contemporary aesthetic without the cold, hard reality of actual concrete flooring.
Encaustic and Patterned Tile Look
Patterned LVT that mimics encaustic cement tiles brings bold design to bathroom floors. Geometric patterns, Moroccan motifs, and Art Deco designs add personality to powder rooms and guest bathrooms without the cost and maintenance of real encaustic tile.
Wood Look
Light oak, weathered grey, and whitewashed wood-look planks suit coastal and Scandinavian bathroom styles. The warm tones balance the hard surfaces of bathroom fixtures and create an inviting atmosphere. For broader wood-look options, explore our vinyl flooring guide.
Installation Methods for Bathroom LVT
The installation method you choose significantly impacts how waterproof your bathroom floor will be.
Click-Lock (Floating Installation)
Click-lock LVT is the most popular DIY method. Tiles or planks snap together and float over the subfloor without adhesive.
Pros:
- Fastest installation — a standard bathroom takes 2-4 hours
- No adhesive required
- Individual tiles can be replaced if damaged
- Works over most existing hard flooring
Cons:
- Joints are not waterproof — water can seep between tiles
- Requires an expansion gap around the perimeter that must be sealed with silicone
- Not the best choice for bathrooms with frequent water on the floor (kids’ bathrooms, shower-heavy bathrooms)
Waterproofing tip: Apply a bead of 100% silicone sealant along the expansion gap before installing baseboards or trim. This prevents water from running under the floor’s edges.
Glue-Down Installation
Glue-down LVT is adhered directly to the subfloor with pressure-sensitive or full-spread adhesive.
Pros:
- More waterproof than click-lock because the adhesive seals the back of each tile
- Thinner profile (2-3mm vs 5-8mm for rigid core)
- Does not shift or move under heavy use
- Can be grouted for a fully waterproof, authentic tile look
Cons:
- Requires a perfectly smooth, clean subfloor
- Harder to replace individual tiles
- Professional installation recommended
- Longer installation time due to adhesive curing
For bathrooms that see heavy water exposure, glue-down installation with grout is the gold standard for LVT.
Loose Lay Installation
Loose-lay LVT relies on friction grip and the tile’s weight to stay in place. It is the easiest to install and remove but offers the least water protection in bathrooms. Loose lay is best suited for half bathrooms and powder rooms with minimal water exposure.
The Grout Question
One of the biggest decisions for bathroom LVT is whether to install with grout. Grouting LVT fills the joints between tiles, creating a fully sealed surface that prevents water penetration.
Grouted LVT
- Appearance: Virtually indistinguishable from real ceramic or stone tile
- Water protection: Sealed joints prevent water from reaching the subfloor
- Grout type: Use flexible acrylic or urethane grout designed for LVT — never use cement-based grout, which is too rigid and will crack as the vinyl expands and contracts
- Maintenance: Grout lines require periodic cleaning, similar to traditional tile
- Best brands for grouted LVT: Karndean, Amtico, Mannington Adura with GripStrip
Groutless LVT
- Appearance: Tight seams visible on close inspection but minimal from standing height
- Water protection: Joints are the weak point; suitable for half baths and low-splash bathrooms
- Maintenance: Easier to clean with no grout lines to scrub
- Best for: Quick installations and bathrooms with minimal direct water contact
For full bathrooms with showers or tubs, grouted glue-down LVT provides the most reliable waterproof performance. For half bathrooms and powder rooms, groutless click-lock is perfectly adequate.
Subfloor Preparation for Bathroom LVT
Proper subfloor prep is non-negotiable in bathrooms. Moisture and levelness issues that might be tolerable in a bedroom will cause problems in a wet bathroom environment.
Concrete Subfloors
- Test moisture levels with a calcium chloride test; most LVT requires less than 5 lbs per 1,000 sq ft per 24 hours
- Fill cracks and low spots with a cementitious patching compound
- Level any high spots greater than 3/16 inch over 10 feet using a floor grinder or self-leveling compound
- Clean thoroughly to remove dust, adhesive residue, and contaminants
Plywood Subfloors
- Ensure plywood is at least 3/4 inch thick and firmly secured to joists
- Fill seams and screw holes with patching compound
- Sand any high spots and vacuum thoroughly
- Check for subfloor deflection — bouncy subfloors can cause LVT joints to separate over time
Over Existing Tile
LVT can be installed over existing ceramic tile if the tile is firmly bonded and level. Fill grout lines with a floor patching compound to prevent the old grout lines from telegraphing through the new LVT. This is a common bathroom renovation shortcut that avoids the messy process of ripping out old tile.
LVT Around Toilets, Vanities, and Tubs
Around Toilets
Remove the toilet before installing LVT. Install the flooring under where the toilet sits, then reinstall the toilet on top with a new wax ring. This provides complete waterproof coverage in the most leak-prone area of the bathroom. If you install around the toilet instead, the gap between the flooring and the toilet base becomes a water trap.
Around Vanities
If possible, remove the vanity and install LVT underneath it. If the vanity is too heavy or permanent, install up to the vanity base and seal the joint with silicone caulk that matches the LVT color.
Around Tubs and Showers
Leave a 1/4-inch expansion gap between LVT and the tub or shower base. Fill this gap with 100% silicone caulk — not latex caulk, which can crack and allow water intrusion. Choose a caulk color that matches your LVT or grout for a clean finish. For tub and shower areas with heavy water exposure, see our waterproof flooring guide for additional sealing strategies.
Best LVT Brands for Bathrooms
| Brand | Best Bathroom Product | Key Feature | Price Range |
|---|---|---|---|
| Karndean | Korlok Stone | Grout-compatible, K-Core rigid technology | $4.50 – $6.50/sq ft |
| COREtec | COREtec Stone | Patented core with cork backing | $3.50 – $6.00/sq ft |
| Mannington | Adura Max Tile | HydroLoc waterproof core | $3.00 – $5.00/sq ft |
| Amtico | Spacia Stone | 36 mil wear layer, groutable | $5.00 – $8.00/sq ft |
| Shaw | Floorte Pro Tile | Budget-friendly rigid core | $2.50 – $4.50/sq ft |
Common Mistakes to Avoid
- Skipping the silicone seal at expansion gaps — this is the most common cause of water damage under bathroom LVT
- Using cement grout instead of flexible grout — cement grout cracks on vinyl floors; always use acrylic or urethane grout
- Installing around the toilet instead of under it — creates a water trap and looks unprofessional
- Choosing low-quality LVT for bathrooms — budget tiles with thin wear layers and poor joint construction fail faster in wet conditions
- Neglecting subfloor moisture testing — even in bathrooms above crawl spaces or basements, subfloor moisture can compromise the installation
- Using a steam mop — steam forces hot moisture into joints and can delaminate the wear layer
Final Verdict
LVT flooring in bathrooms is an excellent choice that delivers the look of natural stone or ceramic at a lower cost with greater comfort and easier installation. For full bathrooms, choose a rigid-core LVT from a reputable brand and install it with glue-down adhesive and flexible grout for maximum water protection. For powder rooms and half baths, click-lock installation with sealed expansion gaps provides a quick, reliable result.
Prefer to explore on your own?
See how new flooring looks in your actual room in seconds — free, no signup.
Try the free Floor Studio →