Stacked stone looks like weeks of masonry work, but most of it now goes up as pre-assembled panels. MSI stone ledger panels, sold under the Rockmount Stacked Stone name, are strips of natural stone bonded into modular 6 by 24 inch panels (1 square foot each), with a smaller 4.5 by 16 inch M-Series panel for backsplashes. Matching L-shaped corners, most commonly 6 by 12 by 6 inches, wrap outside corners so the wall reads as solid stone.
The panels have stepped ends that interlock, and no grout is required, which is why they are popular for fireplace surrounds, accent walls and outdoor kitchen islands. The catch is weight and substrate: these are real stone, up to about 1 inch thick for the full-size panels, and they need a sound, cementitious or masonry surface and the right mortar. Here is what the manufacturer’s own literature lists, plus practical install advice.
- MSI Stone Ledger Panels: Key Specs
- Colors and Stone Types
- Full-Size Panels vs M-Series: Which to Choose
- Tools and Materials
- Substrates: What MSI Ledger Panels Can Go On
- How to Install Stacked Stone Ledger Panels
- Troubleshooting
- Silica Dust and Ladder Safety
- General Cost Ranges
- When to Call a Pro
- Frequently Asked Questions
MSI Stone Ledger Panels: Key Specs
Figures come from the manufacturer’s stacked stone brochure and a representative colour spec sheet (Arctic White). Specs vary slightly by colour, so check the sheet for the exact colour you order.
| Spec | Value | What it means |
|---|---|---|
| Full-size panel | 6 x 24 in (1 sq ft) | Easy coverage math: one panel per square foot |
| M-Series mini panel | 4.5 x 16 in (1/2 sq ft) | Four rows fill a standard 18 in backsplash without cutting |
| Thickness | About 0.375 to 1 in (full size); 0.3 to 0.5 in (M-Series) | Plan trim, outlet extenders and edge returns for this depth |
| Corners | 6 x 12 x 6 in; also 6 x 6 x 6 and 4.5 x 4.5 x 4.5 in (M-Series) | Not all corners come glued; confirm per colour |
| Box (Arctic White sheet) | 6 panels per box; corners 4 per box | 6 sq ft of flat panels per box |
| Approx. weight (Arctic White sheet) | 8.5 lbs per panel (about 50 lbs per box) | Heavy: needs a strong mortar bond and solid substrate |
| Grout | None required | Panels dry-stack; joints are hidden by the stepped ends |
| Use | Interior and exterior walls | Vertical applications only, not floors |
Colors and Stone Types
The brochure lists several dozen colours across marble, quartzite, slate and travertine, in split-face, 3D honed, pencil and multi-finish styles. A selection of popular colours, with the product code from the brochure and whether a mini M-Series version exists:
| Colour | Code (6×24 panel) | Look | Mini version |
|---|---|---|---|
| Arctic White | LPNLQARCWHI624 | Bright, cool white split face | Yes |
| Alaska Gray | LPNLMALAGRY624 | Light to mid gray | Yes |
| Gray Oak | LPNLMGRYOAK624 | Mid gray, cooler tone | 3D version only |
| Silver Travertine | LPNLTSIL624 | Silvery gray travertine | Yes |
| Golden Honey | LPNLQGLDHON624 | Warm gold and tan | Yes |
| Gold Rush | LPNLSGLDRUS624 | Warm, multi-tone gold | Yes |
| Sierra Blue | LPNLQSIEBLU624 | Blues, grays and whites with rust | Yes |
| Coal Canyon | LPNLQCOACAN624 | Dark charcoal | Yes |
| Premium Black | LPNLSPREBLK624 | Deep black | Yes |
Natural stone varies from box to box, so order everything at once and blend panels from several boxes as you install. The manufacturer also notes that panels made from slate may contain iron deposits that can rust, so limit moisture exposure on those colours. If you want the look with no sealing, there is also a porcelain ledger line in the same 6 by 24 inch size.
Full-Size Panels vs M-Series: Which to Choose
The two formats suit different jobs. Full-size 6 by 24 inch MSI stone ledger panels have deeper relief and cover a wall faster, which suits fireplaces, exterior columns and large accent walls where the stone is seen from a distance. Fewer pieces also means fewer joints to line up.
The M-Series mini panel is thinner and lighter, so it is easier to hold on a wall and less likely to overwhelm a kitchen. Its 4.5 inch height means four courses fill a standard 18 inch backsplash without a cut row at the top. The thinner profile also helps around outlets, where a full-thickness panel can push the cover plate well out from the wall. Not every colour comes in the mini format, so confirm availability before you design around it.
Tools and Materials
- Wet tile saw with a diamond blade (a rail or bridge saw handles 24 inch panels well)
- Angle grinder with a diamond blade for notches, used with water or dust extraction
- Polymer-modified thin-set rated for heavy natural stone; white mortar for light colours
- Cement backer board, metal lath and scratch coat, or bare masonry as the substrate
- 4 foot level, laser level or chalk line
- Square notch trowel (1/2 inch is common for heavy stone)
- Margin trowel, mixing paddle and buckets
- Natural stone sealer (penetrating type)
- N95 or P100 respirator, safety glasses, hearing protection, gloves
Substrates: What MSI Ledger Panels Can Go On
The colour spec sheet splits approved substrates into two groups. For interior and exterior: fully cured concrete (at least 28 days), masonry brick, cement mortars and cementitious backer units. For interior only: gypsum plaster, gypsum wallboard and exterior-grade plywood, each with a maximum installation height listed on the sheet. If you plan a floor-to-ceiling wall over drywall, read that limit first; most installers simply add cement backer board.
For adhesive, the sheet calls for a thin-set mortar suitable for the stone indoors and a flexible latex-based mortar system outdoors. On exterior wood-framed walls, a proper water-resistive barrier, metal lath and scratch coat (or a rated backer) is the norm. Outdoors, stone should never sit in contact with soil or mulch.
How to Install Stacked Stone Ledger Panels
- Measure and order. Calculate flat wall area in square feet, subtract openings, and add 10 to 15 percent for cuts. Count outside corners by linear foot: each corner piece covers 6 inches of height.
- Dry-lay and blend. Open several boxes and lay panels on the floor to mix colour and texture before anything goes on the wall.
- Snap a level line. Start the first course on a level ledger board or line, not on a possibly uneven floor or hearth.
- Set corners first. Install corner pieces at outside corners, alternating the long and short legs each course so the pattern interlocks.
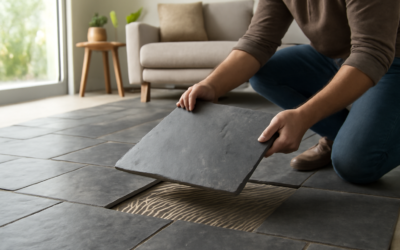
- Back-butter and comb. Spread mortar on the wall with the notch trowel and back-butter each panel so the stone gets full contact. Press and slide slightly to collapse the ridges.
- Interlock the ends. Fit stepped ends together tightly and stagger vertical joints from course to course.
- Cut to fit. Cut panels on the wet saw at the end of runs and around openings. Use cut ends where trim or a corner piece will hide them.
- Clean as you go. Wipe mortar smears off the stone face before they cure.
- Seal. Once mortar has cured, apply a penetrating natural stone sealer, especially near cooktops, grills and fireplaces.
Troubleshooting
- Panels slip down the wall. Mortar is too wet or the substrate is too smooth. Use a stiffer mix, a non-sag mortar, or a temporary ledger board and spacers.
- Visible horizontal seams. Courses drifted out of level. Check with the level every few rows.
- Repeated pattern. Panels came from one box. Blend from several boxes and rotate panels end for end.
- Rust streaks. Iron in some slate colours. Keep those panels out of constantly wet areas and seal them.
- Panels popping off outdoors. Poor coverage or the wrong substrate. Remove, clean, and reinstall on a cementitious surface with full back-buttering.
Silica Dust and Ladder Safety
Cutting natural stone releases crystalline silica. The manufacturer’s own product page advises wet cutting, no dry cutting, and a respirator when cutting, grinding or polishing. Use a wet saw for straight cuts, add water or a shroud with a HEPA dust extractor for grinder work, wear an N95 or P100 respirator, and clean up with a HEPA vacuum rather than a broom.
Tall fireplace walls and exterior facades mean ladder or scaffold work while handling heavy stone. Use a stable ladder on firm, level ground, keep three points of contact, and never overreach with a full bucket of mortar. For anything taller than a single story, rent proper scaffolding or hire a crew.
General Cost Ranges
Natural stacked stone panels generally cost more per square foot than porcelain wall tile but considerably less than full-bed natural stone veneer. Expect material in a moderate range per square foot depending on colour and finish, with corners priced per piece and adding up quickly on columns and islands. Professional installation typically adds a similar or greater amount per square foot, more for exterior work requiring lath and scratch coat.
When to Call a Pro
An interior accent wall or backsplash is a solid DIY weekend project. Bring in a mason or experienced tile installer for exterior walls on wood framing (where water management is critical), anything above one story, fireplace surrounds where clearances to the firebox matter, and walls where the substrate is questionable. Check permits and HOA rules for exterior facade changes.
Frequently Asked Questions
What size are MSI ledger panels?
The full-size panel is 6 by 24 inches, covering 1 square foot. The M-Series mini panel is 4.5 by 16 inches, covering 1/2 square foot.
How many square feet are in a box of MSI stone ledger panels?
The Arctic White spec sheet lists 6 panels per box, which is 6 square feet. Confirm the count for your colour on its spec sheet.
Can MSI stacked stone panels be used outdoors?
Yes. The line is marketed for exterior walls, barbecue surrounds and planter walls, and the M-Series is described as freeze-thaw resistant. Use a flexible latex-based mortar outdoors.
Do MSI ledger panels need grout?
No. The stepped ends interlock so the panels dry-stack without visible grout joints.
Can I install stacked stone panels on drywall?
Interior drywall is listed as a substrate only up to a limited height. For taller walls, install cement backer board first.
Prefer to explore on your own?
See how new flooring looks in your actual room in seconds — free, no signup.
Try the free Floor Studio →