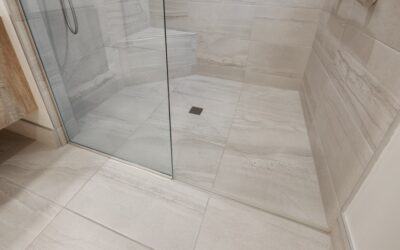
A doorless, curbless shower looks effortless in design magazines but is one of the most technically demanding wet-area builds in residential construction. An open walk in shower done well reads luxurious, ages without mildew, and adds 2 to 5 percent to home value. Done wrong, it sprays water onto bath floors, drains into adjoining rooms, and grows mold inside the wall cavity within three years. The line between success and failure comes down to slope, waterproofing, drain placement, and protective glass placement, not aesthetics.
Part of our Bathroom Remodeling & Flooring guide — explore the full guide →
This guide walks through layout rules, real costs, and the construction details that determine whether an open shower lasts decades or fails fast.
Why People Want Open Walk-In Showers
Three drivers explain the trend. The first is accessibility: curbless designs accommodate aging in place and wheelchairs without retrofits. The second is cleaning: no shower door tracks, fewer grout edges, faster wipe-downs. The third is visual: an open shower makes a 60 sq ft bathroom feel like 80 sq ft because the eye carries through to the back wall instead of stopping at a glass panel.
The trade-offs are heating (open showers feel cooler), water containment (overspray is real), and code: not every jurisdiction allows curbless construction without a separate waterproofing inspection.
Layout Sizing Rules
For an open walk-in shower to function without flooding the bathroom floor, the shower area itself needs minimum dimensions:
- Minimum footprint: 36 x 60 inches (small but workable)
- Recommended footprint: 48 x 72 inches
- Luxury footprint: 60 x 84 inches or larger
- Distance from showerhead to opening: minimum 4 feet of buffer
- Open side glass panel: minimum 24 inches recommended even on “doorless” designs
Putting a showerhead opposite an open entry without any glass screen will guarantee a wet bathroom floor. Plan a fixed 30 to 48-inch glass panel on the side facing the bathroom and place the showerhead on the opposite wall.
Drain Placement and Slope
The shower floor must slope 1/4 inch per foot to the drain. For curbless designs, the entire bathroom floor outside the shower must also slope 1/8 inch per foot away from the shower opening to catch any overspray. This dual slope is what separates curbless showers that work from those that leak into the rest of the bathroom.
Drain options:
- Center point drain: simplest, requires four-way slope; standard 2-inch drain
- Linear drain (24 to 48 inches): single-direction slope, handles more water, modern look
- Wall-side trench drain: hidden look, slope runs entire floor toward one wall
Linear drains have become the default for modern open showers because they accept large-format tile (which cannot pitch four ways) and handle higher GPM flows from rain heads and body sprays. Expect $400 to $800 for the drain itself, plus installation.
Waterproofing: The Step You Cannot Skip
An open walk in shower puts more water on more square footage than a traditional enclosed unit. Waterproofing must extend at least 12 inches beyond the shower edge on all sides, including up the walls 6 inches outside the shower area. Three accepted systems:
- Schluter Kerdi sheet membrane ($2 to $3 per sq ft): gold standard, fully bonded waterproofing
- Liquid-applied membrane (RedGard, Hydro Ban): $1 to $2 per sq ft; brush or roll-on
- Wedi or Laticrete foam board pre-waterproofed panels: $5 to $8 per sq ft
Whichever you choose, follow the manufacturer’s flood test protocol after install: plug the drain, fill the shower to 1 inch, wait 24 hours. If the water level drops, find and fix the leak before tiling. This step catches 95 percent of failures before they become $10,000 problems.
Tile Choices That Work
Large-format porcelain tile (24 x 48 or 30 x 60 inches) on walls plus 2 x 2 inch mosaic on the floor is the most-used combination. The small floor tile creates the multi-directional grout joints needed for proper slope and offers grip when wet. Wall tile should be rated for wet area use and grade 3 or higher for impact resistance.
Slip resistance for shower floors: minimum 0.42 dynamic coefficient of friction (DCOF) wet. Most porcelain mosaic and pebble tile pass this. Glazed wall tile usually does not, so do not use it on the floor.
Glass Panel Specifications
If you include a fixed glass panel, specify 3/8-inch tempered safety glass minimum, 1/2-inch for panels over 60 inches tall. Frameless panels with floor-mounted brass or stainless brackets run $1,000 to $2,500 installed. Skip framed glass; it dates the entire build.
For coastal or humid climates, opt for ClearShield or EnduroShield coatings ($150 to $300 additional). They reduce mineral deposit buildup and make squeegee cleaning effective for 5+ years.
Heating Considerations
Open showers feel measurably cooler than enclosed showers because heat dissipates into the larger bathroom volume. Counter this with:
- Electric radiant floor heat: $10 to $15 per sq ft installed, transforms a cold tile floor
- Wall-mounted infrared heater: $200 to $400, instant warmth at the press of a button
- Heated towel rail: luxury touch at $300 to $700
- Strategic showerhead placement: rain heads and body sprays maintain ambient warmth around the bather
Without one of these, expect to step out of a 105°F shower into noticeably cool air in winter.
Cost Breakdown
A 48 x 72-inch open walk in shower with mid-range materials in a typical 5 x 8-foot bathroom:
- Demolition and prep: $1,500 to $2,500
- Plumbing rough-in modifications: $1,000 to $2,500
- Waterproofing system and slope mud bed: $1,000 to $2,000
- Drain (linear): $400 to $800
- Tile materials: $1,500 to $3,500
- Tile labor: $2,000 to $4,000
- Glass panel: $1,200 to $2,500
- Fixtures (showerhead, valves, hand shower): $500 to $2,000
- Total: $9,000 to $20,000
That is roughly 50 to 100 percent more than a standard tub-to-shower conversion, but the open design is what bidders and buyers respond to in mid-to-high-end markets.
Common Mistakes to Avoid
- Too small a footprint, leading to constant water on the bathroom floor
- Skipping the buffer glass panel on the open side
- Slope below 1/4 inch per foot, causing standing water
- Skipping the 24-hour flood test before tiling
- Using polished tile on the floor; falls happen
- Forgetting niche placement for shampoo and soap until tile is in
Final Word
An open walk in shower is a permanent commitment that demands serious construction discipline. The reward is a daily experience that feels like a spa and a bathroom that visually doubles in size. Hire a tile-setter who works with Schluter or Hydro Ban regularly, demand a flood-test certificate, and never compromise on the slope numbers. The build is unforgiving of shortcuts but extremely generous to those who plan it properly.