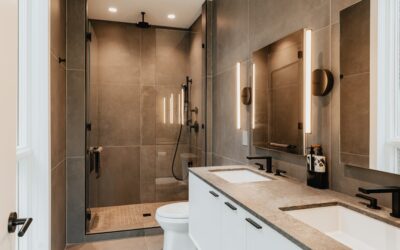
A walk-in shower with a half wall feels open like a wet room but contains splash like a traditional enclosure. Smart walk in shower ideas with half wall designs balance four variables: privacy from the rest of the bathroom, splash containment, glass area for natural light, and accessibility for aging in place or mobility limitations. The right half wall height and length depends on which of those priorities matters most for your space. Here is what actually works at common bathroom sizes.
Part of our Bathroom Remodeling & Flooring guide — explore the full guide →
Why Half Walls Are Trending
The half-wall shower replaces a full glass enclosure with a partial wall — typically 36 to 48 inches tall — that handles splash control while opening up the shower visually. The look has been popular in European bathrooms for decades and is now standard in higher-end American renovations.
Compared to a full enclosure, half walls offer several practical advantages. There is no door to clean. Cleaning the inside of the shower is easier because most of one side is open. The space feels larger and brighter, especially in smaller bathrooms. Accessibility is built in for anyone with mobility issues, since there is no threshold to step over. And construction cost can actually be lower than custom glass since you save on hinges, hardware, and large panes.
Standard Dimensions That Work
Half-wall heights cluster in three common ranges depending on the goal:
- 36 to 42 inches (low): Maximum openness, light, and accessibility. Works only when the shower has enough depth (minimum 60 inches) to prevent splash escaping over the top.
- 48 inches (standard): The sweet spot for most installations. Contains splash from most showerheads while keeping the open feel.
- 54 to 60 inches (tall): Maximum privacy and splash control. Best for showers with adjustable handheld heads aimed near the open side.
Length matters as much as height. A common configuration is a 36 to 48 inch half wall combined with a 24 to 36 inch fixed glass panel above the wall, totaling roughly 72 inches of barrier between the shower and the rest of the room. This combination delivers splash control similar to a full enclosure while preserving the open aesthetic.
Layout Options
Half wall as primary divider. The half wall runs perpendicular from one wall of the bathroom, separating the shower from the toilet or vanity. The opposite side has either no door or a single fixed glass panel. This works well in 5×8 to 6×10 bathrooms.
Half wall with glass topper. The half wall holds a fixed glass panel above it, bringing total height to ceiling level or close to it. The glass topper keeps the lower portion solid (for splash and visual privacy from the toilet area) while the upper portion stays open for light and a sense of space.
Half wall as bench. The half wall doubles as a seating bench when topped with a stone or solid surface counter. Particularly useful in master baths where one user wants seating for shaving legs or other tasks.
Half wall with niche. The half wall is thick enough (typically 6 to 8 inches) to incorporate a recessed shelf or niche on the shower side, providing soap and shampoo storage without breaking up the wet wall.
Construction Methods
Half walls in showers face the same waterproofing demands as full shower walls. The construction approach matters.
The most reliable method is a standard framed 2×4 stud wall, sheathed with cement board or foam tile backer panels, fully waterproofed with a bonded membrane system like Schluter Kerdi, then tiled to match the shower walls. Cap the top with a sloped solid surface piece — quartz, granite, or sealed natural stone — to shed water properly.
An alternative is the Schluter Kerdi-Board or Wedi structural foam panel approach. These rigid foam panels function as both the wall structure and the waterproofing in one product, eliminating the need for separate substrate and membrane. Cost is higher but installation is faster and the system is foolproof when followed correctly.
Skip pony walls built from plain drywall on the shower side. Drywall always fails in wet conditions, even with paint waterproofing. The fix is expensive and the failure mode is mold inside the wall cavity.
Top Cap and Water Shedding
The top of a shower half wall needs to slope toward the shower side at roughly 1/4 inch over the wall thickness. Water that hits the top should drain into the shower, not back toward the bathroom floor.
Material options for the top cap:
- Solid surface (Corian, Hi-Macs): Easy to slope precisely, seamless joints, $80 to $150 per linear foot installed
- Quartz countertop: Matches kitchen countertops, durable, $90 to $180 per linear foot
- Natural stone (granite, marble): Premium look, needs sealing, $100 to $250 per linear foot
- Tile with bullnose edges: Most affordable, more grout lines to maintain, $40 to $80 per linear foot
Glass Topper Specifications
When adding a glass panel above the half wall, use tempered safety glass at minimum 3/8 inch thickness for any panel taller than 18 inches. Fix the glass with U-channel along the wall cap or with point-fixing clips, depending on the design intent. U-channel installations are easier to seal and less prone to vibration; clips offer a cleaner minimalist look.
Cost for a 60 by 36 inch fixed glass topper runs $400 to $900 depending on glass treatment and hardware. Frameless installations with low-iron glass for maximum clarity sit at the upper end of that range.
Showerhead Placement Matters
With less containment than a traditional shower, showerhead placement determines whether the design works or fails. Rules to follow:
- Position the showerhead on the wall opposite or perpendicular to the open side — never aimed toward the opening
- For handheld showers, mount the cradle in a position that aims water back into the shower, not toward the open side
- Body sprays should be on the back wall only, not on any wall facing the opening
- Consider a rain head directly over the user position to keep water falling vertically rather than horizontally
Brands like Hansgrohe, Kohler, and Delta make body spray systems with thermostatic controls that allow precise targeting. Budget $800 to $2,000 for a complete fixture package in a high-end half-wall shower.
Floor and Drain Planning
Open-side showers need careful floor planning. The shower floor should slope at 1/4 inch per foot toward the drain in all directions. With a half-wall layout, that often means a linear drain along one wall rather than a center drain, since you cannot create a perfect four-way pitch in an irregular shower footprint.
Schluter Kerdi-Line, Infinity Drain, and Quick Drain make linear drains in 24 to 60 inch lengths. The drain typically runs along the back wall or along the wall closest to the open side, capturing water before it can migrate toward the bathroom floor.
The bathroom floor outside the shower should also slope very slightly (1/8 inch over 4 feet) back toward the shower entrance, so any splashed water drains back rather than pooling on the bathroom side.
Lighting for Open Showers
Open-concept showers benefit from dedicated overhead lighting positioned over the shower itself. Use wet-location rated recessed cans with a frosted lens, typically 4 to 6 inches in diameter, installed in the ceiling directly over the shower. LED options from companies like Halo or Lithonia run $60 to $150 each.
Wall sconces or vertical strip lights on the half wall create dramatic effects but require wet-rated fixtures specifically designed for shower locations. Standard bathroom sconces are not suitable.
Cost Comparison
A typical half-wall shower installation ranges:
- Standard 36-inch half wall, tile finish, no glass: $1,800 to $3,500 added to base shower cost
- 48-inch half wall with stone cap and glass topper: $3,500 to $6,500
- Half wall with built-in bench, niche, and frameless glass: $5,000 to $9,000
For full bathroom renovations including this type of shower, expect total project costs of $18,000 to $45,000 depending on bathroom size, fixture choices, and labor rates.
Common Mistakes to Avoid
- Building a half wall too low — splash escapes over the top
- Skipping the slope on the top cap — water pools and drips back into the room
- Using drywall instead of waterproof substrate on the shower side
- Aiming the showerhead toward the open side
- Forgetting to plan the linear drain location early in the build
- Installing a too-tall half wall that defeats the open look
The best walk in shower ideas with half wall designs come from planning the showerhead, drain, and wall heights together as a system. Get those three elements right and the shower performs beautifully while looking like a magazine spread.