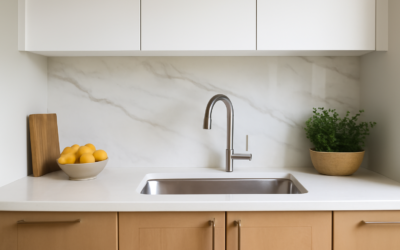
A slab backsplash looks effortless, which is exactly why small mistakes stand out. A 1/8-inch gap at the counter joint, an outlet cutout that lands a hair off, or a seam that does not line up with the countertop seam will catch the eye every time you walk into the kitchen. Good quartz backsplash installation is mostly about accurate templates and patience, not muscle. The stone itself goes up with adhesive and silicone in an afternoon.
Part of our Countertops guide — explore the full guide →
In short, here is how it works. The wall is checked for flatness, a template is made of every piece including outlet and switch locations, the slab is cut by a fabricator, and the pieces are bonded to the wall with a stone-compatible construction adhesive, then sealed at the countertop joint with color-matched silicone. You can choose a short 4-inch splash that matches the counter edge or a full-height backsplash that runs to the upper cabinets or the ceiling.
- Planning a Quartz Backsplash Installation
- Slab vs Tile: Is a Quartz Backsplash Worth It?
- Tools and Materials
- Step-by-Step Installation
- Silica Dust: Why Slab Cutting Belongs in the Shop
- Troubleshooting
- Cost Ranges
- When to Call a Licensed Professional
- Frequently Asked Questions
- Can you install a quartz backsplash yourself?
- What adhesive is used for quartz backsplash?
- Should the backsplash sit on the countertop?
- Is granite backsplash installation different from quartz?
- Do outlets need to be moved for a full-height backsplash?
- How thick is a quartz backsplash?
- Can you install a quartz backsplash over existing tile?
- Is a quartz backsplash safe behind a stove?
- How long does quartz backsplash adhesive take to cure?
The same process applies to granite backsplash installation, with a few differences in weight and sealing. Below, we walk through the decisions, the steps, and the safety considerations that come with cutting engineered stone.
Planning a Quartz Backsplash Installation
Start by deciding height. A 4-inch splash is typically cut from the same slab as the counter and costs little extra, but it leaves painted wall or tile above. Full-height slab backsplash creates the seamless look many people want, especially behind a range, but it uses much more material and needs precise cutouts for outlets, switches, window returns and range hoods.
Next, plan seams. Slabs come in fixed sizes, so a long wall or a full-height design may need a seam. Good fabricators align backsplash seams with countertop seams, place them in inside corners, or hide them behind the range. Veined quartz needs extra care so patterns flow across the joint.
Check the Wall
Stone is rigid. A wall that bows more than about 1/8 inch over several feet will create gaps. Hold a long straightedge against the wall in several directions and shim, skim-coat or plane high spots before templating.
Slab vs Tile: Is a Quartz Backsplash Worth It?
Before committing, weigh the slab look against tile. A slab backsplash has no grout lines to scrub, which is a real advantage behind a busy range where grease splatters every night. Quartz is nonporous, so tomato sauce and coffee wipe off without sealing. Full-height slab also makes the counter and wall read as one continuous surface, which suits minimalist and modern kitchens.
Tile, by comparison, is more forgiving of uneven walls, easier to cut around oddly placed outlets, and generally less expensive per square foot installed. It also offers far more color and pattern choices. Many homeowners compromise with a 4-inch quartz splash plus tile above it, or a full-height slab only behind the range as a focal point with tile or paint elsewhere.
Timing matters too. Quartz backsplash installation usually happens right after countertop installation, often by the same crew, which means the counter seams and backsplash seams can be planned together from the same slab layout. Adding a slab backsplash years later is possible, but matching the exact color and pattern of an older counter can be difficult because batches vary. If you think you might want a full-height slab, order enough material for your quartz backsplash installation at the same time as the counter.
Tools and Materials
- Fabricated quartz or granite backsplash pieces cut to template
- Stone construction adhesive compatible with quartz or natural stone
- 100 percent silicone sealant, color matched, for the counter joint and edges
- Caulk gun, putty knife, painter’s tape, denatured alcohol for cleanup per label
- Level, straightedge, tape measure, pencil
- Plastic shims and suction cups for positioning heavy pieces
- Outlet box extenders so devices sit flush with the stone face
- Safety glasses, gloves, and an N95 or P100 respirator if any cutting is done
A quality stone construction adhesive is important. Some general-purpose adhesives can stain light-colored stone or fail to bond to resin-rich engineered surfaces, so read the product label for stone compatibility.
Step-by-Step Installation
- Install and level the countertop first. The backsplash sits on top of the counter, so the counter must be secured, level and sealed before anything goes on the wall.
- Template the wall. Use thin plywood strips or cardboard to trace the exact profile of the wall and counter. Mark outlet and switch box centers, window trim, and the range hood. Measure boxes twice from both a fixed edge and the counter.
- Turn off power. Shut off breakers for every outlet and switch on the wall, remove the cover plates and loosen devices so they can be pulled forward.
- Dry fit. Set each fabricated piece in place with shims. Check that cutouts line up and that the top edge is level even if the counter is not perfectly straight.
- Mark and tape. Mark piece locations lightly on the wall. Tape the countertop along the joint to keep silicone neat.
- Apply adhesive. Spread beads or dabs of stone adhesive on the back of the piece, keeping them back from the edges so nothing squeezes out onto the face. Follow the manufacturer’s recommended pattern.
- Set the piece. Rest it on shims at the counter, leaving a small gap (often around 1/16 inch) for silicone. Press it firmly to the wall, check level and use tape to hold it while the adhesive grabs.
- Join seams. For multi-piece runs, butt pieces tightly. Fabricators often fill backsplash seams with color-matched epoxy or silicone.
- Seal the counter joint. After the adhesive sets, remove shims and run a thin bead of color-matched silicone along the counter joint and exposed edges. Tool it smooth and pull the tape while the bead is wet.
- Reinstall devices. Add box extenders so outlets and switches sit flush with the stone, then reinstall devices and cover plates before restoring power.
Silica Dust: Why Slab Cutting Belongs in the Shop
Cutting, grinding and polishing quartz and granite releases fine crystalline silica dust. Engineered stone is especially hazardous because it can contain a very high silica content, and breathing this dust is linked to serious lung disease. For that reason, professional fabrication is strongly recommended for slab cutting. Fabricators use wet saws, water-fed tools, dust extraction and respiratory protection.
If any trimming or small adjustment must happen on site, use wet cutting methods only, never dry cut, and wear at minimum an N95 respirator, preferably a P100, along with eye protection. Keep others out of the area and clean with a wet method or HEPA vacuum rather than sweeping, which lofts dust back into the air.
Troubleshooting
Gap at the Top or Wall
Uneven walls cause gaps along the top edge. Fill small gaps with color-matched silicone. Larger gaps mean the wall needed flattening before templating.
Outlet Cutout Off Target
Slightly misaligned cutouts can sometimes be hidden with oversized cover plates. A cutout off by more than that usually requires a recut piece, which is why careful templating matters.
Stain or Dark Spots
Some adhesives can bleed through lighter stone, particularly natural granite. Always use an adhesive labeled for stone and test on a scrap if possible.
Cracking Silicone at the Counter
Movement between counter and wall stresses the joint. Use 100 percent silicone rather than rigid grout at this transition, and replace it if it pulls away.
Cost Ranges
A 4-inch splash cut from leftover counter material is often the least expensive option, sometimes included with countertop fabrication. Full-height slab backsplash costs considerably more because it may require an additional slab, more cutting and polishing, and more installation labor. Each outlet or switch cutout, mitered edge or seam adds to the fabricator’s price. Granite and quartz are priced similarly depending on the color and grade you choose.
When to Call a Licensed Professional
Hire a stone fabricator to template, cut and polish slab pieces, especially for full-height designs with multiple cutouts. Heavy full-height pieces often need two or more installers. If outlets need to move, new circuits are required, or you are adding under-cabinet lighting, a licensed electrician should do that work, and permits may apply. Homeowners who are comfortable with careful measuring can handle a simple 4-inch backsplash installation with pre-cut pieces, but slab cutting should stay with professionals.
Frequently Asked Questions
Can you install a quartz backsplash yourself?
A short 4-inch backsplash with pre-fabricated pieces is a reasonable DIY project. Full-height slabs are heavy and need precise cutouts, so most homeowners leave them to a fabricator.
What adhesive is used for quartz backsplash?
Installers use a stone-compatible construction adhesive for the wall bond and 100 percent silicone for joints and edges. Check the label to avoid staining lighter stone.
Should the backsplash sit on the countertop?
Yes. The backsplash rests on the finished countertop with a small silicone-filled joint, which allows for slight movement and creates a watertight seal.
Is granite backsplash installation different from quartz?
The process is nearly identical. Granite is a natural stone that usually needs sealing and can be sensitive to some adhesives, while quartz is nonporous and needs no sealer.
Do outlets need to be moved for a full-height backsplash?
Not always, but boxes usually need extenders so devices sit flush with the stone. Relocating outlets or adding circuits should be done by a licensed electrician.
How thick is a quartz backsplash?
Quartz backsplash slabs are usually 2 cm (about 3/4 inch) or 3 cm (about 1 1/4 inch) thick. Full-height backsplashes are often cut from 2 cm material to save weight and wall depth, while a 4-inch splash is commonly cut from the same thickness as the counter. Thicker stone needs deeper outlet box extenders and may affect how window trim and side cabinets meet the wall.
Can you install a quartz backsplash over existing tile?
It is possible if the old tile is flat, firmly bonded, and clean, but removing the tile usually gives a better result. Stone over tile adds thickness, which pushes the face out past cabinet edges and window trim and needs deeper outlet extenders. Any loose or hollow tiles must come off first, since the adhesive bond is only as strong as the tile beneath it.
Is a quartz backsplash safe behind a stove?
Yes, a quartz backsplash is commonly installed behind ranges, but the resin in engineered quartz can discolor or crack under intense direct heat. Keep the clearances the range maker specifies, avoid leaving hot pans or griddles resting against the stone, and use a range with a proper back guard if the burners sit close to the wall. Granite tolerates heat better if that is a concern.
How long does quartz backsplash adhesive take to cure?
Most stone construction adhesives grab within minutes and are firm in about 24 hours, but full cure can take longer depending on the product, humidity, and bead thickness. Leave tape and shims in place until the adhesive has set, then run the silicone joint. Silicone is usually dry to the touch within an hour or so and should be kept dry for about a day.