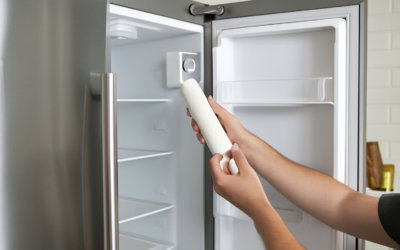
A refrigerator water filter replacement is one of the few appliance maintenance jobs that takes five minutes, needs zero tools, and genuinely protects your family’s water — yet it’s the task most people forget until the ice tastes funny. Every refrigerator with a dispenser or ice maker has a carbon filter that strips chlorine, sediment, lead, and other contaminants, and it has a hard expiration date whether you notice or not.
I get called out constantly for “dispenser problems” that turn out to be nothing more than a filter left in for two years. Here’s everything you need to know to do it yourself and never pay a tech for it.
How Often to Replace It
The universal rule is every six months. That’s the manufacturer standard, and it holds for most households on municipal water. But real life adjusts the schedule.
Replace sooner — every three to four months — if you have hard water, a large family running the dispenser constantly, or well water with heavy sediment. You can stretch to the full six months if you rarely use the dispenser. Two reliable signals it’s overdue regardless of the calendar: water flow slows to a dribble, and ice or water develops an off taste or cloudy look. A carbon filter doesn’t just stop working at six months — it becomes a breeding ground for bacteria and can actually make your water worse than no filter at all.
Find Your Filter Type and Location
Before you buy anything, identify what you have. There are four common designs, and the replacement procedure depends on which one you own:
- Push-in cylinder — hides behind a small door in the upper-right corner of the fridge interior or in the top grille. Common on GE and Whirlpool.
- Quarter-turn twist — a cartridge in the upper interior or base grille that rotates 90 degrees to release. Common on many Whirlpool, Maytag, and KitchenAid units.
- Base grille pull-out — a long cartridge behind the bottom kickplate that pulls straight out.
- Twist-in canister — Samsung’s HAF-QIN style, a cylinder in the interior that twists to lock.
The fastest way to identify yours is to find the model number on a sticker inside the fridge (usually on a side wall or the ceiling) and match it to the correct filter part number. Write that part number down — you’ll reorder it for years.
Step-by-Step Replacement
The procedure is nearly identical across designs. Here’s the general flow:
- You do not need to shut off the water. These filters have internal check valves that stop flow when removed. (If yours is an inline whole-fridge filter behind the unit, do shut the supply.)
- Remove the old filter. For push-in types, press the eject button or push in and pull out. For twist types, rotate a quarter turn counterclockwise and pull. For base-grille types, push in slightly to release, then pull straight out.
- Prep the new filter. Remove the protective caps. No need to soak it.
- Insert the new filter. Push in until it clicks, or insert and twist a quarter turn clockwise until it locks. It should seat firmly with no wobble.
- Flush the system. Run 3–4 gallons of water through the dispenser — about 3 to 5 minutes — to purge carbon fines and trapped air. The first pours will sputter and look cloudy; that’s normal air, not a defect.
Discard the first few batches of ice too, since they were made during the flush.
Resetting the Filter Indicator Light
Your fridge tracks filter age by run time, not by actually measuring water quality, so you have to reset the indicator manually after a refrigerator water filter replacement. The method varies by brand:
- Whirlpool / Maytag / KitchenAid — press and hold the “Filter” or “Filter Reset” button for 3 seconds until the light turns from red to blue or off.
- Samsung — hold “Ice Maker” or “Alarm/Hold 3 Sec for Ice Off” (varies) for 3 seconds; some models use a dedicated reset.
- LG — press and hold the “Filter” button for 3 seconds.
- GE — hold “Reset Water Filter” for 3 seconds until the light clears.
If the light won’t reset, check your owner’s manual for the exact button combo — nearly every model uses a 3-second press of something.
OEM vs. Generic Filters: The Honest Take
Genuine (OEM) filters run $35–$55. Aftermarket generics cost $15–$30 for a multi-pack. The temptation to save is real, and here’s my field-tested verdict: a good generic from a reputable maker with NSF certification is fine for taste and chlorine reduction. The problem is the flood of cheap, uncertified imports that fit the slot but barely filter anything — and some restrict flow so badly they trigger dispenser and ice-maker faults.
If you go generic, insist on NSF/ANSI 42 certification (taste and chlorine) at minimum, and NSF/ANSI 53 if you need lead and cyst reduction. Skip anything without a verifiable certification listed. For homes with lead-service-line concerns or immunocompromised family members, stick with OEM or a certified NSF 53 generic — this is not the place to gamble.
What Your Filter Actually Removes
It helps to know what you’re paying for. A standard carbon refrigerator filter certified to NSF/ANSI 42 reduces chlorine, chlorine taste and odor, and sediment — the things you notice in a glass of water. A filter also certified to NSF/ANSI 53 goes further, reducing health-related contaminants like lead, mercury, certain cysts (including cryptosporidium and giardia), and some volatile organic compounds. A smaller number carry NSF/ANSI 401 certification, which addresses “emerging contaminants” like trace pharmaceuticals.
What a fridge filter does not do is soften water, remove fluoride, or handle bacteria and viruses the way a reverse-osmosis or UV system would. It’s a point-of-use carbon filter, not a whole-house treatment system. Understanding this keeps your expectations realistic — the filter makes municipal water taste better and cuts specific contaminants, but it’s not purifying questionable well water on its own. If your source water has known heavy contamination, the fridge filter is a final polish, not the primary treatment.
Why Skipping Replacement Is a Real Risk
Letting a filter run long past six months isn’t just a taste problem. As the carbon saturates, it stops adsorbing contaminants and can begin releasing trapped particles back into your water — a phenomenon called “dumping.” Worse, the warm, wet, organic-rich carbon bed becomes an ideal home for bacteria, so an old filter can seed your water with more microbes than no filter at all.
There’s a mechanical cost too. A clogged filter restricts flow, which strains the water inlet valve and can produce weak dispenser pressure, hollow or undersized ice cubes, and premature valve failure. So a $45 filter left in for two years can lead to a $60 valve replacement on top of worse-tasting water. Staying on the six-month schedule protects both your health and the appliance.
Troubleshooting After Replacement
Two problems crop up. If flow is slow or sputtering after you flush, the filter may be seated improperly — pull it and reseat until it clicks. If the dispenser leaks, the filter’s O-rings may be dry or pinched; remove, check the seals, and reinsert. A filter that won’t lock is usually the wrong part number for your model.
One more tip: date the new filter. Write the install month on the filter body or the inside of the fridge door with a marker, so you’re never guessing how old it is — the indicator light tracks run time, but a written date is foolproof, especially if the light was never reset properly by a previous owner.
If you want to skip the fridge filter entirely, some households install a whole-house or under-sink filtration system and run an unfiltered bypass to the fridge — but that only works if the upstream system is maintained. For most people, the built-in fridge filter is the simplest, cheapest way to guarantee clean water and ice at the point of use, and staying on schedule is the whole game.
Set a phone reminder every six months, keep a spare filter on the shelf, and refrigerator water filter replacement becomes a non-event. It’s the cheapest insurance you’ll ever buy for clean water and a dispenser that keeps working — and now you never have to pay someone else to do a five-minute job.