Metal roofs shed water beautifully, but they are unforgiving about ventilation. Steel and aluminum panels cool fast at night, and when warm, moist attic air meets that cold underside, it condenses and drips onto insulation and framing. Choosing the right roof vents for metal roof systems is about more than airflow numbers: the vent has to match the panel profile, seal every rib and valley, and work with enough intake at the eaves to keep air moving.
Part of our Roofing guide — explore the full guide →
For most homes, the best setup is a continuous ridge vent built for metal (with profiled closures that match the panel ribs) paired with continuous soffit or eave intake. Plumbing and exhaust penetrations get flexible pipe boots sized to the pipe and sealed to the panel. Where a ridge vent is not practical, low-profile static vents or a gable-and-soffit layout can work if intake and exhaust are balanced.
We cover vent types, metal roof ventilation basics, condensation control, installation steps and the safety precautions that come with working on a slick, sloped metal surface.
Types of Roof Vents for Metal Roof Systems
Metal ridge vents
A ridge vent runs along the peak and lets hot, moist air escape along the full length of the roof. On metal, it sits under the ridge cap, with a vented closure strip or a rolled vent material filling the gaps between panel ribs. Profiled closures are shaped to match your specific panel so insects, wind-driven rain and snow cannot enter through the high ribs. Generic flat vent rolls leave gaps on exposed-fastener panels, so always match the closure to the profile.
Metal building ridge vents
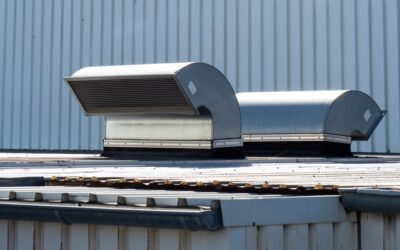
Metal building ridge vents are usually larger, continuous or sectional units made for barns, shops and pole buildings. Many use a baffled design that lets air out while blocking rain. They are common on low-slope steel buildings where there is no traditional attic and moisture from concrete slabs, equipment or livestock needs a way out.
Low-profile and static vents
Static box vents and low-profile vents are installed individually along the upper roof. On metal, they need a base flange or boot designed to sit over the panel ribs, and some use a flat, formed base for standing seam panels. They are a good option when the ridge is short, hipped or otherwise hard to vent continuously.
Pipe boots and penetration flashings
Every plumbing vent, bath fan duct and flue that passes through a metal roof needs a flexible boot, usually EPDM or silicone, with an aluminum or steel base that can be formed to the panel profile. Sized correctly and set in sealant, a boot handles thermal movement that would crack a rigid collar.
Intake vents
Soffit vents, continuous eave vents and vented drip edges bring cool outside air in low so it can sweep up under the roof deck and out the top. Without intake, even the best ridge vent does very little.
Metal Roof Ventilation Basics
Good metal roof ventilation follows the same rules as any vented attic. A common guideline is about 1 square foot of net free vent area for every 150 square feet of attic floor, or 1 per 300 when a proper vapor retarder is in place, split roughly evenly between intake and exhaust. Many roofers aim for slightly more intake than exhaust so the ridge never pulls air in the wrong direction. Check the net free area printed on each vent product and confirm local requirements with your building department.
Avoid mixing exhaust types on the same attic space. A ridge vent combined with gable vents or powered fans can short-circuit airflow, pulling air from the nearest opening instead of from the soffits, and sometimes drawing rain or snow in through the ridge.
Controlling Condensation Under Metal Panels
Condensation is the metal-specific problem. On a cold, clear night, the panel temperature can drop below the dew point of the air under it within an hour. Ventilation helps by keeping that air closer to outdoor conditions, but the underlayment matters too.
- Use a quality underlayment between the deck and panels. Synthetic or high-temperature underlayment adds a barrier against condensation reaching the sheathing.
- Consider anti-condensation backing (a felt-like fleece applied to the panel underside) for open-framed buildings with no deck.
- Seal ceiling penetrations such as light fixtures and attic hatches so warm, humid house air stays out of the attic.
- Vent bath fans and dryers outdoors, never into the attic.
Tools and Materials
- Fall protection harness, roof anchor and rope, or scaffolding as appropriate
- Soft-soled, slip-resistant roofing boots
- Ridge vent material or closures matched to your panel profile
- Pipe boots sized to each penetration
- Butyl tape and roof sealant compatible with metal
- Self-drilling fasteners with neoprene washers
- Drill driver, metal snips, marker, tape measure and chalk line
- Safety glasses and cut-resistant gloves
Installing a Ridge Vent and Pipe Boots on Metal
These steps assume a roof that is walkable and fully protected by fall arrest equipment. If you are not comfortable on a roof, stop here and hire a roofer.
- Plan the slot. Remove the existing ridge cap if present. Snap lines and cut the roof deck back 1 to 1.5 inches on each side of the peak, stopping about a foot short of the gable ends, unless your vent maker specifies otherwise.
- Install closures. Set the vented profiled closures on butyl tape along each side of the ridge so they seal against every rib and flat.
- Set the ridge cap. Place the cap over the closures and fasten through the closures into the ribs or high points with neoprene-washer screws at the spacing the panel maker recommends. Overlap cap sections and seal the laps.
- Size pipe boots. Cut the boot cone to fit snugly on the pipe (slightly smaller than the pipe diameter), then form the flexible base to the panel ribs.
- Seal and fasten the boot. Apply sealant under the base, press it down and fasten around the perimeter about every 1.5 inches. Keep the boot off seams where possible and orient it so water flows around, not into, the base.
- Check intake. Confirm soffit vents are open and not blocked by insulation. Baffles at the eaves keep insulation clear of the airflow path.
Roof Safety Comes First
Roof work is one of the leading causes of serious home improvement injuries, and metal roofs are especially slippery when wet, dewy, frosty or even dusty. A painted steel panel can feel secure in dry shoes at noon and turn into a slide at 8 a.m.
- Use a personal fall arrest system tied to a proper roof anchor, or hire a roofer who does.
- Never walk metal panels when they are wet, frosty or covered in pollen or dust.
- Walk on the flats over purlins or deck support, not on unsupported ribs, to avoid denting panels.
- Set ladders on firm, level ground, extend them 3 feet above the eave, tie them off and keep three points of contact.
- For roofs two or more stories high, or steep pitches, leave the work to a professional crew.
Troubleshooting and Costs
Drips in the attic on cold mornings. Usually condensation, not a leak. Improve intake, seal attic air leaks and check that bath fans vent outdoors.
Water at a pipe boot. The boot may be cracked, undersized or missing fasteners. Replace it rather than smearing more sealant on top.
Snow or rain at the ridge. The closures may not match the panel profile, or mixed exhaust vents are pulling weather in. Match closures and remove competing vents.
Costs vary by roof size and access. Ridge vent material and closures commonly run a few dollars to about $15 per linear foot, pipe boots roughly $15 to $60 each, and professional installation of a metal ridge vent on an existing roof often ranges from several hundred to a couple thousand dollars. Adding soffit intake to a home without it adds to the total.
When to Call a Roofer
Hire a licensed roofing contractor for steep or tall roofs, standing seam systems with concealed clips, any roof that needs deck cutting over a finished ceiling, or persistent condensation that has already damaged insulation or framing. Many jurisdictions require permits for roof modifications, and some metal panel warranties require installer-approved vents and flashings. If you want a durable, weather-tight exhaust path, ask your roofer about a metal roof ridge vent with profiled closures matched to your panels.
Frequently Asked Questions
What are the best roof vents for metal roof homes?
A continuous ridge vent with profiled closures matched to your panels, paired with soffit or eave intake, works best for most houses. Low-profile static vents are an option on hipped or short ridges.
Does a metal roof need ventilation?
Yes, for vented attics. Metal cools quickly at night, and without ventilation, warm moist air can condense on the underside of panels and drip onto insulation and framing.
Can I use a shingle ridge vent on a metal roof?
Not usually. Shingle vents do not seal against panel ribs. Use a vent system with closures designed for your metal panel profile.
How do I seal a pipe through a metal roof?
Use a flexible pipe boot sized to the pipe, form the base to the panel profile, set it in sealant and fasten it around the perimeter with neoprene-washer screws.
Is it safe to walk on a metal roof?
Only with proper fall protection, soft-soled boots and dry conditions. Metal panels are very slippery when wet or frosty, so hire a roofer for steep or tall roofs.