Well-chosen single pendant lights for kitchen island installations do double duty—they deliver focused task lighting over your prep space and act as jewelry that defines the whole room’s style. Whether you’re hanging one large statement fixture or lining up several matching pendants, getting the size, height, and spacing right is what separates a professional look from an awkward one. This guide covers how to choose, size, hang, and wire single pendants over your island for beautiful, functional results.
Part of our Kitchen Remodeling guide — explore the full guide →
- Why Pendant Lights Work Over Islands
- Single Pendant vs Multiple Pendants
- How to Size Your Pendants
- Correct Hanging Height
- Spacing Multiple Pendants
- Choosing a Style That Fits
- Bulbs and Light Output
- Wiring and Installation
- Cost Expectations
- Common Mistakes to Avoid
- Coordinating Pendants With Other Kitchen Lighting
- Matching Cord, Chain, and Canopy Details
- Pendants for Islands With Seating
- Final Thoughts
Why Pendant Lights Work Over Islands
A kitchen island is usually the busiest surface in the home—used for chopping, homework, mail sorting, and casual meals. Recessed ceiling cans alone often leave the island under-lit and cast shadows when you lean over the counter. Pendant lights hang down closer to the work surface, delivering bright, direct task light exactly where you need it. Because they sit at eye level, they also become a design focal point, giving you a chance to inject color, texture, and personality into the kitchen.
Single Pendant vs Multiple Pendants
The first decision is how many fixtures to hang:
- One large single pendant: Best over small islands (under 4 feet) or when you want one bold statement fixture like an oversized dome or linear light.
- Two pendants: The most common choice for standard 4- to 6-foot islands, providing balanced light and symmetry.
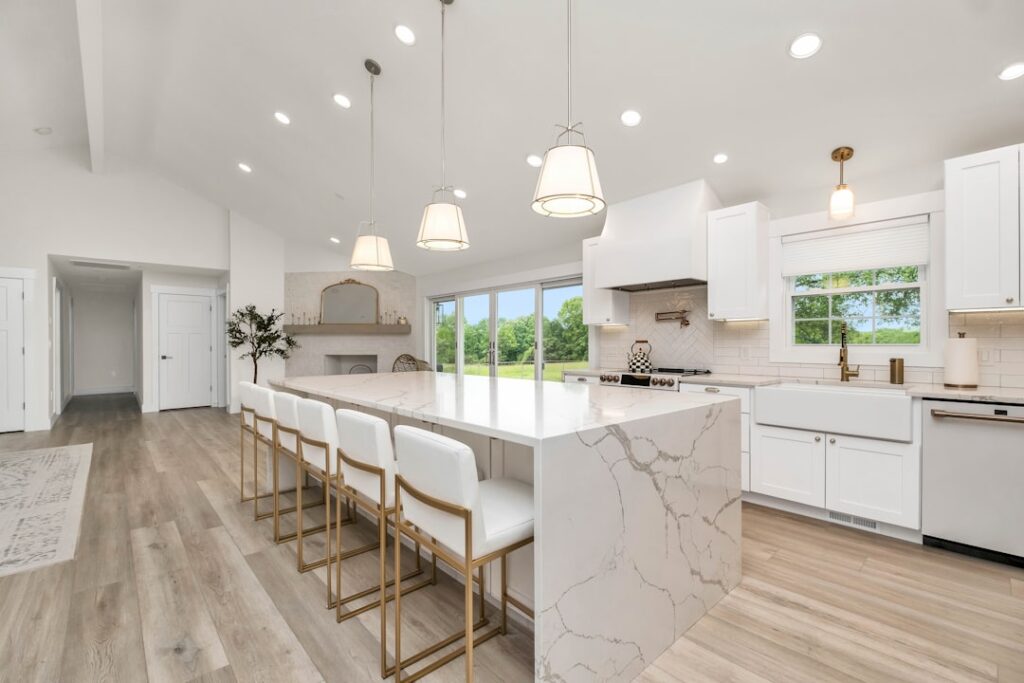
- Three pendants: Ideal for long islands 7 feet and up, spreading even light across the full length.
- Linear suspension: A single elongated fixture that spans the island for a clean, modern look with one electrical box.
The word “single” here often refers to individual single-bulb pendants hung in a row, as opposed to multi-light chandeliers—each fixture is its own clean, simple form.
How to Size Your Pendants
Proper sizing keeps the fixtures in proportion to the island and room:
- For a single statement pendant, its diameter should be roughly one-third to one-half the width of the island.
- For multiple pendants, choose fixtures 10 to 14 inches in diameter for a balanced look on a standard island.
- Scale up in kitchens with high or vaulted ceilings—small pendants get lost in tall rooms.
- Consider the visual weight: a clear glass globe reads lighter than a solid metal drum of the same size.
Correct Hanging Height
Hanging height dramatically affects both function and appearance. The standard rule is to hang the bottom of each pendant 30 to 36 inches above the countertop surface. This keeps the light close enough for good task illumination while staying above sightlines so people across the island can see one another. In a kitchen with 8-foot ceilings, that usually means the bottom of the pendant lands about 66 to 72 inches off the floor. Raise the fixtures slightly in rooms with taller ceilings, but never so high that the glare of the bulb becomes visible from a seated position.
Spacing Multiple Pendants
When hanging more than one pendant, even spacing is critical:
- Center the group of pendants along the length of the island, not the whole ceiling.
- Space pendants 24 to 30 inches apart center to center for standard fixtures.
- Keep the outermost pendants at least 6 to 12 inches in from the ends of the island so they don’t crowd the edges.
- Measure and mark before drilling—dividing the island into equal segments ensures visual balance.
Choosing a Style That Fits
Pendants come in styles for every kitchen:
- Industrial: Metal shades, exposed bulbs, and matte black or aged brass finishes.
- Modern and minimalist: Clean globes, linear bars, and simple geometric forms.
- Farmhouse: Enamel shades, seeded glass, and warm wood or bronze accents.
- Coastal and transitional: Woven rattan, clear glass, and soft finishes.
Coordinate the pendant finish with your cabinet hardware and faucet for a pulled-together look, and consider whether the shade is opaque (directs light down for task work) or clear (spreads ambient glow).
Bulbs and Light Output
Light quality matters as much as the fixture:
- Aim for a combined output of roughly 300 to 400 lumens per pendant over a work surface.
- Choose LED bulbs in the 2700K to 3000K warm-white range for an inviting kitchen glow, or 3500K for a crisper task light.
- Look for a color rendering index (CRI) of 90 or higher so food colors look accurate.
- Put the pendants on a dimmer so you can shift from bright prep light to soft ambiance for dining.
Wiring and Installation
Installing pendants involves basic electrical work:
- Turn off the breaker feeding the circuit and confirm it’s dead with a voltage tester.
- For a single pendant, install it on the existing ceiling junction box centered over the island.
- For multiple pendants, you’ll either need separate junction boxes at each location or a canopy that feeds several pendants from one box—verify local code allows your approach.
- Connect black to black, white to white, and ground to ground, then secure the canopy and adjust the cord or rod length.
- Set the height, level the fixtures, and install bulbs before restoring power.
If your island has no existing wiring, running new circuits into an island typically requires a licensed electrician and can cost $200 to $600 depending on access.
Cost Expectations
Pendant lighting spans a wide range:
- Budget pendants: $30 to $80 each.
- Mid-range designer pendants: $100 to $250 each.
- High-end statement fixtures: $300 to $800 or more.
- Professional installation: $100 to $200 per fixture if wiring already exists.
Common Mistakes to Avoid
Steer clear of these frequent errors: hanging pendants too high so they lose their task-lighting benefit, choosing fixtures too small for a large island, spacing pendants unevenly, and forgetting a dimmer. Also avoid clashing finishes—your pendants should relate to the rest of the kitchen’s metals rather than fighting them.
Coordinating Pendants With Other Kitchen Lighting
Pendants shouldn’t be the only light source over your island. A well-lit kitchen uses layers:
- Ambient lighting: Recessed cans or a flush ceiling fixture provide overall room illumination.
- Task lighting: The pendants themselves, plus under-cabinet lights over the perimeter counters.
- Accent lighting: Toe-kick or in-cabinet lighting for atmosphere.
Put each layer on its own switch and dimmer so you can dial in bright, functional light for cooking and soft, warm light for dining and entertaining. The pendants are the star, but they work best as part of a coordinated plan rather than the sole source.
Matching Cord, Chain, and Canopy Details
Small hardware choices affect the finished look more than most people expect. Cloth-wrapped or braided cords read vintage and industrial, while thin metal rods or clear cords feel modern and minimal. The canopy—the ceiling plate—should match the fixture finish and sit flush. If your ceiling is uneven or you want a specific look, adjustable cords and swag hooks let you fine-tune the drop and even shift a pendant sideways to center it perfectly over the island when the junction box isn’t in the ideal spot.
Pendants for Islands With Seating
If your island doubles as a breakfast bar with stools, factor the seating into your lighting plan. Center the pendants over the working portion of the island rather than directly over diners’ heads to avoid glare in their eyes, and keep the bottoms high enough that seated guests can see across the counter. For a long island with both a prep zone and a seating zone, you might place two pendants over the work area and let the seating end be lit by ambient ceiling light. Thinking through how the island is actually used prevents lighting that looks good empty but functions poorly when people gather.
Final Thoughts
Single pendant lights for a kitchen island bring together beauty and function, spotlighting your busiest surface while giving the room a signature look. Nail the fundamentals—size the fixtures to the island, hang them 30 to 36 inches above the counter, space them evenly, and add a dimmer with warm high-CRI LEDs—and you’ll have lighting that works as hard as it looks good. Whether you choose one dramatic pendant or a trio of matching lights, the payoff is a kitchen that feels finished, inviting, and perfectly lit.