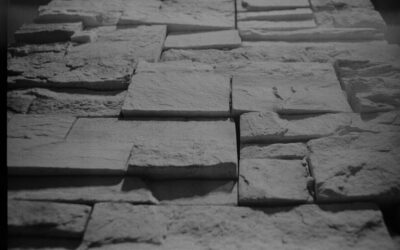
Most failed stone facades are not failures of the stone. They fail because water got behind the wall and had nowhere to go. Stacked stone veneer is a thin layer of real or manufactured stone, typically 1 to 2 inches thick, set in long horizontal strips that mimic a dry-laid ledge wall. On an exterior wall or foundation skirt it looks heavy and permanent, yet it weighs a fraction of full masonry and needs no brick ledge or footing.
The short answer for most homeowners: choose a ledgestone profile with tight-fitting pieces, plan corner units before you buy flats, and treat the drainage layer (weather barrier, lath and weep screed) as the real project. Get those right and the stone itself goes up quickly, with no grout joints to tool.
- What Stacked Stone Veneer Is and How Ledgestone Profiles Differ
- Exterior Applications: Walls, Foundation Skirts and Columns
- Planning Materials: Flats, Corners and Quantities
- Step-by-Step: Installing Stacked Stone Veneer on an Exterior Wall
- Weep Screed, Drainage and Grout-Free Joints
- Troubleshooting Common Problems
- Cost Ranges for Exterior Stone Veneer
- Safety: Silica Dust and Ladder Work
- When to Hire a Mason
- Frequently Asked Questions
Underground walls follow different rules, and on tall walls the ladder work changes the risk. Both are covered in the sections on safety and hiring.
What Stacked Stone Veneer Is and How Ledgestone Profiles Differ
Stacked stone veneer is a category of adhered veneer cut or cast into thin, elongated pieces, usually 2 to 4 inches tall and 6 to 24 inches long. Installed tight, the joints nearly disappear, which is why installers call it a dry-stack or grout-free look. Ledge stone veneer is the most common profile name, and you will also see it labeled stone veneer ledgestone, stackable stone veneer or stacked stone siding depending on the supplier.
Within that family, profiles vary more than people expect:
- Ledgestone (split face): rough, irregular faces with shadow lines between courses. The classic mountain look.
- Tight-cut or linear stacked: smoother faces and crisp edges for modern exteriors. Joints read almost as hairlines.
- Panelized stacked stone: pieces pre-bonded into interlocking panels, often 6 by 24 inches, with staggered ends that hide seams.
- Country ledge or rustic ledge: thicker, chunkier pieces with more depth variation and deeper shadows.
Material matters too. Natural thin-cut stone is sawn from quarry blocks and typically weighs 10 to 15 pounds per square foot. Cultured stone veneer (manufactured from lightweight concrete with pigment) usually lands between 8 and 12 pounds per square foot. Lightweight stone veneer and light stone veneer products made from polyurethane or foam are a third option, often marketed as faux stacked stone exterior panels; they screw on and are not true masonry, so they suit sheds, skirting and accent walls more than a primary facade.
Exterior Applications: Walls, Foundation Skirts and Columns
Stacked stone exterior work shows up in three places most often. Foundation skirts (the band from grade up to 24 or 36 inches) hide exposed concrete and anchor the house visually. Full-height accent walls frame an entry or a gable. Porch columns and pillars get wrapped to look like solid stone piers.
Each location has its own detail. A skirt needs a clean termination at the top, usually a sill or cap piece, so water sheds off rather than into the top edge. Columns need corner units on every vertical edge, which pushes the corner count way up. Full walls need flashing at windows, doors and the roofline tie-in, plus a plan for where the stone meets siding.
Keep the bottom edge off the ground. Most manufacturers call for at least 4 inches of clearance above soil and 2 inches above paved surfaces like patios or driveways. Stone buried in mulch wicks moisture and stains, and it hides the weep screed that lets the wall drain.
Planning Materials: Flats, Corners and Quantities
Veneer is sold in two forms. Flats cover the face of the wall and are sold by the square foot. Corners are L-shaped pieces with one long and one short return, sold by the linear foot. Measure each wall’s area, subtract windows and doors, then measure every outside corner from bottom to top.
Here is the step most first-timers miss: each linear foot of corners covers roughly three-quarters of a square foot of wall face. Subtract that area from your flat total so you do not overbuy. Then add 5 to 10 percent waste for flats (more for complex walls with many openings).
Tools and materials
- Water-resistive barrier (two layers of grade D paper or an approved housewrap, per the manufacturer)
- Galvanized expanded metal lath, 2.5 lb or 3.4 lb, and corrosion-resistant fasteners
- Weep screed (or casing bead) at the base of the wall
- Type S mortar or a polymer-modified veneer mortar for scratch coat and setting
- Square-notch trowel, margin trowel, hawk and a stiff scratch rake
- Wet tile saw with a diamond blade for clean, low-dust cuts
- Angle grinder with a diamond wheel for trimming in place
- 4-foot level, chalk line, mixing paddle and drill
- N95 or P100 respirator, safety glasses and gloves
A wet tile saw is worth renting even on a modest skirt. It cuts thin stone straight, keeps dust down, and leaves cleaner ends at window returns where every cut shows.
Step-by-Step: Installing Stacked Stone Veneer on an Exterior Wall
This sequence applies to framed walls with sheathing. Over clean, unsealed concrete or block you can often skip the barrier and lath and apply a scratch coat directly, though many pros still use lath on painted or sealed surfaces.
- Prepare the wall. Remove siding down to sheathing, repair soft spots and confirm the sheathing is solid. Flash windows and doors before any barrier goes up.
- Install the weep screed. Fasten it level along the base, at least 4 inches above grade. It gives trapped water an exit and creates a clean bottom line.
- Hang the water-resistive barrier. Lap it shingle-style, upper courses over lower, and lap it over the weep screed flange so water runs outward.
- Fasten the lath. Cupped side out, overlapping seams by at least 2 inches, fastened into studs at the spacing the manufacturer specifies (often every 6 inches vertically).
- Apply the scratch coat. Trowel about 1/2 inch of mortar, fully embedding the lath. Rake horizontal grooves once it firms up, then let it cure until thumbprint hard or overnight.
- Set corners first. Start at the bottom corner, alternating long and short returns on each course so the pattern reads like interlocked stone.
- Back-butter and press flats. Dampen the scratch coat if it has dried. Back-butter each piece with a full coat of mortar, press it on with a slight wiggle until mortar squeezes out, and work from the corners inward.
- Keep courses tight and staggered. Butt pieces snugly. Offset vertical joints at least 3 inches between courses so you never stack seams.
- Cut ends and fill gaps. Trim to length on the wet saw. Fill any small voids with matching chips rather than mortar, which ruins the dry-stack look.
- Clean as you go. Remove mortar smears with a dry brush once they stiffen. Wet mortar smeared across the face stains porous stone.
Expect a two-person crew to set roughly 50 to 100 square feet per day on a straightforward wall once the scratch coat is cured.
Weep Screed, Drainage and Grout-Free Joints
Because ledgestone has no grout joints, more of the wall surface is open to driving rain. Water will get behind it. That is expected, and the system is designed to manage it: the barrier stops water at the sheathing, the lath and mortar hold the stone, and the weep screed lets moisture drain out the bottom.
In wet climates and on tall walls, many builders add a drainage mat or a rainscreen gap between barrier and lath. It costs a little more and takes a day, but it dramatically reduces the efflorescence, staining and sheathing rot that show up years later on poorly drained walls.
Never caulk the weep screed closed, never bury it under soil, and keep sprinklers aimed away from the wall.
Troubleshooting Common Problems
- White haze (efflorescence): Salts carried out by moisture. Brush dry, then clean with a masonry cleaner made for the stone type. Persistent haze means a drainage problem.
- Loose pieces: Usually poor back-buttering or a scratch coat that dried too fast. Remove, clean both surfaces and reset with fresh mortar.
- Visible seams in panels: Mix boxes as you go and rotate pieces so repeated colors and shapes do not line up.
- Stains at the base: Splashback from soil or mulch. Regrade, add gravel and restore clearance.
- Cracks at window corners: Often missing flashing or movement in framing. Address the flashing before resetting stone.
Cost Ranges for Exterior Stone Veneer
Prices vary by region and material, but general ranges help with budgeting. Manufactured ledgestone materials often run in the mid single digits to low teens per square foot, with natural thin-cut stone higher. Corners cost more per linear foot than flats per square foot. Installed by a mason, most exterior projects fall somewhere between the low twenties and the forties per square foot, with complex walls, columns and second-story work at the high end. Faux panels made of foam or resin cost less to buy and install but do not offer the same durability or resale appeal.
DIY can cut the total roughly in half on a simple skirt, provided you rent the right tools and have help with mixing.
Safety: Silica Dust and Ladder Work
Cutting natural stone and cured mortar releases crystalline silica, a fine dust that damages lungs over time. Cut wet whenever possible, wear an N95 or P100 respirator during dry grinding, keep others away from the cut zone, and clean up with a HEPA vacuum or wet methods rather than dry sweeping.
Ladder work deserves the same respect. Set ladders on firm, level ground at a 4-to-1 angle, keep three points of contact, and never carry a bucket of mortar up a ladder by hand. For anything above the first story, use scaffolding or pump jacks, or hire a crew that has them. Stone and mortar are heavy, and a fall with a full hawk is a serious one.
When to Hire a Mason
Bring in a pro for walls over one story, for stone tied into roof flashing or chimney details, for any wall with known moisture damage, and anywhere local code requires a permit or inspection for exterior cladding. A good mason will also confirm the wall can carry the added weight and detail the transitions to siding properly.
Frequently Asked Questions
Is stacked stone veneer good for exterior walls?
Yes, when installed with a water-resistive barrier, metal lath, a scratch coat and a weep screed. Those layers manage moisture so the stone and the wall behind it last for decades.
What is the difference between ledge stone veneer and cultured stone veneer?
Ledge stone describes the profile: long, thin, stacked pieces. Cultured stone describes the material: manufactured concrete cast to look like stone. Many ledgestone products are cultured, but natural thin-cut ledgestone also exists.
Does stacked stone need grout?
Most ledgestone profiles are set tight with no grout joints. The pieces butt together and any small gaps are filled with matching chips.
Can I install stacked stone directly on concrete?
Clean, unpainted, unsealed concrete or block can often take a scratch coat directly. Painted or sealed surfaces need lath or surface prep first, so check the manufacturer’s requirements.
How long does exterior stacked stone last?
Properly drained installations commonly last as long as the house. Most failures trace back to missing flashing, buried weep screeds or soil contact rather than the stone itself.