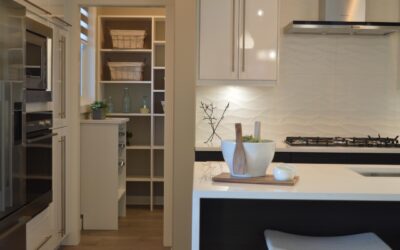
The wall behind your stove takes more abuse than any other surface in your kitchen. Grease splatters, steam, heat, and cooking residue hit it daily, making the right stove backsplash ideas essential for both protection and style. Some materials hold up there and some fail. Below are the best options for durability, looks, and your budget.
Part of our Kitchen Remodeling guide — explore the full guide →
- Why the Stove Backsplash Matters Most
- Best Heat-Resistant Backsplash Materials
- Easy-to-Clean Surface Options
- Design Ideas for Behind the Range
- Creating a Focal Point With Your Stove Backsplash
- Integrating Your Range Hood and Backsplash
- Cost Guide for Stove Backsplashes
- Installation Considerations
- Cooktop Backsplash Ideas for Induction, Gas and Island Layouts
- Frequently Asked Questions
Why the Stove Backsplash Matters Most
The area behind your stove is the hardest-working section of your kitchen walls. Gas ranges can produce temperatures exceeding 500 degrees Fahrenheit at the burner level, and radiant heat reaches the wall behind. Steam from boiling pots carries moisture directly onto the surface. And every sizzle in a hot pan launches micro-droplets of oil and sauce onto the backsplash.
This means your stove backsplash material needs to handle heat without cracking, warping, or discoloring. It needs to resist grease and moisture absorption. And it needs to clean easily — because you will be wiping it down constantly.
The good news is that the stove backsplash is also the most visible spot in most kitchens, making it the perfect place to showcase a premium material or a striking design. Think of it as functional art that protects your wall while anchoring your entire kitchen aesthetic.
Best Heat-Resistant Backsplash Materials
Not all backsplash materials can handle the heat zone behind a stove. Here are the ones that perform best under high-temperature conditions.
Porcelain tile is the top recommendation for stove backsplashes. Fired at temperatures exceeding 2,000 degrees Fahrenheit, porcelain is virtually impervious to the heat your stove produces. It does not discolor, crack, or warp from thermal cycling. Large-format porcelain slabs eliminate grout lines and simplify cleaning.
Ceramic tile handles kitchen heat well, though it is slightly more porous than porcelain. Glazed ceramic creates a non-porous surface that resists staining. It is also the most affordable tile option, starting at $2 per square foot.
Natural stone — particularly granite and slate — handles heat without issue. Marble works behind the stove but requires diligent sealing to prevent oil absorption. Avoid limestone in this location; it is too soft and porous for heavy cooking zones.
Stainless steel panels offer restaurant-grade durability. They handle any temperature, clean with a single wipe, and pair perfectly with stainless appliances. The main drawback is that they show fingerprints and water spots, so you will wipe them frequently.
Tempered glass panels can withstand kitchen heat and offer a sleek, modern look. Back-painted tempered glass creates a seamless, grout-free surface in any color you choose. They cost more than tile but the clean look and zero-maintenance grout situation make them worthwhile.
Materials to avoid behind the stove: Peel-and-stick vinyl tiles (adhesive can soften from heat), untreated wood (fire risk and grease absorption), and standard wallpaper (peels and discolors). If you love the look of wood, choose a porcelain tile that mimics wood grain instead.
Easy-to-Clean Surface Options
The reality of cooking is mess. The best stove backsplash ideas prioritize surfaces that wipe clean without scrubbing.
Glass tile and glass panels are the easiest surfaces to clean. Grease and sauce wipe off with a damp cloth and no special cleaners. The non-porous surface does not absorb stains or odors.
Polished porcelain and ceramic with glossy glazes clean nearly as easily as glass. The smooth, sealed surface prevents food particles from lodging in texture. Avoid heavily textured or rough-finish tiles behind the stove — they trap grease in every crevice.
Stainless steel cleans instantly but shows streaks. Use a microfiber cloth with stainless steel cleaner to maintain a spotless surface. Some homeowners embrace the patina; others find the maintenance annoying.
Minimize grout lines regardless of which material you choose. Grout is porous and absorbs grease, eventually discoloring behind the stove. Use large tiles, slab materials, or epoxy grout (which is non-porous and stain-resistant) to reduce this issue. If you use cement grout, seal it every six to twelve months in the stove zone.
Design Ideas for Behind the Range
The stove backsplash is prime real estate for a design feature. Here are ideas that combine beauty and function.
Decorative tile medallion. Center a pre-made or custom tile medallion above the stove. Floral, geometric, or crest designs in stone or ceramic create a focal point that draws the eye immediately. Frame it with simple field tiles for maximum impact.
Herringbone accent panel. Run herringbone-pattern tile from the countertop to the range hood, flanked by simple subway tile on either side. This highlights the stove area without tiling the entire kitchen in a complex pattern.
Pot filler niche. If you have a pot filler faucet above your stove, frame it with a recessed niche in a contrasting tile. This draws attention to the fixture and adds depth to the backsplash.
Floor-to-ceiling statement. Extend the backsplash from the countertop all the way to the ceiling behind the range, even if the rest of the kitchen has a standard-height backsplash. This vertical emphasis makes the stove area feel grand and intentional.
Metal accent tiles. Incorporate a row of bronze, copper, or brushed nickel accent tiles within a stone or ceramic field. Metal tiles reflect light, add texture, and complement your hardware and fixtures.
Creating a Focal Point With Your Stove Backsplash
Professional kitchen designers treat the stove wall as the kitchen’s centerpiece. Here is how to maximize its visual impact.
Use a different material or pattern behind the stove than the rest of the backsplash. If the perimeter backsplash is plain subway tile, use a decorative pattern or premium material behind the range. This creates a natural hierarchy that guides the eye.
Height matters. Extend the stove backsplash higher than the surrounding areas. If your side backsplashes stop at the bottom of the upper cabinets (18 inches), take the stove backsplash up to the ceiling or to the bottom of the range hood. The extra height creates drama.
Lighting enhances everything. Under-cabinet lights or dedicated picture lights aimed at the backsplash behind the stove make tile colors pop and highlight texture. LED strip lights hidden beneath the range hood are the most common and effective approach.
Consider a shelf or ledge integrated into the backsplash above the stove for displaying decorative items, small herbs, or cooking essentials. This adds function and creates visual depth.
Integrating Your Range Hood and Backsplash
Your range hood and stove backsplash should work together as a unified design element. Here are strategies for seamless integration.
Match the materials. A stone backsplash looks best with a custom stone or plaster-covered hood surround. Stainless steel backsplashes pair naturally with stainless hoods. Tile backsplashes work with almost any hood style.
Run tile behind the hood. If your hood is wall-mounted with visible sides, tile behind and around it for a finished look. Stopping the tile at the hood line leaves an awkward gap that collects dust and grease.
Custom hood surrounds built from the same material as the backsplash — whether stone, tile, or plaster — create a built-in look that appears intentional and high-end. This is particularly effective with mantel-style wood hoods over stone backsplashes.
Proportion matters. A massive commercial-style hood needs a substantial backsplash to anchor it visually. A small hood over a dramatic backsplash can look unbalanced. Match the visual weight of both elements for a cohesive result.
Cost Guide for Stove Backsplashes
Because the stove backsplash typically covers 10 to 20 square feet (smaller than a full kitchen backsplash), even premium materials remain accessible. Here are typical costs for materials and installation in 2026.
Ceramic tile: $100 to $400 installed. The most budget-friendly option with excellent heat resistance.
Porcelain tile: $150 to $600 installed. Better density and moisture resistance than ceramic.
Natural stone tile: $250 to $900 installed. Varies widely by stone type — slate on the low end, premium marble on the high end.
Glass tile: $200 to $700 installed. Beautiful but requires careful installation and cuts.
Stainless steel panel: $200 to $500 installed. Simple installation but limited design options.
Tempered glass panel: $300 to $800 installed. Custom sizing and back-painting increase costs.
Decorative medallion or mural: Add $100 to $500 for the centerpiece, plus standard tile costs for the surrounding area.
If you are doing a stove-area-only backsplash rather than the entire kitchen, the smaller square footage means you can afford to splurge on a premium material. The cost difference between basic ceramic and premium marble on 15 square feet might only be $300 to $500 — a worthwhile investment for the most visible spot in your kitchen.
Installation Considerations
Installing a backsplash behind the stove involves a few unique challenges that the rest of the kitchen does not present.
Gas line clearance. If you have a gas range, ensure the backsplash material does not interfere with the gas connection behind the stove. Leave access for the gas shut-off valve, either by using a removable panel or ensuring the valve remains accessible when the stove is pulled out.
Electrical outlets. Many kitchens have an outlet behind or near the stove. Code may require it to remain accessible. Plan your tile layout to accommodate outlet plates cleanly.
Heat-rated adhesive. Use a heat-resistant thinset mortar behind the stove, especially if you have a gas range. Standard thinset works for most electric ranges, but high-heat thinset provides extra insurance against thermal cycling.
Grout selection. Epoxy grout is strongly recommended behind the stove. It resists heat, grease, and staining far better than traditional cement grout. It costs more and is harder to work with, but the long-term performance justifies the investment in this high-abuse area.
Cooktop Backsplash Ideas for Induction, Gas and Island Layouts
A freestanding range and a built-in cooktop put very different demands on the wall behind them. A cooktop set into a counter may sit under a window, in an island with no wall at all, or beside a wall oven tower, and the fuel type changes how much heat reaches the surface. These cooktop backsplash ideas focus on those layouts rather than the classic range wall.
Induction Cooktops Open Up More Choices
Induction heats the pan directly, so the cooktop surface and the air around it stay much cooler than with an open flame. That means the backsplash sees grease and steam but far less radiant heat. Materials that would be risky behind a gas burner, such as sealed natural stone with softer finishes, honed surfaces or decorative glass mosaics, become more practical. Splatter is still the main issue, so a smooth, easy-to-wipe surface remains the smartest pick, and grout lines should still be minimized or filled with a stain-resistant grout.
Gas Cooktops and Clearance to Combustibles
Gas cooktops produce open flame and the most heat at the wall. The installation manual for your specific cooktop lists required clearances to combustible materials on the sides and back and above the burners, and those numbers vary by model. Follow them exactly, and check local code for any added requirements. Keep wood trim, open shelving and wall-mounted spice racks outside the stated clearance zone, and choose noncombustible materials such as porcelain, ceramic, stone or metal for the area closest to the burners. Gas connections themselves are licensed-professional work only; if you ever smell gas, leave the home and call your utility.
When the Cooktop Sits Under a Window
A cooktop below a window leaves only a short strip of wall, often just a few inches to the sill. Run the backsplash material up to the sill and wrap the sill itself in the same stone or tile so grease cannot soak into painted wood. Avoid fabric curtains or blinds near the burners, and choose a window treatment that will not blow toward the flame, or skip one entirely. Venting matters more here, since there is no wall-mounted hood; a downdraft vent or a ceiling-mounted hood sized to the cooktop helps keep grease off the glass.
Island and Peninsula Cooktops
With no wall behind the cooktop, the backsplash question becomes how to protect seating and the far side of the counter. Popular cooktop backsplash ideas for islands include:
- A low rear splash, a few inches tall, in matching stone along the back edge.
- A raised tempered glass guard that blocks splatter while keeping the sight line open.
- Extra counter depth behind the cooktop so stools sit well clear of hot pans.
Whatever you choose, keep a safe gap between the burners and any seating, and confirm the cooktop maker allows an island installation with your venting plan.
Frequently Asked Questions
What is the best material for a backsplash behind a stove?
Porcelain tile is the best all-around choice. It handles heat up to 2,000 degrees Fahrenheit, resists moisture and grease, cleans easily, and comes in virtually any style. For a completely grout-free option, tempered glass panels or stainless steel are excellent alternatives.
How high should a stove backsplash go?
At minimum, extend the backsplash from the countertop to the bottom of the range hood, typically 24 to 36 inches. For maximum visual impact, continue to the ceiling. The area behind the stove benefits from extra height because steam and grease travel upward.
Can I use peel-and-stick tile behind a stove?
It is not recommended. The adhesive on most peel-and-stick tiles softens when exposed to sustained heat, causing tiles to slide or detach. Some manufacturers claim heat resistance, but real tile or a solid panel is far more reliable behind a cooking surface.
How do I clean grease off my stove backsplash?
For tile backsplashes, spray with a degreasing kitchen cleaner, let it sit for two to three minutes, then wipe with a microfiber cloth. For stubborn buildup, make a paste of baking soda and water, apply to the grease, let it sit for ten minutes, then scrub gently with a non-abrasive sponge. Clean grout lines with a grout brush and oxygen bleach cleaner.
Should the stove backsplash match the rest of the kitchen?
It does not have to. Using a different material, pattern, or color behind the stove is a classic design strategy that creates a focal point. The key is to ensure the stove backsplash complements the rest of the kitchen through shared colors, materials, or style elements. A completely unrelated design will look disjointed.
Prefer to explore on your own?
See how new flooring looks in your actual room in seconds — free, no signup.
Try the free Floor Studio →