
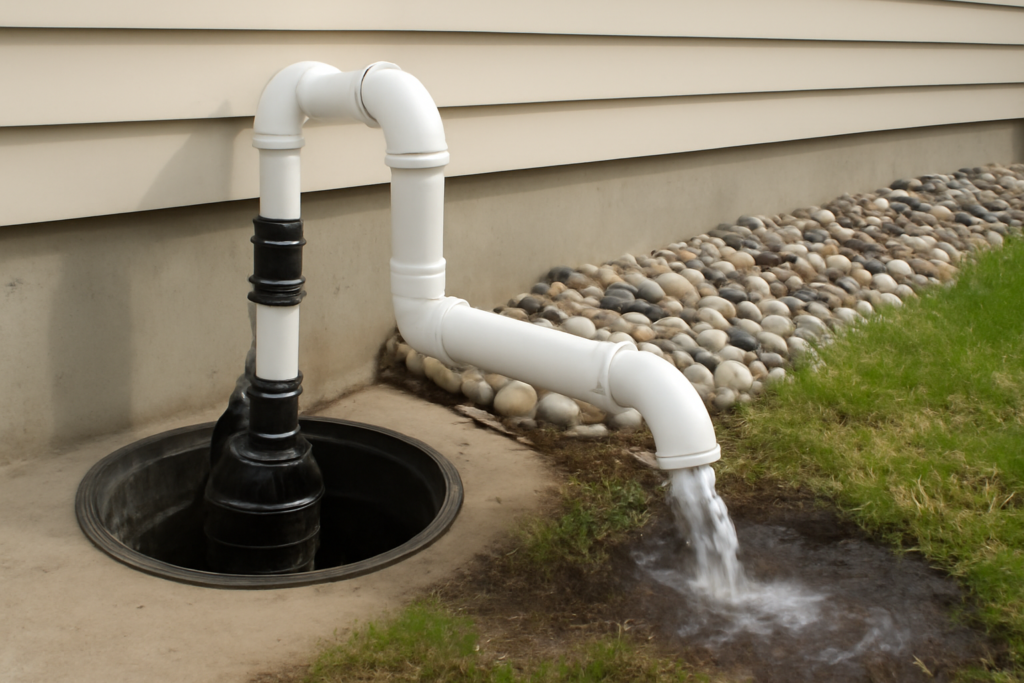
Your sump pump discharge pipe is the single most abused part of a basement waterproofing system, and it is also the part people get wrong most often. The pump can be perfect, but if the discharge dumps water two feet from the wall or freezes solid in January, you are back to a wet basement. After years of pulling flooded pumps and re-running lines, I can tell you the pipe matters as much as the pump.
This guide walks through pipe size, material, slope, freeze protection, and code so your sump pump discharge pipe moves water far from the foundation and keeps it there.
- What the Discharge Pipe Actually Does
- Pipe Size and Material
- Slope, Distance, and Where to Send the Water
- Freeze Protection — the Number-One Failure
- Step-by-Step Installation Overview
- Electrical and Code Notes
- Maintenance That Prevents Failures
- Handling the Dishwasher and Multiple Fixtures
- Testing After Installation
- Common Mistakes to Avoid
What the Discharge Pipe Actually Does
The pump lifts water out of the pit and pushes it up through a vertical riser, then out through the rim joist or wall. From there gravity takes over and the water needs to travel far enough that it does not seep right back down along the footing. The whole point is horizontal distance and a downhill grade. If water pools at the outlet, it re-enters the soil, saturates the drain tile, and the pump cycles again ten minutes later. I have seen pumps burn out in a single season because someone ran the discharge to a splash block against the wall.
Pipe Size and Material
Most residential pumps use a 1-1/2 inch discharge port; some 1/3 HP and larger units use 1-1/4 inch. Never neck the pipe down below the pump port — you will kill flow and raise back-pressure. If anything, step up. A common upgrade is running the vertical riser in 1-1/2 inch PVC, then transitioning to 2 inch or larger once the line is horizontal and outside. The bigger horizontal pipe drains faster and is far less likely to freeze because water does not sit in a thin film.
- Schedule 40 PVC: the standard. Rigid, cheap (about $4 to $8 per 10-foot stick of 1-1/2 inch), glued with primer and solvent cement.
- ABS: fine where local code allows, black, similar cost.
- Corrugated drain pipe: only for the buried outdoor run away from the house, never for the pressurized section.
Install a check valve on the vertical riser, about 12 to 18 inches above the pump. Without it, the column of water in the pipe drains back into the pit every cycle, making the pump run twice as often. A spring-loaded or swing check valve runs $10 to $25.
Slope, Distance, and Where to Send the Water
The buried horizontal run should slope away from the house at a minimum of 1/8 inch per foot — 1/4 inch per foot is better and helps prevent standing water that can freeze. Get the outlet at least 10 feet from the foundation; 15 to 20 feet is smarter on clay soil or a lot that grades back toward the house. The ground at the outlet must be lower than the pipe exit and pitched away.
Do not tie the discharge into your sanitary sewer or a floor drain — that is illegal in most jurisdictions and can overwhelm the treatment system. Send it to daylight on a downhill part of the yard, a dry well, or a storm drain where code permits. A dry well (a gravel-filled pit or perforated barrel) works well on lots with no natural slope; size it for the pump’s gallons-per-hour and the local water table.
Freeze Protection — the Number-One Failure
A frozen discharge line is the classic winter disaster. The pump kicks on, hits a plug of ice, dead-heads against it, and either trips the breaker or overheats. The water backs up into the basement while the outside is choked solid. A few defenses that actually work:
- Slope everything so no water sits in the pipe. Idle water is what freezes. Continuous downhill grade is your best friend.
- Bury the outdoor run below the frost line where you can — often 12 to 48 inches depending on your climate zone.
- Up-size the horizontal pipe to 2 inch or larger so a thin freeze does not fully block it.
- Install a freeze-relief fitting (an “IceGuard” style tee near the exit). If the buried line ices over, water simply spills out the relief slots at ground level instead of backing up inside.
- Avoid long horizontal runs of exposed pipe above grade on the north side of the house.
Heat tape is a last resort and only helps on the exposed section near the wall; it does nothing for a buried plug 15 feet out.
Step-by-Step Installation Overview
- Cut the riser to length from the pump check valve up to just below the rim joist. Dry-fit before gluing.
- Core or drill a clean exit hole through the rim joist or foundation wall, pitched slightly down toward the outside.
- Run the pipe through, seal the penetration with exterior-grade sealant or expanding foam plus caulk to keep out pests and drafts.
- Transition to the larger horizontal pipe outside; maintain your 1/8 to 1/4 inch-per-foot fall.
- Trench the buried run to your outlet point, bedding the pipe on a couple inches of gravel.
- Add the freeze-relief tee near the house and terminate at daylight, a pop-up emitter, or a dry well.
- Backfill, then test by dumping five gallons of water into the pit and watching the full path to the outlet.
A pop-up emitter at the end is a nice touch — it stays flush with the lawn, opens under pressure, and closes to keep out debris and rodents.
Electrical and Code Notes
The pump itself is electrical, and any receptacle serving a sump pump in an unfinished basement should be GFCI-protected — code requires it, and it protects you. A dedicated 15- or 20-amp circuit is ideal so the pump does not share a breaker with other loads. Nuisance GFCI trips on older pumps do happen; if yours trips, replace the pump rather than defeating the GFCI. Check your local building department before you tie into any storm system, and confirm the legal minimum discharge distance and outlet location for your area — some towns are specific.
Maintenance That Prevents Failures
- Twice a year, pour a bucket of water in the pit and confirm the pump runs and water exits the far end.
- Every fall, walk the outdoor line and clear the outlet before freezing weather.
- Check the check valve — a stuck one makes the pump short-cycle audibly.
- Keep the pit lid on to reduce debris and humidity.
- Consider a battery backup pump or a water-powered backup for storm outages, since power tends to fail exactly when it rains hardest.
Handling the Dishwasher and Multiple Fixtures
On a discharge line that has to lift high or run long, back-pressure becomes a real factor. Every vertical foot the pump lifts and every fitting the water passes through eats into flow. A 1/3 HP pump might be rated for 35 GPH at 10 feet of head but only half that at 20 feet, so a tall basement with a long horizontal run needs a stronger pump than the spec sheet’s headline number suggests. If your basement floor sits 9 or 10 feet below grade and the outlet is 20 feet out, size up to a 1/2 or 3/4 HP pump to keep real-world flow adequate. Undersizing here is why some pumps “run constantly but never keep up” during a downpour.
Minimize elbows too. Every 90-degree elbow adds resistance equivalent to several feet of straight pipe. Use two 45-degree fittings instead of a sharp 90 where you can, and keep the run as direct as the layout allows. Long-radius sweeps move water better than tight elbows and are less prone to catching debris.
Testing After Installation
Never assume a fresh install works — prove it. Fill a five-gallon bucket and pour it steadily into the pit until the float trips and the pump kicks on. Walk the entire path: confirm water shoots up the riser, the check valve holds (you should hear it seat with a soft clunk when the pump stops), no joints weep, and water exits the far outlet with force. Then watch that the outlet water actually flows away and does not pool. Run this test again every spring and fall for the life of the system. Two minutes of testing beats discovering a failure at 2 a.m. during a storm.
Common Mistakes to Avoid
The list is short and the same every time: outlet too close to the wall, no check valve, no slope, undersized or necked-down pipe, tying into the sanitary sewer, and no freeze relief. Fix those six and a decent $120 pump will keep a basement dry for a decade. Get any one of them wrong and the best pump on the shelf cannot save you. Spend your effort on the pipe, because the water only cares where it ends up — and a well-planned sump pump discharge pipe is what carries it safely away.


